Development Tips, Excel, How To, Jet Reports, Office Integration, Report

Using Jet Report NF Function

In my previous post I have explained usage of NL Function, if not seen please check this Link.

The NL function works great if you want a single field from a record, but if you want to retrieve more than one field from the same record, retyping all the filters for each field can be tedious.

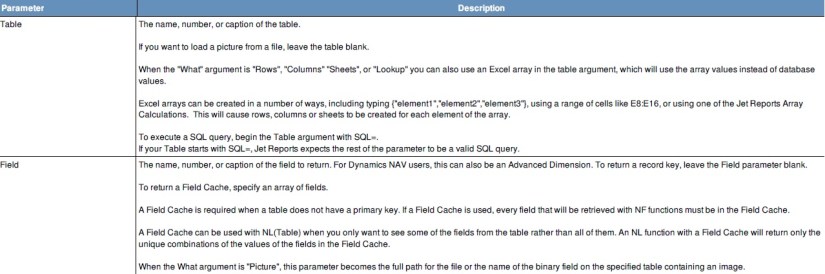
The NF function is a shortcut that will return the value of a field in a record. One or more NF functions can be used with a single NL function that has the NL field parameter left blank.
NFFunction-1
NFFunction-2
Similarly we can enter Formula in other cells:
NFFunction-3
The output of Above Report will be as below:
NFFunction-4
You need to press Report or Refresh Button on the Ribbon to view the output of the Report.

If we see in above output column D is not having any valid information for reporting point of view so we can Hide them. Also Colum Headings will add more meaning full information. Let’s do some Formatting to the Report too.

To Return to Designer mode you need to press Design button on Ribbon.
NFFunction-5
The First Row & First Column is reserved for Jet Commands, so don’t use for your data purpose.

The A1 cell is auto populated when you run the Report First time.

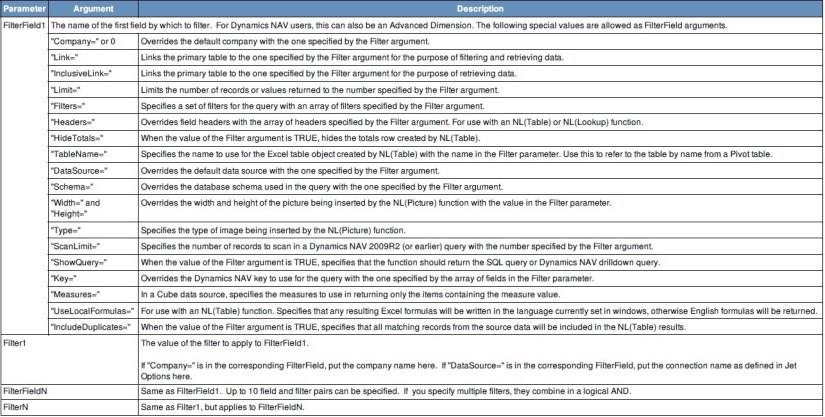
The Hide in D1 instructs Jet to Hide this column at Report run.

E3 to G3 I have added the Column Heading for my Data. You can use any Formula or Formatting Supported in Excel.

E5 to G…. is the data area which retrieves the value from database using the Jet Functions.

Let’s See the output of above Report. Press Report or Refresh Button to view the output of the Report or execute the Report.
NFFunction-6
The Report & Refresh button is having different purpose:

Report: Retrieves data from catch, help full in testing report while Designing.

Refresh: Retrieves fresh data from the database, you will get updated data if any between earlier run.

If you closely monitor the Report you will find that the First Row/Column [1] and Column D is hidden from Report output.

If there is no primary key in the table, Jet Reports will give an error message if you leave the Field parameter of the NL blank so you can try leaving the Field blank, then fill in a list of field names if necessary.

See my upcoming posts for more details of NL & NF Functions with more usage.

Development Tips, Excel, How To, Jet Reports, Office Integration, Report

Using Jet Report NL Function

 
Returns fields or record keys from a table based on filters. Duplicates report templates.
 
Note:
If the NL function is making copies of a template, it must be the only function in the cell.
The functions =-NL(“Rows”) and =NL(“Rows”)*-1 are not valid.
 
NLFunction-1
 
Example:

=NL(“Rows”,”Customer”,,”Salesperson Code”,”PS”,”Shipping Agent Code”,”DHL”)

This NL returns the record key for all the Customer with Salesperson Code = ‘PS’ and Shipping Agent Code as ‘DHL’
 
NLFunction-2

If you specify multiple filters, they combine in a logical AND.
 
NLFunction-3

NL Function Parameters & Arguments with brief Description.
 
NLFunction-4
NLFunction-5
NLFunction-6

Navision Cronus NL Function Examples:

This NL that returns the record key for all of the customers in the Customer table who are in the City of Boston with a Balance less than zero

=NL(“Rows”,”Customer”,,”Balance”,”<0″,”City”,”Boston”)

This NL returns the Customer Name from sales quote number 10000. This NL can only return one record so the “What” parameter is blank

=NL(,”Sales Header”,”Name”,”No.”,”10000″,”Document Type”,”Quote”)

This NL returns information for a company other than the default one in the Options screen

=NL(“Rows”,”Customer”,,”0″,”CRONUS USA, Inc.”)

This NL returns information for a company other than the one in the Options screen using a connection other than the default.

=NL(“Rows”,”Customer”,,”0″,”CRONUS USA, Inc.”,”DataSource=”,”2″)

This NL creates sheets called “US”,”CANADA” and “MEXICO” using an array in the table field

=NL(“Sheets”,{“US”,”CANADA”,”MEXICO”})

This NL creates lookup values for use with Report Options for each item in cells F5 through F15.

=NL(“Lookup”,F5:F15,”My Values”)


See my upcoming posts for more details and uses of this function.


Development Tips, Instalation & Configuration, Jet Reports, Office Integration, Report

Using the Jet Ribbon Jet Essentials 2015 Update 1 for Navision 2015

Jet ribbon in Excel has been modified to make it easier to use.
JetRibbon-1

Some items have been moved so as to provide better grouping of related items.  Other (less-common) items do not display by default.

Additionally, the Function Wizard (“Jfx”) has been replaced by four smaller icons…
JetRibbon-2

which allow you to easily select what type of Jet function you would like to place in your report.

You have a great deal of control over which items appear on the ribbon.  Simply go to the “Jet Ribbon” section of the Jet Essentials Application Settings..
JetRibbon-3

Place a check next to those items you do want on the ribbon and uncheck those that you do not want to see.

Checkout Upcoming posts for more information.

Development Tips, Excel, Instalation & Configuration, Jet Reports, Office Integration, Report

Uninstalling Jet Express

If you need to uninstall Jet express from a client machine-

From the Start Menu select Programs and Features find the Jet Express application, right click and select Uninstall.

If you need to uninstall the Jet components from the Microsoft Dynamics NAV 2015 Server- 

  • Open the Microsoft Dynamics NAV Development Environment and then connect to the database
  • Open the Object Designer (on the Tools menu, choose Object Designer)
  • Select all to see all business objects.
  • Select all the business objects in the 14125500-509 range, right-click and select delete.

When asked if you want to delete the selected lines click yes.

Also remove the Web Service Entry too.

Also remove the Navision Instance, if created dedicated for Jet.

Checkout Upcoming posts for more information.

Development Tips, Excel, Instalation & Configuration, Jet Reports, Office Integration, Report

Specify your Jet Interface Language

You can specify the language of your Jet Express interface.

  • Select Application Settings from the Jet Ribbon
  • Select the Language tab or General tab depending upon version you are using.
  • Pick the user interface language that you wish to use.
  • Click OK

JetExcel-9
You will need to restart Excel for the user interface language change to take effect.

Checkout Upcoming posts for more information.

Development Tips, Excel, Instalation & Configuration, Jet Reports, Office Integration, Report

Configuring a Data Source in Jet Express

Select Data Source Settings from the Jet Ribbon

Use the Data Source Version drop down button and select “Dynamics NAV 2013 and later”.

JetExcel-6

Select the Web Service Tab

  • Enter the Server, SOAP Services Port and Instance.
  • If your Web Service is configured to use SSL encryption then check the “Use SSL encryption” box.
  • Pick the Jet_Data_Source codeunit.
  • Pick your default Company.
  • Click Test Connection to ensure connectivity.
  • Click OK.

JetExcel-7
Checkout Upcoming posts for more information.

Development Tips, Excel, Instalation & Configuration, Jet Reports, Report

Enable SOAP Services and identify connection parameters

Jet express calls Web Services (SOAP) when running reports or accessing information from

Microsoft Dynamics NAV 2015. Using the Microsoft Dynamics NAV Server Administration Tool select the instance that you want to use and check the box next to Enable SOAP Services.

If Jet Express will be used outside a secure network then SSL should be enabled for the SOAP Services to help provide security and data integrity for data communications.
JetExcel-5
From the Microsoft Dynamics NAV Server Administration Tool record the

  • Credential Type
  • Server Name
  • Instance (note: for performance reasons, it is strongly recommended that a separate instance be created solely for use by Jet Express)
  • SOAP Services Port
  • Whether SSL is enabled for SOAP Services

This information is required for configuring your data source connection in Jet Express on client machines.

Note – You cannot run both Jet Express and Jet Essentials on the same computer.

Checkout Upcoming posts for more information.

Development Tips, Excel, Instalation & Configuration, Jet Reports, Office Integration, Report

Publishing the Jet Data Source Codeunit to the Web Service

Microsoft Dynamics NAV 2015 includes a “Jet Data Source” codeunit which must be published to enable Jet Essentials or Jet Express to operate. This can be published using the Microsoft Dynamics NAV Role Tailored Client (RTC).

To publish this code unit, inside the RTC go to Departments > Administration > IT Administration > General and select Web Services.

JetExcel-4
Publish the Jet Data Source code unit by selecting New from the Web services ribbon

  • Object Type: Codeunit
  • Object ID: 14125500
  • Service Name: Jet Data Source
  • And check the box to publish.
  • Click OK

Checkout Upcoming posts for more information.

Development Tips, Excel, Instalation & Configuration, Jet Reports, Office Integration, Report

Installing and Publishing the Jet Business Objects on the Microsoft Dynamics Server

To install the .fob file open the Microsoft Dynamics NAV Development Environment and then connect to the database.

  • Open the Object Designer (on the Tools menu, choose Object Designer)
  • Import the .fob file (on the File menu, choose Import)
  • Locate the import file (Jet Reports Objects.fob), and then choose Open.
  • The .fob file includes modified objects. When prompted choose Yes to import all objects.
  • Verify that no objects are to be skipped. Objects are skipped if the version of the object in the database is later than the one in the .fob file.
  • Choose the OK button to import the .fob file.

The .fob file installs a set of business objects in the range of 14125500-14125504 and Table 14125600.
JetExcel-3
Jet Express users must have Read, Insert, Modify, Delete (RIMD-) permissions to Table 4125600 “Jet Cancellation”.

Checkout upcoming posts for more information.

Development Tips, Excel, Instalation & Configuration, Jet Reports, Office Integration, Report

Installing Jet Express for Excel – Navision 2015

Jet Express is an Excel add-in which must be installed each client machine. The client machines must have Excel installed.

Download the current version of Jet Express

  • Download the version of the product that matches your version of Microsoft Office (either 32-bit or 64-bit).
  • Microsoft Office 2007 is 32-bit.
  • If you are using Microsoft Office 2010 you can determine this by selecting the File On your version of Excel.
  • Button in your Excel ribbon and then selecting either Help or Account, depending
  • If you attempt to install the wrong version you will receive an error message and the application will not install.
  • Run the .exe file.
  • If you receive a message asking “Do you want to allow the following product to make
  • Changes on this computer?” select YES.

Once Jet Report is installed, when you open your Excel you will get new Tab as Jet.
JetExcel-2

Checkout upcoming posts for more Information.