Development Tips, How To, Information, Report, Tip & Tricks

Open Report Design in Visual Studio from Custom Report Layouts

You may have noticed that when we try to edit Report Layout from Custom Report Layouts Page, it always open in Word or Report Builder no direct option to edit it in Visual Studio.

This requirement leaded to the necessity of the below customization, It can be done other ways also but the easiest way to do it one which i am going to discuss in my today’s post. Hope you will like it.

CustRepLayout-1

I have provided with the option where user can select the desired Editor either he wants to open it in Report Builder or Visual Studio.

To achieve this i have added one field in Table 9650 – Custom Report Layout with desired options as shown below.

CustRepLayout-2

And made this field available in Page Custom Report Layouts – 9650 as shown below.

CustRepLayout-3

Now in Codeunit 9652 – Edit RDLC Report Layout I have replaced the code shown in Yellow with the code shown in Red box.

CustRepLayout-4

CustRepLayout-5

Thats all, what you are waiting for go-ahead and design the reports in your way.

I will come up with more other topics in my upcomming posts, till then keep practicing and learning.


Development Tips, How To, Information, Profiles, Tip & Tricks

Setting different Column Layout for different users

On Community Forum i came across one requirement for opening Page with different column on Page for different users.

Here i have given an demo how can be done, but will require some tweaking to achieve the actual result.

I have copied the Customer List Page and removed extra fields.

Playing with columns1

I have added one Field above Repeater so that we can decide which format we want to see on screen. User can enter 1/2/or any other value.

I have created two more variables Set1 and Set2 to show/hide fields as per the value entered in SetSelect.

Assigned the Set1 & Set2 to few columns on the Page Fields to Property Visible.

Set1 to Responsibility Center, Location Code & Currency Code.

Set2 to Post Code, Country/Region Code, Phone No. & Fax No.

Added code on OnOpenPage Trigger to select Default page Format when Page is Opened. This code you will modify as per your requirement like check the User and assign the default Value.

Added Code to SetSelect-OnValidate Trigger to select the required format of Page. You need to modify the code as per your requirement.

Playing with columns2

In this demo if user enter value for SetSelect and you will get different view of same page.

Do some research and design one as per your requirement, this way we need not to create different Pages for different Users. Same Page can serve you different purpose if limited to only different views.

I will come with more information in my upcomming posts.

Till then keep browsing and learning.


Development Tips, Email, Excel, How To, Information, Office Integration, Report, Server, Tip & Tricks

Export Data as CSV and send as Attachment to Mail

One of my Follower/Reader have requested for this post.

This post will explain the the below steps:

  • Export the data of table to csv file format. (I am using XMLPort you can use Excell Buffer or any other method to create the file)
  • Attach to Mail and Send.

Step 1.

Create a XMLPort as below.

CSVAttachment-1

Set the Property of XMLPort.

CSVAttachment-2

Set the Property of Integer Data Item.

CSVAttachment-3

Set the Property of Table DataItem for which data to be exported.

CSVAttachment-4

Set the Captions of the Columns in CSV file.

CSVAttachment-5

Write the code to transfer the value of Table columns.

You may find some extra code adjust accordingly as per your requirement.

CSVAttachment-6

Define a function to Setfilter for data to export.

Adjust the code as per your requirement.

CSVAttachment-7

CSVAttachment-8

Step 2.

Here is the function to Export the data to csv File using above created XMLPort.

This function Saves the file to Shared folder, if required you can use TEMPORARYPATH to save your File.

CSVAttachment-9

Step 3.

Send the File as Attachment to the Mail.

CSVAttachment-10

You make required adjustment as per your requirement.

Make sure in case you are using Shared Folder give necessary rights on folder to Service Account and operating User Accounts.

Please respond did you found useful this information.

Their are other ways to achive the same, this was readyly available with me as i have used in one of my project so shared the same.

Stay tuned for more details in my Up comming posts.

Backup, Development Tips, How To, Information, PowerShell, Schedule, Server, SQL, Tip & Tricks

SQL Server Database Backup using PowerShell

In this post we will see how we can take backup of databases from SQL Server using PowerShell and schedule it as a daily run Plan.

Step-1 : We will create Powershell Script to take backup of Databases in SQL Server.

SCheduleJob-18

Here is the full Script for your ready refrence.

param( $serverName, $backupDirectory )

[System.Reflection.Assembly]::LoadWithPartialName(“Microsoft.SqlServer.SMO”) | Out-Null

[System.Reflection.Assembly]::LoadWithPartialName(“Microsoft.SqlServer.SmoExtended”) | Out-Null

[System.Reflection.Assembly]::LoadWithPartialName(“Microsoft.SqlServer.ConnectionInfo”) | Out-Null

[System.Reflection.Assembly]::LoadWithPartialName(“Microsoft.SqlServer.SmoEnum”) | Out-Null

$server = New-Object (“Microsoft.SqlServer.Management.Smo.Server”) $serverName

$dbs = $server.Databases

foreach ($database in $dbs | where { $_.IsSystemObject -eq $False })

{

$dbName = $database.Name

$timestamp = Get-Date -format yyyy-MM-dd-HHmmss

$targetPath = $backupDirectory + “\” + $dbName + “_” + $timestamp + “.bak”

$smoBackup = New-Object (“Microsoft.SqlServer.Management.Smo.Backup”)

$smoBackup.Action = “Database”

$smoBackup.BackupSetDescription = “Full Backup of “ + $dbName

$smoBackup.BackupSetName = $dbName + ” Backup”

$smoBackup.Database = $dbName

$smoBackup.MediaDescription = “Disk”

$smoBackup.Devices.AddDevice($targetPath, “File”)

$smoBackup.SqlBackup($server)

“backed up $dbName ($serverName) to $targetPath

}

Save this Script file as ps1 extension.

You can create the script using even notepad.


Step 2: We will Create Batch file to call PowerShell scrip and to be used in Windows scheduler.

SCheduleJob-18

Save as .BAT file. Here is the batch script for ready refrence:

powershell -ExecutionPolicy RemoteSigned

-File “C:\User Data\SQL Backup\Tools\SQLServerBackupAllDatabase.ps1”

-serverName “INDEL-AXT5283NB”

-backupDirectory “C:\User Data\SQL Backup”

>> “C:\User Data\SQL Backup\LOG\\%date%.log”

Step 3 : Create a Windows Scheduler

Open Windows Task Scheduler.

Create New Task as shown below :

SCheduleJob-18

Enter Name & Description on General Tab as shown below:

SCheduleJob-18

On Trigger Tab create New Trigger and enter details as shown below :
SCheduleJob-18

On Action Tab Create Action and enter information as shown below : Here Select the batch file created in Step 2.

SCheduleJob-18

In Settings Tab do the setting as shown Below :

SCheduleJob-18

Click on OK to Save the Task and return to Task Scheduler Window.

Here you can see the newly created Task.

SCheduleJob-18

When Task is executed you will find the backup of databases at defined path in the script.

SCheduleJob-26

You can also find Log file at the path defined in batch.

SCheduleJob-27

Thats all for this post, will come up will more information in my up comming posts.

Development Tips, Functional Tips, How To, Information, Jet Reports, Tip & Tricks

Gaining the Competitive Advantage with BI

See how a robust business intelligence solution can help you leverage technology in order to gain new visibility on your business that will enable profitable, data-driven decisions on a daily basis.

Video-1

Video-2

Development Tips, Functional Tips, How To, Information, Jet Reports, Tip & Tricks

Finding the Right Business Intelligence Solution for your Company

Get answers to the most commonly asked questions around what to look for in a business intelligence solution and provider, including implementation expectations, important features to look for (that you probably didn’t know you need), and different options for report and dashboard distribution.

Watch Video here :

Development Tips, How To, Information, PowerShell, Tip & Tricks

More about Loops in PowerShell

Do Until

The logic of this loop is to execute the Do {block} until (the condition is true).

As usual in PowerShell, pay close attention to the style of brackets, the curly brackets or parentheses guides you to write the correct code.

PS-L-1

Note: Don’t try: Until ($strQuit = “N”).  You need here to use -eq, this is PowerShell’s way of comparing two values.

Do While

The logic of ‘Do … While’ is the opposite of the Do Until. {Execute the block statement} while the (condition is true)
PS-L-1

Note: There are difference between until & while in above two examples: Until ($strQuit -eq “N”) While ($strQuit -ne “N”)


‘While’ on Its Own – No Explicit ‘Do’

This method is the more traditional way with the (condition) followed by the {Block command}.  Clearly, PowerShell’s While loop is simpler and more basic than the ‘Do … While’ construction in above two examples.

PS-L-1

Note: In this example the ‘While’ clause is at the beginning instead of the end.


‘For’ Loop

Below example is a simple method using the keyword ‘For’. As usual there is a (condition) and {Block Statement}.

The speciality of this loop is the <init> and <repeat> sections.

Here is the syntax:

For (<init>; <condition>; <repeat>) {<command_block>}

Example: Times Table for 25

PS-L-1

One side-effect of the For loop is that it always returns the <init> before it tests for the condition.

The <repeat> modifies the $i variable, which is then tested inside the <condition> of the next cycle.
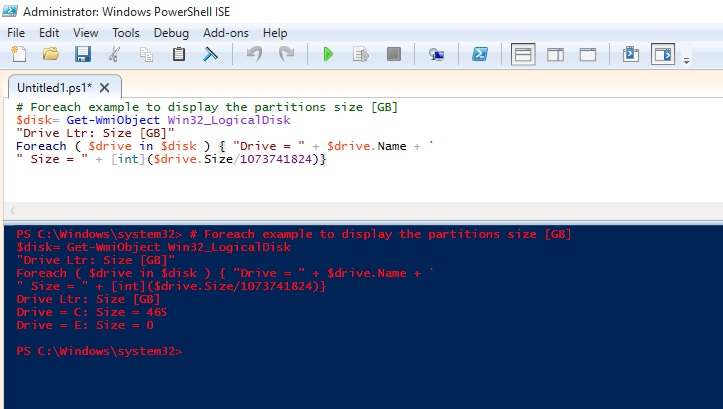
 

‘Foreach’ loop

The PowerShell ‘Foreach’ loop is more complex, and has more arguments than the ‘for’ and ‘Do While’ loops.  The key feature is that the loop interrogates an array, known as a collection.  It then applies a {Statement Block} to each iteration.  In addition to the position and the type of bracket, observe the tiny, but crucial keyword – ‘In’.


PS-L-1


PS-L-1

# PowerShell ForEach loop to display files in C:\Program files

$Path = “C:\Program Files\” “{0,10} {1,-24} {2,-2}” -f ` ” Size”, “Last Accessed”, “File Name ” Foreach ($file in Get-Childitem $Path -recurse -force) {If ($file.extension -eq “.txt”)     {     “{0,10} {1,-24} {2,-2}” -f `     $file.length, $file.LastAccessTime, $file.fullname     } }


# PowerShell ForEach-Objcet piping into block statement

Clear-Host $Path = “C:\Program Files\” Get-Childitem $Path -recurse -force | Foreach-Object {If ($_.extension -eq “.txt”) {Write-Host $_.fullname        } }


PS-L-1


PS-L-1


I will come up with more stuffs in my upcoming posts.

Till then keep practicing and stay tuned for more details.

Development Tips, How To, Information, PowerShell, Tip & Tricks

An Introduction to PowerShell – Profile

PowerShell is a great way to automate almost anything in Windows.

However, it’s not just a scripting language.

If you find yourself using it as a command line shell it may be useful to store your functions and customizations in a profile that gets loaded every time you load the Console.

The first thing we do here is check if we already have a profile. There is an automatic variable, $Profile, that stores the fully qualified location of the PowerShell profile. An easy way to check if any profile exists is to use the Test-Path cmdlet on the $Profile variable.

Test-Path $Profile

PS-18

As you can see no profile file yet created for me, so we will create one, we can easily do that with the New-Item cmdlet.

New-Item –Path $Profile –Type File –Force

Using the force parameter will cause a profile to be created even if already we have one. This means our old profile will be overwritten and new will be created.

PS-19

Profile can be edit using notepad, which can be easily started using PowerShell.

notepad $Profile

PS-20

You can put any commands, functions, alias’s and even module imports into your PowerShell profile.

I normally work on PowerShell for Navision so I would prefer loading module whenever I launch the PowerShell command, so I include my cmdlets for loading the same in my profile.

PS-21

Save the Profile and close the PowerShell. Next time I launch PowerShell this Module get loaded for me by default.

Finally, I would like to also have some customizations to the console. One is it basically determines if you have opened an elevated PowerShell console and changes the font colour, this way I will always remember that I am running with elevated privileges.

Let us Save the Profile and check the effect of this Profile.

PS-22

That’s all for today.

I will come up with more stuffs in my upcoming posts.

Till then keep practicing and stay tuned for more details.


Development Tips, How To, Information, PowerShell, Tip & Tricks

An Introduction to PowerShell – Execution Policies

PowerShell has something called Execution Policies, which stop you from just running any old script. In fact, by default, you can’t run any scripts and need to change your execution policy if you want to be allowed to run them. There are 4 notable Execution Policies:

  • Restricted: This is the default configuration in PowerShell. This setting means that no script can run, regardless of its signature. The only thing that can be run in PowerShell with this setting is an individual command.
  • AllSigned: This setting does allow scripts to run in PowerShell. The script must have an associated digital signature from a trusted publisher. There will be a prompt before you run the scripts from trusted publishers.
  • RemoteSigned: This setting allows scripts to be run, but requires that the script and configuration files that are downloaded from the Internet have an associated digital signature from a trusted publisher. Scripts run from the local computer don’t need to be signed. There are no prompts before running the script.
  • Unrestricted: This allows unsigned scripts to run, including all scripts and configuration files downloaded from the Internet. This will include files from Outlook and Messenger. The risk here is running scripts without any signature or security. It is recommenced that you never us this setting.

To see what your current Execution Policy is set to, open a PowerShell Console and type:

Get-ExecutionPolicy

PS-14

Set-ExecutionPolicy RemoteSigned

PS-15

To run this command you need to run the PowerShell with Administrative rights. Right click on icon and select Run as Administrator and try the command again.

PS-16

When i run PowerShell as Administrator, now i am able to execute the command successfully as in below screen.

PS-17

The proper term for a PowerShell command is a cmdlet, and from now on we will use this correct terminology. It just felt more appropriate to call them commands for this introduction.

I will come up with more stuffs in my upcoming posts.

Till then keep practicing and stay tuned for more details.


Development Tips, How To, Information, PowerShell, Tip & Tricks

An Introduction to PowerShell – ForEach

ForEach simply looks at a set of list and pulls out one at a time to look at them and then, perform some type of action or set of commands on it.

One different part of a ForEach loop is the keyword in that lives within that parenthetical statement. That tells PowerShell to create a single variable to hold the values that come out, one at a time, for your list.

Let’s define a variable with list of Fruits

$names = “Apple”,”Banana”,”Grape”,”Orange”,”Chiku”

When we make a list within a variable, we have created an array, which is simply a sort of matrix thing that PowerShell holds in memory that lets it store a lots of things at one time.

Let’s also initialize a count variable so we get a feel of how the loop is going.

$count = 0

Let’s use a ForEach loop to count how many names we have. Remember our keyword in we have to create a new variable that we can call FruitName. This holds each single name that comes out of that list of names we have stored in the variable $names.

ForEach ($FruitName in $names)

{

$count += 1

Write-Host “$FruitName”

}


Finally, I’ll add a simple Write-Host line after the end (after the right curly brace, that is) to display the count, so we can actually give us the count of names in the list of Fruits.

Write-Host “The total number of names is $count.”


Here is the output of above script.

PS-13

I will come up with more stuffs in my upcoming posts.

Till then keep practicing and stay tuned for more details.