Cumulative Updates, How To, Information, Instalation & Configuration, Tip & Tricks

Cumulative Update 31 for Microsoft Dynamics NAV 2013 R2 – Released in May 2016

Cumulative Update 31 includes all application and platform hotfixes and regulatory features that have been released for Microsoft Dynamics NAV 2013 R2.

The cumulative update includes hotfixes that apply to all countries and hotfixes specific to the following local versions:

  •   AU – Australia
  •   AT – Austria
  •   BE – Belgium
  •   CH – Switzerland
  •   CZ – Czech Republic
  •   DE – Germany
  •   DK – Denmark
  •   ES – Spain
  •   FI  – Finland
  •   FR – France
  •   IS – Iceland
  •   IT – Italy
  •   NA – North America
  •   NL – Netherlands
  •   NO – Norway
  •   NZ – New Zealand
  •   RU – Russia
  •   SE – Sweden
  •   UK – United Kingdom

Where to find Cumulative Update 31

You can download the cumulative update from KB 3157488 – Cumulative Update 31 for Microsoft Dynamics NAV 2013 R2 (Build 45822).

Warning

Before you install a cumulative update in a production environment, take the following precautions:

  1. Test the cumulative update in a non-production environment.
  2. Make a backup of the system or computer where the cumulative update is to be installed.

Additional Information

For more information about cumulative updates for this version, see Announcement of update rollups for Microsoft Dynamics NAV 2013 R2.

For a list of all cumulative updates for this version, see Released Cumulative Updates for Microsoft Dynamics NAV 2013 R2.

For a list of all hotfixes included in cumulative updates for this version, see the following CustomerSource and PartnerSource pages:

CustomerSource:

PartnerSource

Cumulative Updates, Information, Instalation & Configuration, Tip & Tricks

Cumulative Update 38 for Microsoft Dynamics NAV 2013 – Released in May 2016

Cumulative Update 38 includes all application and platform hotfixes and regulatory features that have been released for Microsoft Dynamics NAV 2013.KB 3157486

The cumulative update includes hotfixes that apply to all countries and hotfixes specific to the following local versions:

  • AU – Australia
  • AT – Austria
  • BE – Belgium
  • CH – Switzerland
  • DE – Germany
  • DK – Denmark
  • ES – Spain
  • FI – Finland
  • FR – France
  • IS – Iceland
  • IT – Italy
  • NA – North America
  • NL – Netherlands
  • NO – Norway
  • NZ – New Zealand
  • SE – Sweden
  • UK – United Kingdom

Where to find Cumulative Update 38

You can download the cumulative update from KB 3157486 – Cumulative Update 38 for Microsoft Dynamics NAV 2013 (Build 45787).

Warning

Before you install a cumulative update in a production environment, take the following precautions:

  1. Test the cumulative update in a non-production environment.
  2. Make a backup of the system or computer where the cumulative update is to be installed.

Additional Information

For a list of all cumulative updates for this version, see Released Cumulative Updates for Microsoft Dynamics NAV 2013.

For a list of all hotfixes included in cumulative updates for this version, see the following CustomerSource and PartnerSource pages:

CustomerSource:

PartnerSource:

Azure, Corfu Navision 2016, Development Tips, How To, Information, Instalation & Configuration, Machine, Server, Tip & Tricks, Virtual

Creating Virtual Machine on Azure

Continuing from my previous post.

In previous post we saw how to register for Free Azure Portal Account, if you missed you can find the link here.

Today we will see how to create Virtual Machine for Dynamics Navision 2016 pre Loaded.

Lets start creating one for our future posts practice.

Open the page : https://azure.microsoft.com/en-us/free/ and follow onscreen Instruction to login to your account.

Login using the account credentials you used for registering on Azure Portal.

Azure-5

Upon signing you will be landed to your dashboard on Portal.

You can see we don’t have any resource on Portal yet.

Azure-6

Lets start creating one.

Click on New from Top right corner.

Choose Virtual Machine.

Enter “Microsoft Dynamics NAV 2016” in the search box, it will list available Virtual Machine images.

Select the one available Virtual Machine for commissioning.

I have choose this because we will get preinstalled NAV 2016 which will save our time.

Azure-7

Select Deployment Model, I have choose Classic and click on Create.

Azure-8

Next we will enter  Host Name, User Name, Password, other things you adjust as per your need. Click on Create.

Note your User Name & Password you will require this to login to the Server.

Azure-9

Give some time to get created and up your Server.

In the mean time you can explore other things till your Server is up and running for you.

Once it is made available, you can start login and explore your newly created Server.

Where to find my Server?

From the Navigation Bar choose Virtual Machine (classic).

It will list you all Virtual Machines created by you.

Select your Virtual Machine in my case it is NavDemo.

You can find the Server Name and IP of your Virtual Machine.

Azure-10

I am using my IP to login to my Server.

Open your Remote Desktop Connection and enter your IP.

The User Name & Password as we created in previous step.

Azure-11

Here I am Login to my Server.

Azure-12

You can see that Dynamics NAV 2016 is already available with my Server.

Azure-13

That’s all for today, we will see more in my upcoming posts.

Till then keep exploring & Learning.


Azure, How To, Information, Instalation & Configuration, Tip & Tricks

AZURE free Subscription

Azure-0

I will be going with few posts demonstrating the Navision in Azure environment.

To start with we will be required to subscribe to Azure first.

Open page:

https://azure.microsoft.com/en-us/free/

Click on Start now.

Azure-1

Enter your Mobile No to verify you phone no.

Azure-2

Next you will be required to verify your credit card.

Once both things are verified you can start with Sign up with the Azure Subscription.

Azure-3

Before you start with managing your services on Azure here presented few FAQ.


Few FAQ on Azure Subscription.


Why is my credit card being charged $1 for signing up for the Free Trial offer?

To ensure a valid credit card, Microsoft will charge your credit card $1 when signing up for the Free Trial Offer. This is only an authorization hold, the charge will be reversed within 3-5 business days.

What happens with the services I created after the 30-day trial period ends?

Once the trial period is over, if you have not upgraded to a Pay-As-You-Go Azure subscription, we will decommission your services, and you will not be able to use them anymore.

What do I get when I sign up for a Free Trial?

You receive a $200 credit to spend on Azure services during the trial. You can use this $200 however you want to create and try out any combination of Azure resources. It enables you to explore our cloud entirely for free.

Do I pay anything during the trial?

No – the trial is absolutely free.

Do I have to pay something at the end of the trial?

No – there is absolutely no obligation to buy anything at the end of the trial.

How do I know how much of the $200 I’ve used and how much I have left?

During the trial we display your remaining trial credits at the top of the management portal. You cannot miss it.

What happens if I exceed the $200 free trial credit?

If you exceed your $200 free credit, we will suspend your free trial account. You can optionally upgrade your trial to be a Pay-As-You-Go Azure subscription at this point if you want to continue using and paying for services. If not, don’t worry – you won’t be billed anything.

Please refer to updated FAQ on site at time of using, all information is true as on date of this post, anything can change. https://azure.microsoft.com/en-us/pricing/free-trial-faq/

Azure-4

Click Start managing my subscription, you will land to your Dashboard.

Will come with next step in my upcoming post.


How To, Information, Instalation & Configuration, Maderia, Tip & Tricks

Using Payment Services – in Madeira

It’s obvious you know we can include link in PDF documents, if you don’t know no issues everything is not known to every one until he uses it or someone inform them. Today we will be learning this feature for making payments using links in your PDF invoices generated from Madeira.

If you had setup the preview this feature is already available in CRONIUS US demo company.

How do we Setup:

Login to Madeira Project using your Credentials.

Click on Search Page from right top corner.

Search for Payment Services page.

PayPalPayment-1


PayPalPayment-2

Open the Page.

Click on Setup and enter your details as shown in above screen.

Click on Maximize button and Show more to see more details.

PayPalPayment-3

Payment Service Link:

In the CRONUS US demonstration company, the payment link inserted into invoices will link to the PayPal test site.

For your actual Company, we will set so that the payment link will point to the real PayPal site, where payments can be made.

It is advisable that not to do this up for the Actual Company until Project “Madeira” is generally available for purchase. And authorized documentation on this feature is released from Madeira.

If you have setup Always Include on Document then you need not to perform any additional step, but in case you want to add the Payments Service Link to individual invoices that too can be done.

Manually Selecting Payment Services:

Open your Invoice on which you want to include this option.

PayPalPayment-4

As you can see in above Invoice no Payment Service is included.

Click on the Lookup on right side of the field.

PayPalPayment-5

Select the Payment Service from the list of available Services, and click on OK.

PayPalPayment-6

When you send the invoice to your customer the Payment Service Link will be included in the Invoice PDF.

PayPalPayment-7


PayPalPayment-8


PayPalPayment-9


PayPalPayment-10

How it will look in Invoice:

The PDF will contain the link to your selected Payment Service using which your customer can do the payment.

PayPalPayment-11

Stay tuned for more Information in upcoming posts.

Till then keep exploring and learning.


Corfu Navision 2016, Information, Instalation & Configuration

Download Microsoft Dynamics NAV 2016 – In Released

Most awaited finally released Dynamics NAV 2016 In. Find download link.

Customer / Partner login required.

https://mbs.microsoft.com/partnersource/northamerica/deployment/downloads/product-releases/msdnav2016download

Development Tips, How To, Information, Instalation & Configuration, Maderia, Office Integration, Tip & Tricks

Assisted Setup (Office Add-Ins) in Madeira

In this post we will discuss about how to setup Office Add-Ins.

Select Assisted Setup & Tasks from the ribbon of Action Tab.

SetupOfficeAddIn-1

Select Setup Office Add-Ins from the list.

SetupOfficeAddIn-2

Click on Next Button on Welcome Screen.

SetupOfficeAddIn-3

Select Setup for (Organization or you only) and click on Next Button.

SetupOfficeAddIn-4

Enter your E-mail id and Password, click on Next to continue with next step.

SetupOfficeAddIn-5

If you wish to receive few sample mails in your Mail box click on the check box or leave it blank, click on Next Button.

SetupOfficeAddIn-6

That’s it. click on Finish to complete the setup.

SetupOfficeAddIn-7

SetupOfficeAddIn-8

That’s all for this post.

Will come with more details in my upcoming posts.

Till then keep exploring & learning.


Development Tips, How To, Information, Instalation & Configuration, Maderia, Office Integration, Tip & Tricks

Assisted Setup (Email) in Madeira

In this post we will discuss how to setup Email.

Its very easy and single user intervention required.

SetupEmail-1

From Action Tab click on Assisted Setup & Task from the ribbon.

SetupEmail-2

On Welcome screen click on Next Button.

SetupEmail-3

Select the Email Provider and click on Next to continue.

SetupEmail-4

Enter your Email id and password, click on Next Button.

SetupEmail-5

That’s it, click on Finish.

SetupEmail-6


SetupEmail-7


Just required to enter Email id and password, setup is done.

Will come with other option in my next post.

Till then keep exploring and learning.


How To, Information, Instalation & Configuration, Maderia, Tip & Tricks

Assisted Setup (Sales Tax) – in Madeira

Today we will see how Sales Tax setup is done in Madeira. Since preview is limited to US so many of the information may not apply or some different options will be available for other countries. 

Whatsoever may be in final release we will see at that time when finally it will be released. Lets look what is available in this preview.

Login to Madeira using your credentials.

From Action Tab on landing/ Role Center Page on Ribbon click on Assisted Setup & Task.

SalesTax-1

List with available options page is opened.

SalesTax-2

Select Setup Sales Tax to continue.

Welcome Screen appears click on Next Button.

SalesTax-3

Default tax group is created and you can start with other setup, click on Next.

SalesTax-4

We are only talking about Tax since this preview is only for US so options relevant to them only available. 

SalesTax-5

Select the Account for Tax Account (Sales & Purchase) using the Assist button which lists you the Available Accounts in COA.

SalesTax-6

Next City, Country & State related information need to be filled, and then click Next Button to proceed.

SalesTax-7

Depending upon Information provided in Previous Screen it suggests Tax Area Code, click on Next Button to continue.

SalesTax-8

We are done with Setup now we will assign this to Customer, Vendor and Company.

Click on Next to continue.

SalesTax-9

You can Assign the Tax Information to Customer as per entering simple query.

We can assign or we can leave this activity for later.

We have option to schedule a reminder for this activity. Click on Schedule to continue.

SalesTax-10

Enter the Date and Time for Start & Expiry of this reminder.

This will setup a Job for this and keep reminding you so that you have track of, that this activity is still pending and need to be completed.

Once done choose OK Button to continue.

SalesTax-11

You can see this in Jobs Entry Page.

SalesTax-11-1

Similarly you can do for Vendor too.

SalesTax-12

For company it will be applicable if you selected, so no separate screen for same for query based assignment.

Select OK to Continue.

SalesTax-13

We are done with our Tax Setup for Company, Customer & Vendor.


That’s all for today, will come up with more information in my next post.

Till then keep exploring and learning.


Development Tips, How To, Information, Tip & Tricks, Web Services

Exposing & Consuming the Web service from & inside Navision – Part-4

Continuing from my previous post. Find the link to access the same in case you missed it.

Exposing & Consuming the Web service from & inside Navision – Part-1

Exposing & Consuming the Web service from & inside Navision – Part-2

Exposing & Consuming the Web service from & inside Navision – Part-3


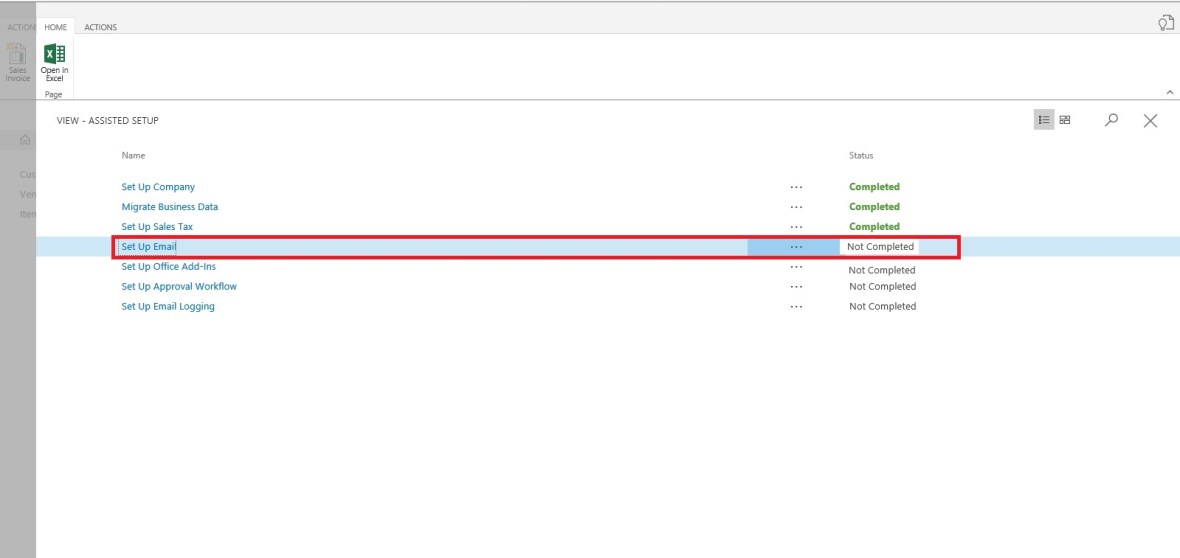
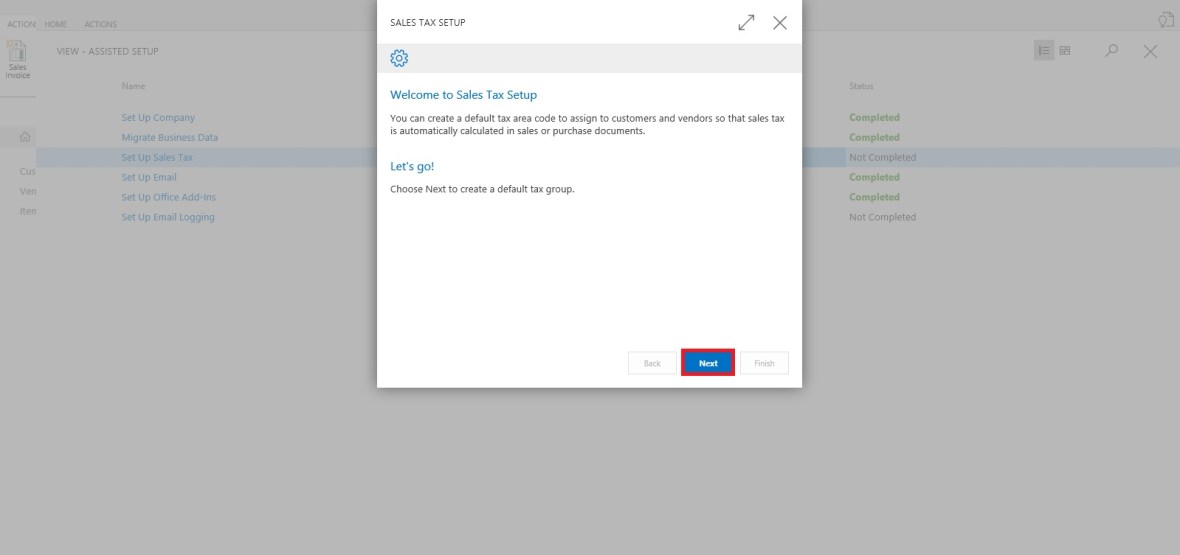
Step 5: Create a Codeunit to test Retrieve the data using above DLL and Send data in XML Format using another Web Service exposed in Dot Net.

How to create WCF Service Application using C#, Publishing it and creating DLL Class Library is out of scope of this document. You may require to take help from guy who are comfortable in .Net technology.

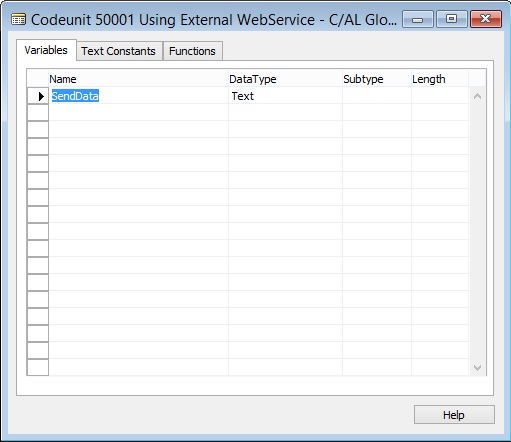
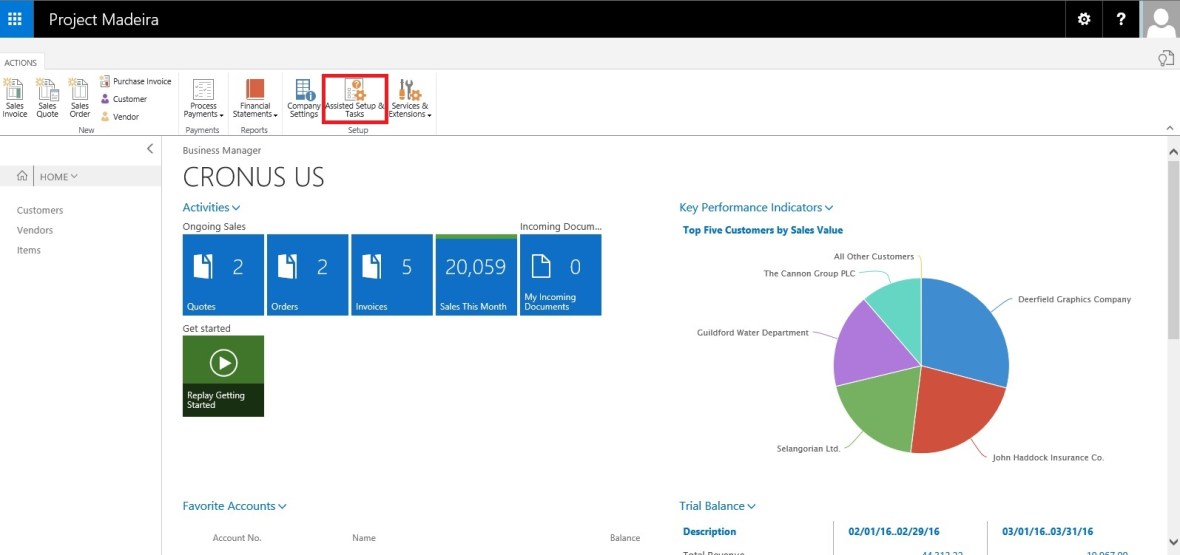
Let’s start with new codeunit, select the available ID in your database and suitable name to save this codeunit.

We will define a Global variable to hold the data we receive from Navision Web Service and pass to Web Service exposed outside Navision.

WebServiceUsage-16

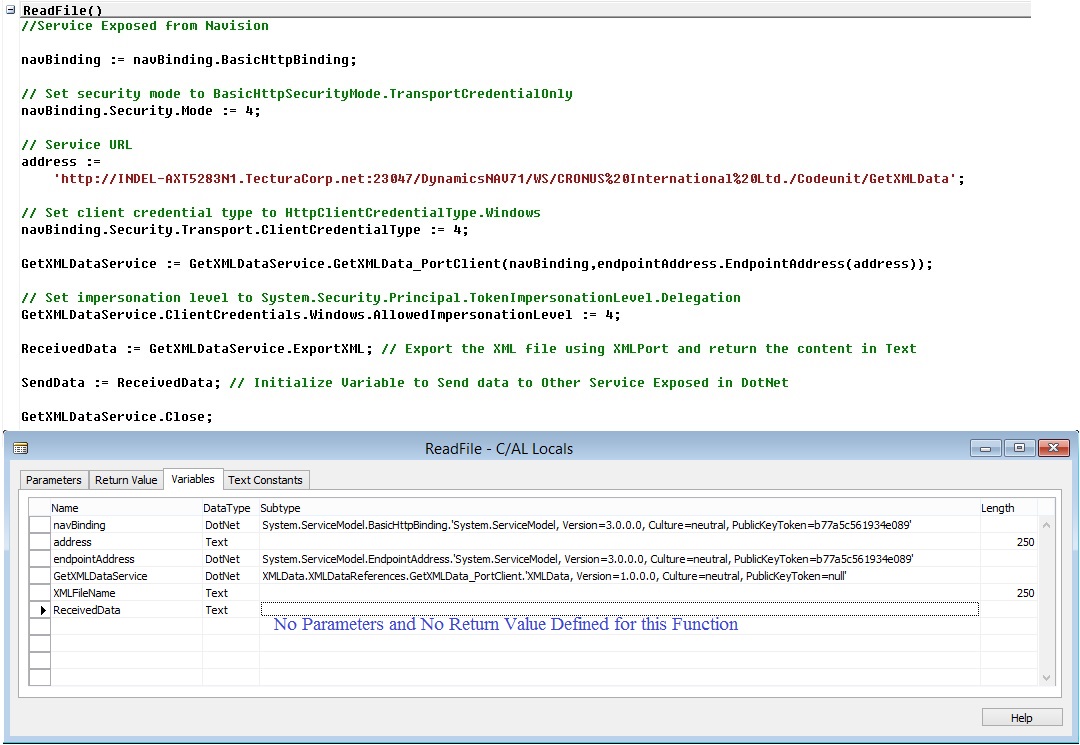
Create a Function to Read/Export the data using Navision Web Service.

Variables defined to the function is also shown in below screen.

We will add the code similar to below. Description provided along with the code in below screenshot.

WebServiceUsage-17

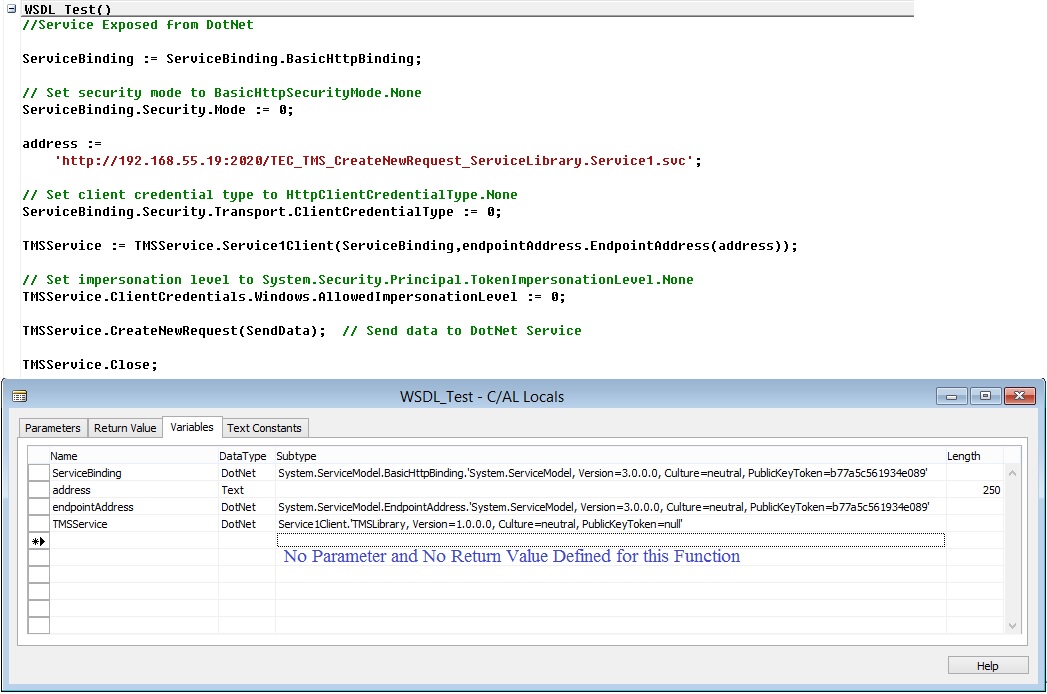
Create a Function to Send Exported data from above function to the Web Service created outside the Navision. Web Service created in DotNet.

Here too we are using DLL file of the Outside Exposed Web Service.

Variables defined to the function is also shown in below screen.

We will add the code similar to below. Description provided along with the code in below screenshot.

WebServiceUsage-18

Now we have our both function ready.

One which Export data consuming the Navision Published Web Service and then read the data in BigText Variable and finally converted to Text variable.

Second one will send data consuming the Web Service Exposed outside Navision created in DotNet. 

Let us test our process if it works as desired.

We will call above both function.

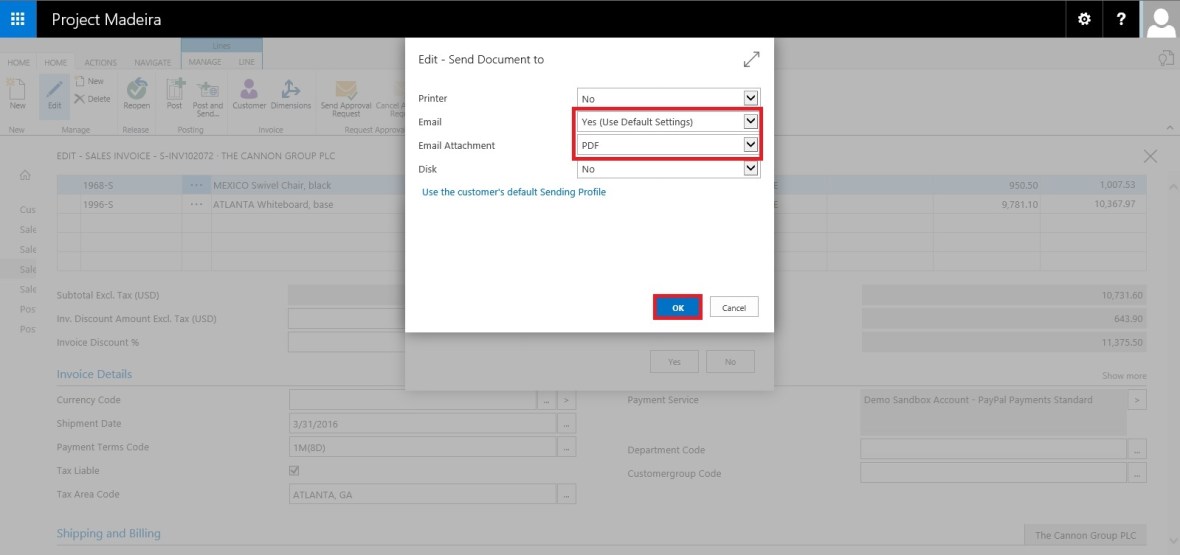
When we call First Web Service as a result we get the XML format file data in my Global defined Text Variable.

We will review the data which we are going to send to Second Web Service on Screen for which we are simply calling the Message.

Finally we will send the data to the Second Web Service, the content of XML file stored in our Global Variable.

Code we use is as below shown screenshot.

WebServiceUsage-19

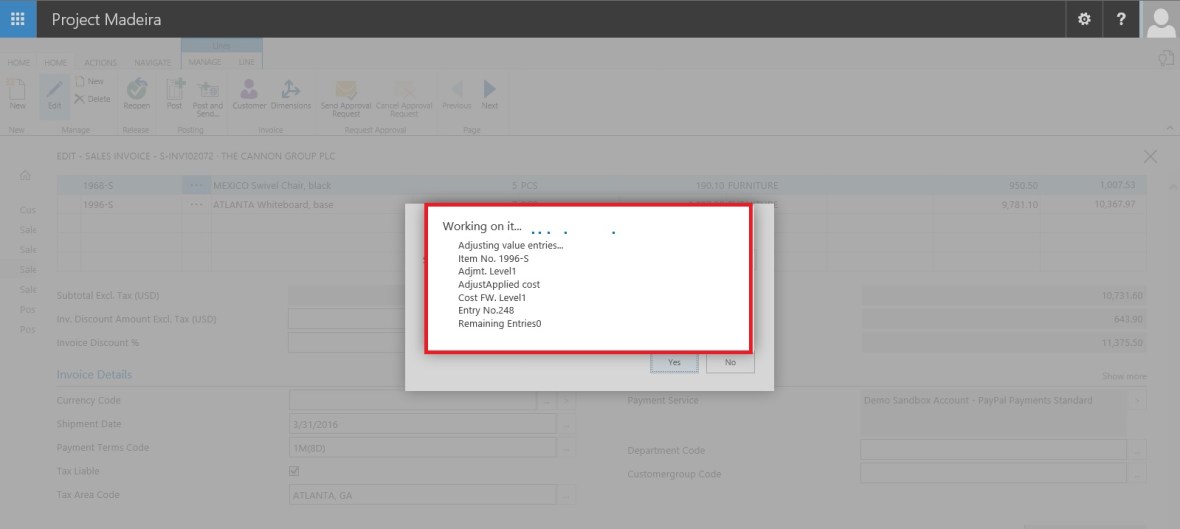
Save the codeunit and execute, as we have written our test code in Run trigger so we can directly run this codeunit.

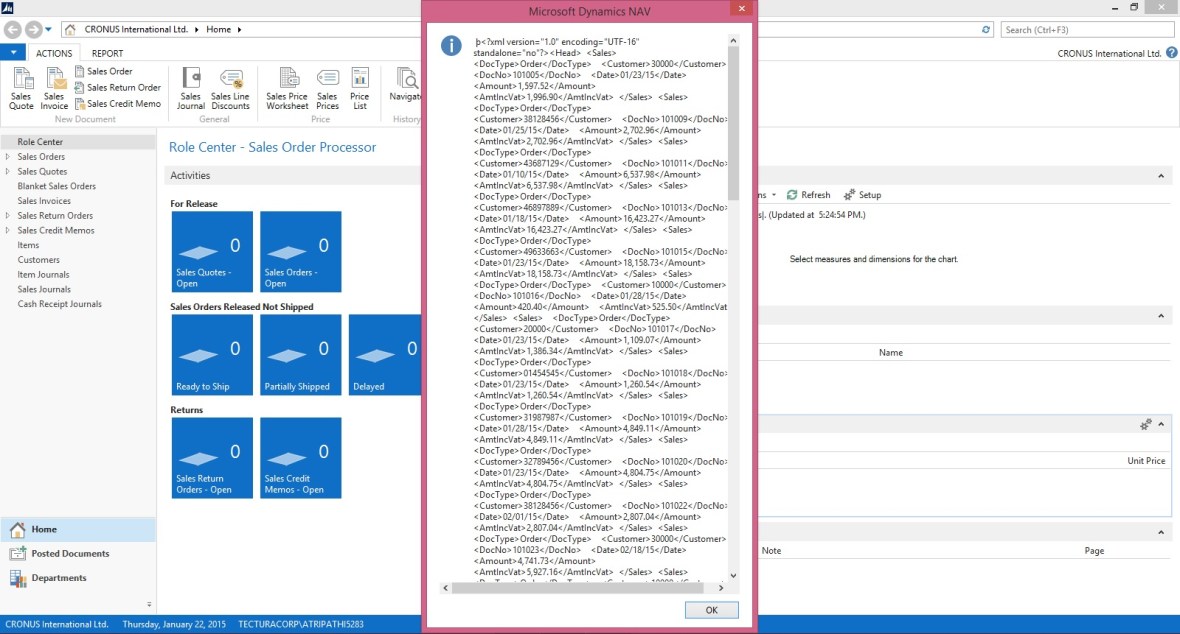
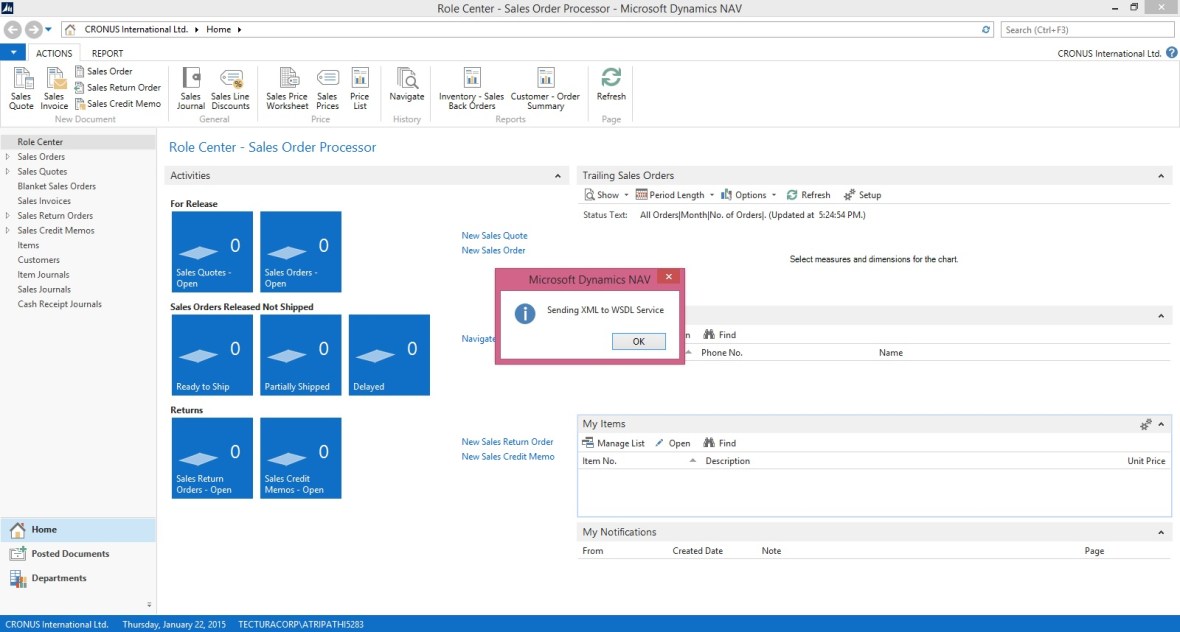
The output will be as shown in below screenshots.

Until this step our Data is Exported and data is loaded in Global defined Text variable.

WebServiceUsage-20

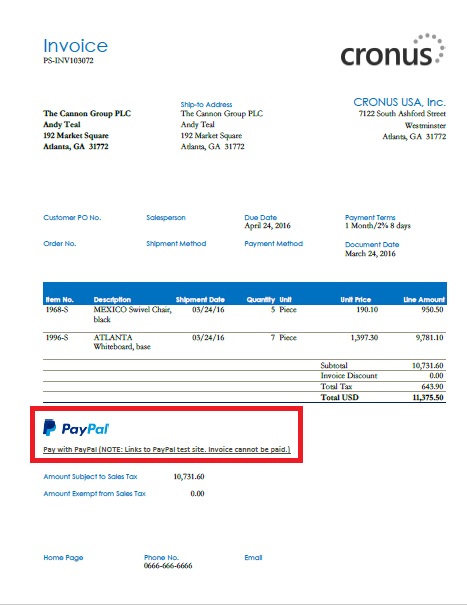
Here the content of Text variable is shown in Message window, which we can verify the data which we are going to send to the external Web Service.

WebServiceUsage-21

As a final step we are sending this content to the External Web Service Exposed using DotNet.

WebServiceUsage-22

Verify the data received at the DotNet side. You can program the Second Web Service as save the content on disk as file or perform any processing like inserting those data in some other table or displayed on screen. 

That’s it for this series.

I will be posting couple of more posts on Web Services soon.

Since this was in response of request from one of my reader so I stick to the requirement.

In my other post I will show some different flavour of using the same.

Till then keep exploring and learning.

Will be back with other posts soon.