Development Tips, How To, Information, PowerShell, Tip & Tricks

An Introduction to PowerShell – Do While

Do While is the simplest of the looping constructs in PowerShell.

A looping construct is basically a piece of code that repeats the same action over and over again to a set of iteration, it loops through a set of statements, doing some action in each of its iteration, until some condition is met or that set of statement is exhausted.

Do While is simply a construct that says to PowerShell, “repeat set of things until some condition becomes true”.

For example, let’s set up a control variable called count and give it an initial value of one.

$count = 1

Then, let’s set up a simple Do While construct that adds 1 to whatever value of count is already in that variable, until the variable has the number 10 in it.

Do

{

$count = $count + 1

Write-Host “The current value of the variable is $count”

} While ($count –lt 10)


PS-10

Another way of doing same is:

You can also set up a Do While construct so that your set of commands only executes when the condition is true. You just need to eliminate the do statement, and only use while.

While ($count –lt 10)

{

$count = $count + 1

Write-Host “The current value of the variable is $count”

}

PS-11

Only difference in above both way of using Do While construct is in first way if we initialize Count with 11 then also the loop with execute once as the condition is tested after loop is executed at least once if condition is satisfied the loop will continue else will exit. Where as in second way the condition is tested before it enters the loop and will exit before first iteration of the loop.

PS-12

I will come up with more stuffs in my upcoming posts. 

Till then keep practicing and stay tuned for more details.


Development Tips, How To, Information, PowerShell, Tip & Tricks

An Introduction to PowerShell – If/Then

The simplest form of decision making in PowerShell is the if/then mechanism.

The code that runs if your comparison clause is YES/TRUE or NO/FALSE must be surrounded within curly braces, it is best practice to put these curly braces on lines by themselves so that you can match them up when you are writing more complicated scripts.

If condition is met then

{

Do This

}

Else

{

Do This

}

Example:

If (20 –gt 15)

{

Write-Host “20 is Greater than 15”

}


PS-7

Here the –gt is the PowerShell switch for “greater than”.


Another Example using Nesting

If (20 –gt 25)

{

Write-Host “20 is Greater than 25”

}

elseif (25 –gt 20)

{

Write-Host “25 is Greater than 20”

}

PS-8

You can include n number of these elseif blocks in your script, there is no maximum limit for how many times it occurs in script.

If (10 –gt 11)

{

Write-Host “10 is Greater than 11”

}

elseif (11 –lt 10)

{

Write-Host “11 is Less than 10”

}

elseif (20 –gt 40)

{

Write-Host “20 is Greater than 40”

}

else

{

Write-Host “None of above conditions are true”

}

PS-9

I will come up with more stuffs in my upcoming posts.

Till then keep practicing and stay tuned for more details.

Corfu Navision 2016, Development Tips, How To, Information, Server, Tip & Tricks, What's New

Configuring Session Timeout – Navision 2016

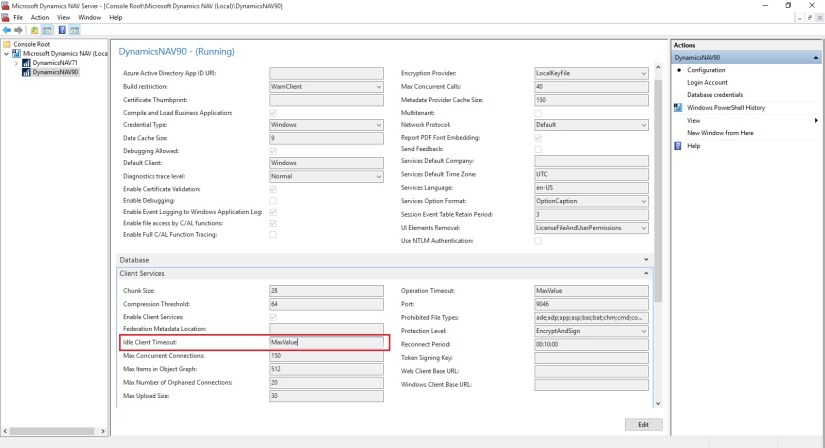
Dynamics NAV Windows client timeout configuration is managed at the service level by setting the Idle Client Timeout setting.

To configure the Dynamics NAV Windows client to time out after 10 minutes of idleness, you will require to set this to 00:10:00 and then restart the Dynamics NAV Server service so that the change comes in effect.

There are some additional settings

ClientServicesReconnectPeriod

ClientServicesMaxNumberOfOrphanedConnections,

When you start the Microsoft Dynamics NAV Windows client or Microsoft Dynamics NAV Web client, a connection is established with the Microsoft Dynamics NAV Server instance and a corresponding session is added on Microsoft Dynamics NAV Server.

Microsoft Dynamics NAV Server includes several timeout settings that determine when a session closes as a result of inactivity over the client connection, lost client connection, or closing of the client.

You can configure this in CustomSettings.config file of Microsoft Dynamics NAV Server.

ClientServicesReconnectPeriod :- This value determines the time during which a client can reconnect to an existing session on Microsoft Dynamics NAV Server before a session closes.

ClientServicesIdleClientTimeout :- This value determines the interval of time that a Microsoft Dynamics NAV client connection can remain inactive before the session is closed.

You can configure this in the ClientSettings.config file of the Microsoft Dynamics NAV Windows client.

ClientServicesKeepAliveInterval :- This value determines the interval of time (in seconds) between keep-alive messages that are sent from the Microsoft Dynamics NAV Windows client to Microsoft Dynamics NAV Server. This value is also used, in part, to define the reconnect period when a connection is lost.

You can configure this in the web.config file of Microsoft Dynamics Web Server for the client.

SessionTimeout :- This value specifies how much of time that session remains open when there is no activity over the connection from the Microsoft Dynamics NAV Web client to Microsoft Dynamics NAV Server.

SessionTimeOut-1

The SessionTimeout setting enables you to set the Microsoft Dynamics NAV Web client inactive session timeout different than for the Microsoft Dynamics NAV Windows client, which is only controlled by the ClientServicesIdleClientTimeout setting.

Typically, this is set the inactive session timeout period on Microsoft Dynamics NAV Web client connections shorter than for the Microsoft Dynamics NAV Windows client.

When the Microsoft Dynamics NAV Windows client is inactive, reliable sessions automatically sends messages from the Microsoft Dynamics NAV Windows client to Microsoft Dynamics NAV Server.

You can control the interval of the keep-alive messages by setting the ClientServicesKeepAliveInterval setting on the Microsoft Dynamics NAV Windows client.

The default value of the ClientServicesKeepAliveInterval setting is 120 seconds (2 minutes).

If there is no activity on the client connection for duration of the load balancer’s idle timeout setting, then the load balancer might redirect the client connection to another server.

To avoid this condition, it is recommend that set the ClientServicesKeepAliveInterval to half the value of the load balancer’s idle timeout setting.

The idle timeout on Windows Azure is around 4 minutes, so the default setting of ClientServicesKeepAliveInterval (2 minutes) should be sufficient.

Occasionally, a Microsoft Dynamics NAV client can lose the network connection to Microsoft Dynamics NAV Server.

You can use ClientServicesReconnectPeriod setting on Microsoft Dynamics NAV Server to control how long a session remains open after the connection is lost to allow time for the client to reconnect to the session.


SessionTimeOut-2

  • The connection is lost and the initial inactivity period starts (default is 4 minutes).
  • After the initial inactivity period, the service channel enters a faulted state. When the service channel is in the faulted state, Microsoft Dynamics NAV Server considers the session with the client as orphaned and waits for it to reconnect.
  • If the client does not reconnect within the time period that is specified by the ClientServicesReconnectPeriod setting (default is 10 minutes), then Microsoft Dynamics NAV Server closes the session.
  • The session is then removed from the Active Session table in the Microsoft Dynamics NAV.

ClientKeepAlive:- This  setting is managed at the user level and located in the ClientUserSettings.config file.

The value of this setting is given in seconds and defines the interval between ‘pulse’ signals sent by the client to prevent the client from going idle in some scenarios, or for some users.


In Dynamics NAV 2016 Cumulative Update 8:

The ClientKeepAlive setting has been moved from the user level to the service level, and is no longer defined in number of seconds but as a time interval, just like the Idle Client Timeout setting.


Before Cumulative Update 8:

  1. In the server configuration file, set Idle Client Timeout  to 00:10:00
  2. In the client configuration file, set ClientKeepAlive  to any value  larger than 600 This value is in seconds, so 600 equals 10 minutes.


SessionTimeOut-3

After Cumulative Update 8:

  1. In the server configuration file, set Idle Client Timeout  to 00:10:00
  2. In the server configuration file, set Keep Alive Interval  to a value larger than 00:10:00

To configure the timeout for the Dynamics NAV Web client, it is sufficient to configure the SessionTimeout setting in the web.config file to the relevant interval – in above example it’s 00:10:00.

For more information you can check out here : https://community.dynamics.com/nav/b/navteam/archive/2016/06/24/configuring-client-timeout


Corfu Navision 2016, Demand, Development Tips, Functional Tips, How To, Information, Inventory, MPS, MRP, Tip & Tricks

Basics of Demand, Forecast, MPS & MRP

What is MPS?

MPS term is used for Master Production Schedule. It is used to plan items which have direct demand. Like Sales Order, Service Orders and Forecasts. It is run Weekly based on Orders and forecasts for that period.

What is MRP?

MRP term is used for Material Requirements Planning. It is used to plan items which have dependent demand. Like sub items used to produce FG or are defined in BOM. It is run Daily to expedit parts required to produce the plan.

What is Forecast?

Forecasting allows your company to create “what if” scenarios and efficiently and cost-effectively plan for and meet demand. Accurate forecasting can make a critical difference in customer satisfaction levels with regard to order promising dates and on-time delivery.

The forecasting functionality in the program can be used to create sales or production forecasts, in combination or independently.

What is Demand?

Calculation is done order-by-order, meaning that the order that includes the demand line with the earliest due date or shipment date is considered first, and all other demand lines in that production order, irrespective of their individual due dates or shipment dates, are also calculated for that order. When the calculation is completed, all unfulfilled demand is displayed as planning lines, sorted by the earliest demand date, with the various quantity fields filled in.

Actual demand is calculated from Sales Order, Service Orders, Components Needed, Job Planning Lines.

This demand is compared with the Forcasted demands like defined in Production Forecast.

Regenerative Plan is calculated as per Period, MPS, MRP and other provided parameters.

Lets understand this via a simple Example:

Step-1

Define Forecast for Item A as requirement of 1000 Qty for Jan Month.

Step -2

Run the Regenerative Plan, you will get the Planning for Item A with due date as 1st Jan of 1000 Qty.

Let us see what happens under different demand levels.

Scenario-1

When demand is less than Forecast for the month.

Let us Make a Sales Order for 200 Qty of Item A.

Lets see the impact of this on our Plan.

Sales demand is for 200 Qty

Forecast demand will be for 800 Qty (1000 – 200)

Actual demand in this case is of 200 Qty

If we run our Plan 2 lines will be created as below

a) 200 Qty with due date equivalent to Sales Order date

b) 800 Qty with due date as 1st Jan from Forecast

If we see our Total demand is still 1000 Qty

Scenario-2

When demand is equal to Forecast for the month.

Let us Make a Sales Order for 1000 Qty of Item A.

Lets see the impact of this on our Plan.

Sales demand is for 1000 Qty

Forecast demand will be for 0 Qty (1000 – 1000)

Actual demand in this case is of 1000 Qty

If we run our Plan 1 line will be created as below

a) 1000 Qty with due date equivalent to Sales Order date

If we see our Total demand is still 1000 Qty

Scenario-3

When demand is greater than Forecast for the month.

Let us Make a Sales Order for 1500 Qty of Item A.

Lets see the impact of this on our Plan.

Sales demand is for 1500 Qty

Forecast demand will be for 0 Qty

Actual demand in this case is of 1500 Qty

If we run our Plan 1 line will be created as below

a) 1500 Qty with due date equivalent to Sales Order date

If we see our Total demand is now 1500 Qty

Will comeup with more details in my upcomming posts.

Corfu Navision 2016, Development Tips, How To, Information, Inventory, Tip & Tricks

How Inventory is Calculated in Navision 2016

Today we will see terms used for Inventory and how Inventory is calculated in Navision.

InvProj-1

You can find details of Inventory on Item Card itself. Also how much Inventory is available or required at different area in ERP.

InvProj-2

If you open Item Availability by Location you will find in more details. When you drilldown you can find in more details from where these figure comes from.

Scheduled Receipts:

Here all the entries from below area is included:

a) Purchase Orders

b) Transfer Orders

c) Firm Planned Production Order

d) Release Production Order

e) Assembly Orders

How Navision calculates?

AvailType::”Scheduled Order Receipt”:
BEGIN
InsertEntry(DATABASE::”Purchase Line“,Item.FIELDNO(“Qty. on Purch. Order”),PurchLine.TABLECAPTION,Item.”Qty. on Purch. Order“);
InsertEntry(DATABASE::”Prod. Order Line“,Item.FIELDNO(“FP Order Receipt (Qty.)”),STRSUBSTNO(Text002,ProdOrderLine.TABLECAPTION),Item.”FP Order Receipt (Qty.)“);
InsertEntry(DATABASE::”Prod. Order Line“,Item.FIELDNO(“Rel. Order Receipt (Qty.)”),STRSUBSTNO(Text003,ProdOrderLine.TABLECAPTION),Item.”Rel. Order Receipt (Qty.)“);
InsertEntry(DATABASE::”Transfer Line“,Item.FIELDNO(“Qty. in Transit”),Item.FIELDCAPTION(“Qty. in Transit”),Item.”Qty. in Transit“);
InsertEntry(DATABASE::”Transfer Line“,Item.FIELDNO(“Trans. Ord. Receipt (Qty.)”),Item.FIELDCAPTION(“Trans. Ord. Receipt (Qty.)”),Item.”Trans. Ord. Receipt (Qty.)“);
InsertEntry(DATABASE::”Sales Line“,0,SalesLine.TABLECAPTION,Item.”Qty. on Sales Return“);
InsertEntry(DATABASE::”Assembly Header“,Item.FIELDNO(“Qty. on Assembly Order”),AssemblyHeader.TABLECAPTION,Item.”Qty. on Assembly Order“);
END;

Planned Receipts:

Here all the entries from below area is included:

a) Planned Production Order

b) Planning Worksheet

c) Requisition Worksheet

How Navision calculates?

AvailType::”Planned Order Receipt”:
BEGIN
InsertEntry(DATABASE::”Requisition Line“,Item.FIELDNO(“Purch. Req. Receipt (Qty.)”),ReqLine.TABLECAPTION,Item.”Purch. Req. Receipt (Qty.)“);
InsertEntry(DATABASE::”Prod. Order Line“,Item.FIELDNO(“Planned Order Receipt (Qty.)”),STRSUBSTNO(Text000,ProdOrderLine.TABLECAPTION),Item.”Planned Order Receipt (Qty.)“);
END;

Gross Requirement:

Here all the entries from below area is included:

a) Sales Order

b) Transfer Order

c) Firm Planned Production Order Components

d) Released Production Order Components

e) Job Planning Lines

f) Service Orders

g) Assembly Orders Components

How Navision calculates?

AvailType::”Gross Requirement”:
BEGIN
InsertEntry(DATABASE::”Sales Line“,Item.FIELDNO(“Qty. on Sales Order”),SalesLine.TABLECAPTION,Item.”Qty. on Sales Order“);
InsertEntry(DATABASE::”Service Line“,Item.FIELDNO(“Qty. on Service Order”),ServLine.TABLECAPTION,Item.”Qty. on Service Order“);
InsertEntry(DATABASE::”Job Planning Line“,Item.FIELDNO(“Qty. on Job Order”),JobPlanningLine.TABLECAPTION,Item.”Qty. on Job Order“);
InsertEntry(DATABASE::”Prod. Order Component“,Item.FIELDNO(“Scheduled Need (Qty.)”),ProdOrderComp.TABLECAPTION,Item.”Scheduled Need (Qty.)“);
InsertEntry(DATABASE::”Planning Component“,Item.FIELDNO(“Planning Issues (Qty.)”),PlanningComponent.TABLECAPTION,Item.”Planning Issues (Qty.)“);
InsertEntry(DATABASE::”Transfer Line“,Item.FIELDNO(“Trans. Ord. Shipment (Qty.)”),Item.FIELDCAPTION(“Trans. Ord. Shipment (Qty.)”),Item.”Trans. Ord. Shipment (Qty.)“);
InsertEntry(DATABASE::”Purchase Line“,0,PurchLine.TABLECAPTION,Item.”Qty. on Purch. Return“);
InsertEntry(DATABASE::”Assembly Line“,Item.FIELDNO(“Qty. on Asm. Component”),AssemblyLine.TABLECAPTION,Item.”Qty. on Asm. Component“);
END;

Planned Order Releases:

How Navision calculates?

AvailType::”Planned Order Release”:
BEGIN
InsertEntry(DATABASE::”Requisition Line“,Item.FIELDNO(“Purch. Req. Release (Qty.)”),ReqLine.TABLECAPTION,Item.”Purch. Req. Release (Qty.)“);
InsertEntry(DATABASE::”Prod. Order Line“,Item.FIELDNO(“Planned Order Release (Qty.)”),STRSUBSTNO(Text001,ProdOrderLine.TABLECAPTION),Item.”Planned Order Release (Qty.)“);
InsertEntry(DATABASE::”Requisition Line“,Item.FIELDNO(“Planning Release (Qty.)”),ReqLine.TABLECAPTION,Item.”Planning Release (Qty.)“);
END;

Finally we can calculate Projected Available Inventory as below formula:

Inventory + Scheduled Receipts + Planned Receipts – Gross Requirement

thats all for today, will come with more information in my upcomming posts.


Corfu Navision 2016, Data, Data Model, Development Tips, Dynamics Content Package, Functional Tips, How To, Information, Jet Reports, Permission, Power Bi Content Pack, PowerBI.com, Report, Tip & Tricks

Plug & Play – Power BI and Jet Enterprise in NAV 2016

This is where Power BI and Jet Enterprise really shine – they have the ability to understand NAV because they have little bundles of interpretation packs that can interpret NAV for you!

Checkout more via below shared link :-

http://www.catapulterp.com/plug-and-play-power-bi-and-jet-enterprise-in-nav-2016/

Corfu Navision 2016, Development Tips, How To, Information, Instalation & Configuration, Server, Tip & Tricks

Multilanguage across Conflicting Text Encoding Formats

For more details please see my earlier posts:

Managing Multilanguage support in Navision Overview

How do I translate my ResX Files?

Working with Partner Translation Toolkit

To support users with translated strings across conflicting text encoding formats, you must save the translations to a text file in UTF-8 text encoding format.

This converts the file to Unicode, which Microsoft Dynamics NAV Development Environment cannot import. Instead, you add the files to a dedicated Translations folder on the Microsoft Dynamics NAV Server computer.

The default location of this folder is

C:\Program Files\Microsoft Dynamics NAV\90\Service\Translations.

When you have more than one service instance, there is a Translations folder for each service instance, such as

C:\Program Files\Microsoft Dynamics NAV\90\Service\Instances\MyInstance\Translations.

Microsoft Dynamics NAV Server adds any strings in text files that you place in the relevant Translations folder to the metadata for Microsoft Dynamics NAV.

To add translated strings for a conflicting text encoding format:

In the development environment, export the strings for the objects that you want to translate.

Translate-1

Select the Objects you wish to add translation, Export and save as text file.

Translate the strings in the resulting text file into desired Language by using your preferred translation process.

Translate-2

I have translated following Captions in Khmer language:

  1. For Field Name & Search Name in Table Customer (18)
  2. TextConstant in Report CustList (50000) to display Caption for Name & Search Name
  3. Caption for User defined variable in Page Customer Card (21)

When translations are complete, save the translated strings into a text file in the UTF-8 text encoding format. The extension of the file must be .txt.

It is recommend that you remove the other Language strings from the Unicode file before you copy it to the Microsoft Dynamics NAV Server computer.

Microsoft Dynamics NAV Server queries the Translations folder for updated strings, and for performance reasons the folder should only contain strings that you cannot import into the development environment because of conflicting codepages.

Copy the UTF-8 file to the equivalent of

C:\Program Files\Microsoft Dynamics NAV\90\Service\Translations

on the Microsoft Dynamics NAV Server computer.

When you have more than one service instance, there is a Translations folder for each service instance, such as

C:\Program Files\Microsoft Dynamics NAV\90\Service\Instances\MyInstance\Translations.

Restart the Microsoft Dynamics NAV Server instance.

Microsoft Dynamics NAV Server adds the translated strings in the file to the metadata store for the Microsoft Dynamics NAV deployment.

Now Users of this Microsoft Dynamics NAV Server session can now change the user interface language from English to required Language.

The metadata store is updated whenever you add new strings to the Translations folder and then restart the Microsoft Dynamics NAV Server service instance. Cached strings are not deleted from the metadata store when you restart the service instance.


Let us see the effect of this translation. Let’s run the RTC to see the net effect of same.

[A] Customer List in English However Data Stored in Khmer Language

Translate-3

B] Two Captions Changed in Khmer Language for Name & Search Name

Translate-4

[C] Customer Card in English Language. Selected Captions are changed in Khmer Language

Translate-5

[D] Caption Changed for Name & Search Name to Support Khmer Language also for Field not available in Table the Test Caption

Translate-6

[E] Report Caption in English Language however data in Khmer Language

Translate-7

[F] Report Caption Changed to Khmer Language for Name & Search Name

Translate-8

You can manage Languages using above trick for translate strings across conflicting text encoding formats.

Will comeup with more details in my upcomming posts.


Development Tips, Functional Tips, How To, Maderia, Tip & Tricks

Setup Send Documents by Email in Madeira

To enable emails from within Project “Madeira”, start the Set Up Email assisted setup on the Home page. We have already seen this in our previous post, you can find it here.

To offer your customers to pay for sales electronically using a payment service, such as PayPal, you can also have the PayPal information and hyperlink inserted in the email body. We have already covered this in our previous post, you can find it here.

From all supported documents, you initiate emailing by choosing the Send action, on posted documents, or the Post and Send action, on non-posted documents.

Let us Setup document-specific email body for sales invoices.

From the search page find Report Selections Sales:

SetupEmail-10

Fill the Value as shown in below screen in same sequence.

SetupEmail-11

If you want to offer customers to pay for sales electronically, you can set up the related payment service, such as PayPal, and then have the PayPal information and hyperlink inserted in the email body as well. We have already covered this in our previous post, you can find it here.

Will come up with more details & feature explaination in my upcomming posts.


Development Tips, Functional Tips, How To, Maderia, Tip & Tricks

How do I process Sales Return? – In Maderia

We have seen in our previous post the feature where if a posted sales invoice has not yet been paid, then you can use the Correct or Cancel functions on the posted sales invoice to automatically reverse the involved transactions.

There could be the situation where customer wants partial refund or return of sales.

You can create the Credit Memo from the Posted Sales Invoice, which will create the Credit Memo for you and leave to you to modify and post the credit memo.

Most fields on the sales credit memo header are filled with the information from the posted sales invoice. You can edit all the fields, with new information that reflects the return agreement.

You can apply the Customer Entries via selecting the line with the posted sales document that you want to apply the sales credit memo to.

The posted sales documents that you applied the credit memo to are now reversed, and a refund payment can be created for the customer.

The sales credit memo is removed and replaced with a new document in the list of posted sales credit memos.

Let us see how we can achieve this in Madeira.


CorrectCancelSalesInvoice-12

Select the Sales Invoice and open it for action.

CorrectCancelSalesInvoice-13

Select Create Corrective Credit Memo.

CorrectCancelSalesInvoice-14

Perform the required correction and choose Apply Entries.

CorrectCancelSalesInvoice-15

Select the document to which you want this Credit Memo to be adjusted.

CorrectCancelSalesInvoice-16

Once Application is done, Post the Credit Memo.

Respond to Yes to post the Credit Memo.

Respond to Yes to Open the posted Credit Memo.

CorrectCancelSalesInvoice-17

This is the posted Credit Memo for the Invoice.

Let us check the Ledger for this Customer:

CorrectCancelSalesInvoice-18

Here you can see the net effect of the Credit Memo on Invoice.

Thats all for this post will come up with more features and details in my upcomming posts.


Development Tips, Functional Tips, How To, Maderia, Tip & Tricks

Correct or Cancel Unpaid Sales Invoices – in Madeira

Sometimes Invoices are posted in mistake or customer demands changes in invoice after posting.

Once the payment is initiated, partially or fully paid correction or cancellation is not allowed from Posted Sales Invoice itself. In such case you need to follow traditional way of doing so by passing Sales Credit Memo to Cancel the Sale and reimburse to customer manually.


What happens when you select Correct Action?

The Posted Invoice for which you say correct that invoice gets cancelled and new Sales Invoice with same information is created.

Naturally to maintain the integrity of data new Sales Invoice is created with new Document No.

A Sales Credit Memo for previous Invoice is created to void the effect of initial posted Sales Invoice.

The Canceled and Paid is marked on initial posted Sales Invoice document.


What happens when you select Cancel Action?

The Posted Invoice for which you say correct that invoice gets cancelled.

A Sales Credit Memo for previous Invoice is created to void the effect of initial posted Sales Invoice.

The Canceled and Paid is marked on initial posted Sales Invoice document.


Important Points:-

If the Canceled check box is selected, then you cannot correct or cancel the posted sales invoice because it has already been corrected or canceled.

Once the payment is initiated, partially or fully paid correction or cancellation is not allowed from Posted Sales Invoice itself.


Let us see how it works in Madeira:-

Login with your credentials to Madeira project.


CorrectCancelSalesInvoice-1

From the Navigation Bar choose Sales.

CorrectCancelSalesInvoice-2

Select Posted Sales Invoice. And choose to open the posted Sales Invoice.

CorrectCancelSalesInvoice-3

Select Correct to Modify the Invoice.

CorrectCancelSalesInvoice-4

Select Yes to continue with the process.

CorrectCancelSalesInvoice-5

Make the required modification to the Invoice and post it.

CorrectCancelSalesInvoice-6

Select Yes to continue with posting.

CorrectCancelSalesInvoice-7

Select Yes to continue.

CorrectCancelSalesInvoice-8

This is new modified Invoice that got posted.

Let us move to the original Invoice which we corrected.

CorrectCancelSalesInvoice-9

Select Show Corrective Credit Memo.

CorrectCancelSalesInvoice-10

This is the Credit Memo posted against the Invoice which we corrected.

CorrectCancelSalesInvoice-11

You can see the Closed and Canceled is Marked to TRUE.