Data, How To, Information, Tip & Tricks, What's New

Save General Journals as Standard Journal in Navision

Do you Know you can save the General Journal as Standard Journal and retrive edit and post it later.

Many of time we pass entries of same Nature, Like Rent, Salary, Bills etc.. just an example you can decide upon which entries you post frequently and club it as Standard Journal to save your time.

You can create once and retrive it every month or when ever required and Post it in future/later.This can serve you as template for future use.

Let us see how we can use this feature.

StdGen-1

Open your General Journal.

Make entries which you do oftenly. Don’t put Postng Date & Document No. Complete your all entries.

Next we will save this as Standard Journal for future use.

From Action choose Save as Standard Journal.

StdGen-2

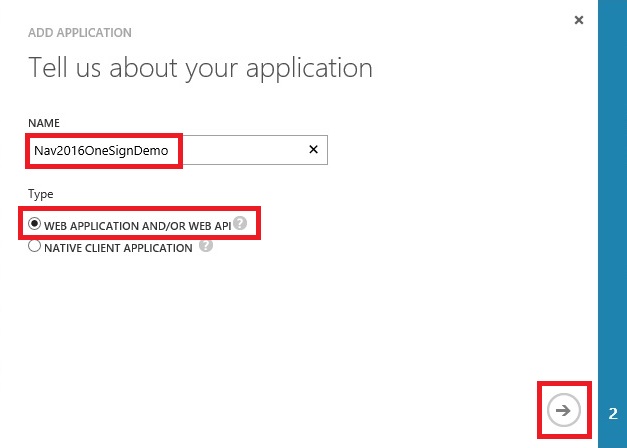
Give Code & Name for your Journal Template.

If Amounts are fixed every time you can enter them too and while Save choose Save Amount.

No Let us review the entry that we saved.

From Action Choose Get Standard Journal.

This will display you all Saved Standard General Journals.

StdGen-3

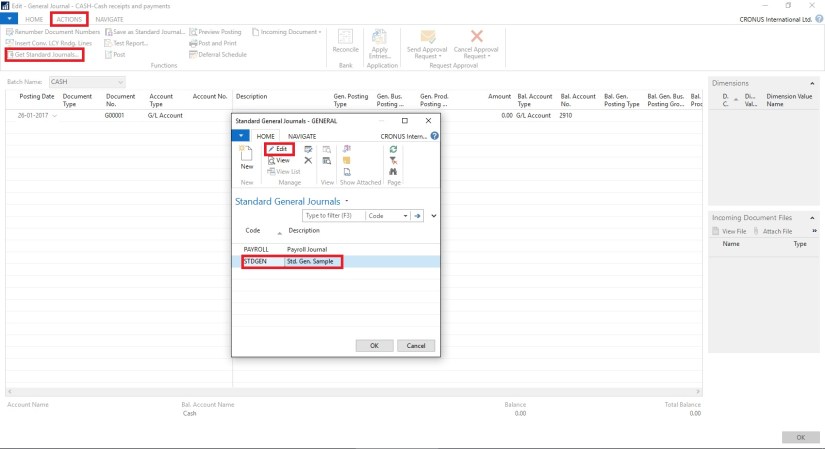
Select the required Journal Code and Click on Edit.

StdGen-4

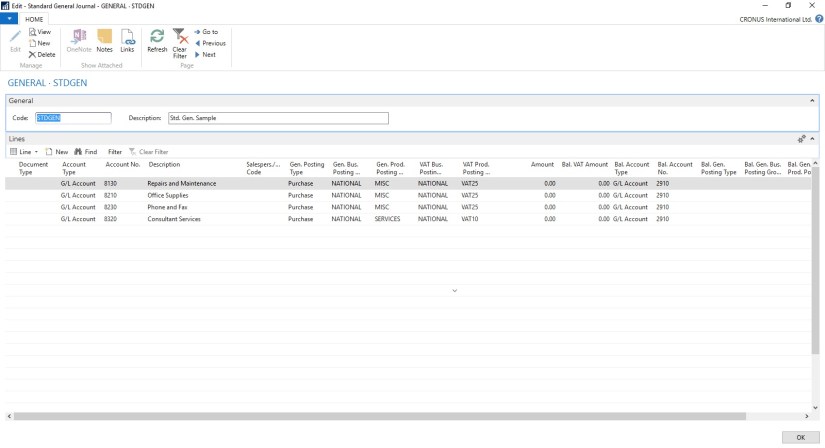
This is what is Saved in your Standard Journal.

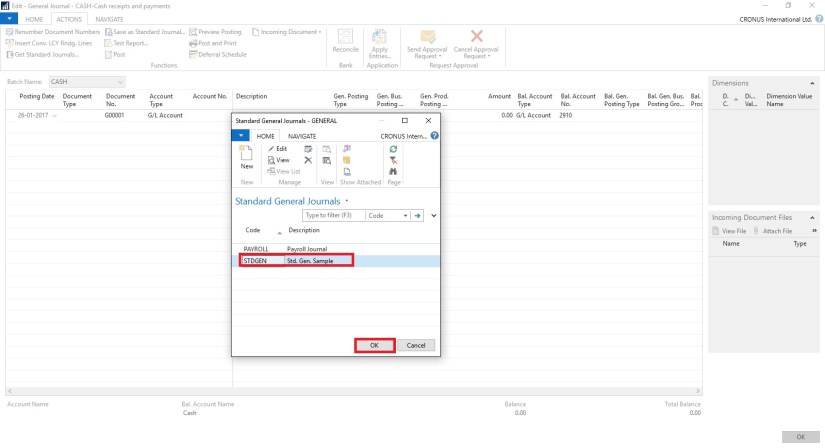
Let use return to the Standard Journal List.

Select desired/ earlier saved Std. Journal and Click on OK.

StdGen-5

Confirmation of Std. Journal retrived and Journals created in General Journal Page.

StdGen-6

Your General Journal gets populated with values you saved to Std. Journal.

Have you Noticed, Posting Date as your Work Date and Next Document No. from your assigned No. Series is populated Automatically.

StdGen-7

Fill the Amount and any other required fields and Post the Journal.

Next time when again you wish to post similar entries just retrive it and continue.

Thats all for todays Post, What you are waiting for give it a try.

I will comeup with more details in my upcoming Posts, till then keep exploring and Learning.


Data, Development Tips, How To, Information, Tip & Tricks

Creating Views – to Save Filtered Lists in NAV

Do you Know you can save the Page as View with filters.

Many of time we access to Page and apply same set of Filters to fetch our data. You can save the same for quick retrival of data applying the filters automatically in future access.

You save the Page with Filters as View.

Let us see small example how to achieve it.

First we will open the List Page in my case i am having one customized Customer List.

FilteredView-1

Suppose this is the Page which i use for Balances Retrival each month and on daily basis.

I Enter Filter as Balance > 5000 & Current Month Filter whenever i wish to check balances for my reporting or followup purpose.

For Date Filter i use (-CM..CM) sothat when i open this view next month it takes the appropriate Filter for that month.

FilteredView-2

Click on the Page Name post applying all the required Filters.

Select Save View as.

Give the Name for the View.

Select the Location to save the View.

On Confirmation respond as Yes.

FilteredView-3

Your View will be Saved, You can create as much Views as desired using different Filters.

FilteredView-4

Small and good Feature.

What you are waiting for give it a try.

I will comeup with more information in my upcoming posts, till then keep exploring and learning.


Azure, Corfu Navision 2016, How To, Information, Instalation & Configuration, Office 365, Office Integration, Tip & Tricks

Configuring Single Sign-On using Office 365 on Navision 2016

Today we will see how we can enable Single Sign-On using Office 365 for Navision 2016.

Before we start we should have Virtual Machine ready on Azure with Navision 2016 installed, Certificates and Nav User is configured. Endpoints are open so that web client can be used from outside Virtual Machine on internet.

It should be hosted on Public IP, then only we will be able to configure it.

For details regarding Azure Subscription you can see my earlier post here.

For details regarding Creating Virtual Machines you can see my earlier post here.

You also need Office 365 Subscription ready for use and you can use the AD of same to configure your Single Sign-On.

Let us start with Admin console of office 365. Click on Azure AD this will create Management Console to work with AD.

SingleSignOn-1

Enter your details and click on Next.

SingleSignOn-2

Enter your details and click on Next, Finally Sign Up.

SingleSignOn-3

It will take few minutes to configure and make it available for you.

SingleSignOn-4

Once your Subscription is ready click on Start Managing my Service.

SingleSignOn-5

From Management Console click on Virtual Machine, if you dont have already to create one for you.

SingleSignOn-6

Select the Virtual Machine in Search for Microsoft Dynamics Nav 2016.

SingleSignOn-7

Select the approprite Virtual Machine from the List.

SingleSignOn-8

Enter your details and Create. For more details see the link provided on top of the post.

SingleSignOn-9

Let us return to our AD, Click on Applications. This will List all you Apps currently available with your AD or office 365.

SingleSignOn-10

Click on Add to configure your Application.

Give a Name and Select Web Application/or Web API, as we are configuring for Web Client today. Click on Next.

SingleSignOn-11

Enter your Web Client URL and Office portal AD URL.  Click on OK.

SingleSignOn-12

Your New application gets registered with your AD.

Select the created Application and Click on View Endpoints.

SingleSignOn-13

Copy the Federation MetaData URL and keep it handy at safe place we will require this in our next step. Close the window we are not performing any changes here.

SingleSignOn-14

Open your Navision User Card.In Office 365 Authentication enter your Office portal user email id which you will be using for Single Sign-On.

SingleSignOn-15

Open your Navision Service Instance configuration and enter Federal MetaData URL which we copied in our previous step.

SingleSignOn-16

Restart you NAV Service.

SingleSignOn-17

Open the Web Client Folder under your IIS. Edit your Web.config file using prefered Editor.

SingleSignOn-18

Enter you Client Service Credentials as AccessControlService.

SingleSignOn-19

Change value of ACS URI as below. You have full explaination of same in the file itself.

SingleSignOn-20

Thats all, Now you open your web client and you will be redirected to Office 365 Login Page, enter your valid office 365 e-mail user id and password you will be authenticated and Web Client is opened.

Thats all for today, I will come up with moredetails in my upcoming posts.

Till then keep exploring and learning.


Development Tips, How To, Information, Report, Tip & Tricks

Open Report Design in Visual Studio from Custom Report Layouts

You may have noticed that when we try to edit Report Layout from Custom Report Layouts Page, it always open in Word or Report Builder no direct option to edit it in Visual Studio.

This requirement leaded to the necessity of the below customization, It can be done other ways also but the easiest way to do it one which i am going to discuss in my today’s post. Hope you will like it.

CustRepLayout-1

I have provided with the option where user can select the desired Editor either he wants to open it in Report Builder or Visual Studio.

To achieve this i have added one field in Table 9650 – Custom Report Layout with desired options as shown below.

CustRepLayout-2

And made this field available in Page Custom Report Layouts – 9650 as shown below.

CustRepLayout-3

Now in Codeunit 9652 – Edit RDLC Report Layout I have replaced the code shown in Yellow with the code shown in Red box.

CustRepLayout-4

CustRepLayout-5

Thats all, what you are waiting for go-ahead and design the reports in your way.

I will come up with more other topics in my upcomming posts, till then keep practicing and learning.


Development Tips, How To, Information, Profiles, Tip & Tricks

Setting different Column Layout for different users

On Community Forum i came across one requirement for opening Page with different column on Page for different users.

Here i have given an demo how can be done, but will require some tweaking to achieve the actual result.

I have copied the Customer List Page and removed extra fields.

Playing with columns1

I have added one Field above Repeater so that we can decide which format we want to see on screen. User can enter 1/2/or any other value.

I have created two more variables Set1 and Set2 to show/hide fields as per the value entered in SetSelect.

Assigned the Set1 & Set2 to few columns on the Page Fields to Property Visible.

Set1 to Responsibility Center, Location Code & Currency Code.

Set2 to Post Code, Country/Region Code, Phone No. & Fax No.

Added code on OnOpenPage Trigger to select Default page Format when Page is Opened. This code you will modify as per your requirement like check the User and assign the default Value.

Added Code to SetSelect-OnValidate Trigger to select the required format of Page. You need to modify the code as per your requirement.

Playing with columns2

In this demo if user enter value for SetSelect and you will get different view of same page.

Do some research and design one as per your requirement, this way we need not to create different Pages for different Users. Same Page can serve you different purpose if limited to only different views.

I will come with more information in my upcomming posts.

Till then keep browsing and learning.


Development Tips, Email, Excel, How To, Information, Office Integration, Report, Server, Tip & Tricks

Export Data as CSV and send as Attachment to Mail

One of my Follower/Reader have requested for this post.

This post will explain the the below steps:

  • Export the data of table to csv file format. (I am using XMLPort you can use Excell Buffer or any other method to create the file)
  • Attach to Mail and Send.

Step 1.

Create a XMLPort as below.

CSVAttachment-1

Set the Property of XMLPort.

CSVAttachment-2

Set the Property of Integer Data Item.

CSVAttachment-3

Set the Property of Table DataItem for which data to be exported.

CSVAttachment-4

Set the Captions of the Columns in CSV file.

CSVAttachment-5

Write the code to transfer the value of Table columns.

You may find some extra code adjust accordingly as per your requirement.

CSVAttachment-6

Define a function to Setfilter for data to export.

Adjust the code as per your requirement.

CSVAttachment-7

CSVAttachment-8

Step 2.

Here is the function to Export the data to csv File using above created XMLPort.

This function Saves the file to Shared folder, if required you can use TEMPORARYPATH to save your File.

CSVAttachment-9

Step 3.

Send the File as Attachment to the Mail.

CSVAttachment-10

You make required adjustment as per your requirement.

Make sure in case you are using Shared Folder give necessary rights on folder to Service Account and operating User Accounts.

Please respond did you found useful this information.

Their are other ways to achive the same, this was readyly available with me as i have used in one of my project so shared the same.

Stay tuned for more details in my Up comming posts.

Corfu Navision 2016, Cumulative Updates, Updates

Cumulative Update 9 for Microsoft Dynamics NAV 2016 – released in July 2016

Cumulative Update 9 includes all application and platform hotfixes and regulatory features that have been released for Microsoft Dynamics NAV 2016.

Where to find Cumulative Update 9

You can download the cumulative update from KB 3172549 – Cumulative Update 9 for Microsoft Dynamics NAV 2016 (Build 46290).

Warning

Before you install a cumulative update in a production environment, take the following precautions:

  1. Test the cumulative update in a non-production environment.
  2. Make a backup of the system or computer where the cumulative update is to be installed.

Additional Information

For information about how to install the cumulative update, see How to Install a Microsoft Dynamics NAV 2016 Cumulative Update.
Note that if you upgrade to this cumulative update from a version older than Microsoft Dynamics NAV 2016 Cumulative Update 6, you must run the development environment with elevated rights (run as administrator).

For a list of all cumulative updates for this version, see Released Cumulative Updates for Microsoft Dynamics NAV 2016.

For more details see Link :https://blogs.msdn.microsoft.com/nav/2016/07/05/cumulative-update-9-for-microsoft-dynamics-nav-2016-has-been-released/

Cumulative Updates, Updates

Cumulative Update 21 for Microsoft Dynamics NAV 2015 – released in July 2016

Cumulative Update 21 includes all application and platform hotfixes and regulatory features that have been released for Microsoft Dynamics NAV 2015.

Note: You must convert the database if you are upgrading to this cumulative update from a cumulative update earlier than Cumulative Update 9 (build 41779). For more information, see Converting a Database in Help for Microsoft Dynamics NAV.

Where to find Cumulative Update 21

You can download the cumulative update from KB 3172546 – Cumulative Update 21 for Microsoft Dynamics NAV 2015 (Build 46293).

Warning

Before you install a cumulative update in a production environment, take the following precautions:

  1. Test the cumulative update in a non-production environment.
  2. Make a backup of the system or computer where the cumulative update is to be installed.

Additional Information

For information about how to install the cumulative update, see How to Install a Microsoft Dynamics NAV 2015 Cumulative Update.

For information about how to work around a recent process change, see How to Get Back the ‘Hotfix Directories’ from NAV 2015 Cumulative Update 1.

For a list of all cumulative updates for this version, see Released Cumulative Updates for Microsoft Dynamics NAV 2015.

For more details See this Link : https://blogs.msdn.microsoft.com/nav/2016/07/05/cumulative-update-21-for-microsoft-dynamics-nav-2015-has-been-released/

Cumulative Updates, Updates

Cumulative Update 33 for Microsoft Dynamics NAV 2013 R2 – released in July 2016

Cumulative Update 33 includes all application and platform hotfixes and regulatory features that have been released for Microsoft Dynamics NAV 2013 R2.

Note: Implementing this cumulative update will require a database upgrade.

Where to find Cumulative Update 33

You can download the cumulative update from KB 3172538 – Cumulative Update 33 for Microsoft Dynamics NAV 2013 R2 (Build 46296).

Warning

Before you install a cumulative update in a production environment, take the following precautions:

  1. Test the cumulative update in a non-production environment.
  2. Make a backup of the system or computer where the cumulative update is to be installed.

Additional Information

For more information about cumulative updates for this version, see Announcement of update rollups for Microsoft Dynamics NAV 2013 R2.

For a list of all cumulative updates for this version, see Released Cumulative Updates for Microsoft Dynamics NAV 2013 R2.

For a list of all hotfixes included in cumulative updates for this version, see the following CustomerSource and PartnerSource pages:

CustomerSource:

PartnerSource

See this Link for more details : https://blogs.msdn.microsoft.com/nav/2016/07/05/cumulative-update-33-for-microsoft-dynamics-nav-2013-r2-has-been-released/


Cumulative Updates, Updates

Cumulative Update 40 for Microsoft Dynamics NAV 2013 – released in July 2016

Cumulative Update 40 includes all application and platform hotfixes and regulatory features that have been released for Microsoft Dynamics NAV 2013.

Where to find Cumulative Update 40

You can download the cumulative update from KB 3172331 – Cumulative Update 40 for Microsoft Dynamics NAV 2013 (Build 46292).

Warning

Before you install a cumulative update in a production environment, take the following precautions:

  1. Test the cumulative update in a non-production environment.
  2. Make a backup of the system or computer where the cumulative update is to be installed.

Additional Information

For a list of all cumulative updates for this version, see Released Cumulative Updates for Microsoft Dynamics NAV 2013.

For a list of all hotfixes included in cumulative updates for this version, see the following CustomerSource and PartnerSource pages:

CustomerSource:

PartnerSource:


Please See this link for more details :- https://blogs.msdn.microsoft.com/nav/2016/07/05/cumulative-update-40-for-microsoft-dynamics-nav-2013-has-been-released/