Development Tips, Instalation & Configuration, Jet Reports, Office Integration, Report

Using the Jet Ribbon Jet Essentials 2015 Update 1 for Navision 2015

Jet ribbon in Excel has been modified to make it easier to use.
JetRibbon-1

Some items have been moved so as to provide better grouping of related items.  Other (less-common) items do not display by default.

Additionally, the Function Wizard (“Jfx”) has been replaced by four smaller icons…
JetRibbon-2

which allow you to easily select what type of Jet function you would like to place in your report.

You have a great deal of control over which items appear on the ribbon.  Simply go to the “Jet Ribbon” section of the Jet Essentials Application Settings..
JetRibbon-3

Place a check next to those items you do want on the ribbon and uncheck those that you do not want to see.

Checkout Upcoming posts for more information.

Development Tips, Excel, Instalation & Configuration, Jet Reports, Office Integration, Report

Uninstalling Jet Express

If you need to uninstall Jet express from a client machine-

From the Start Menu select Programs and Features find the Jet Express application, right click and select Uninstall.

If you need to uninstall the Jet components from the Microsoft Dynamics NAV 2015 Server- 

  • Open the Microsoft Dynamics NAV Development Environment and then connect to the database
  • Open the Object Designer (on the Tools menu, choose Object Designer)
  • Select all to see all business objects.
  • Select all the business objects in the 14125500-509 range, right-click and select delete.

When asked if you want to delete the selected lines click yes.

Also remove the Web Service Entry too.

Also remove the Navision Instance, if created dedicated for Jet.

Checkout Upcoming posts for more information.

Development Tips, Excel, Instalation & Configuration, Jet Reports, Office Integration, Report

Specify your Jet Interface Language

You can specify the language of your Jet Express interface.

  • Select Application Settings from the Jet Ribbon
  • Select the Language tab or General tab depending upon version you are using.
  • Pick the user interface language that you wish to use.
  • Click OK

JetExcel-9
You will need to restart Excel for the user interface language change to take effect.

Checkout Upcoming posts for more information.

Development Tips, Excel, Instalation & Configuration, Jet Reports, Office Integration, Report

Configuring a Data Source in Jet Express

Select Data Source Settings from the Jet Ribbon

Use the Data Source Version drop down button and select “Dynamics NAV 2013 and later”.

JetExcel-6

Select the Web Service Tab

  • Enter the Server, SOAP Services Port and Instance.
  • If your Web Service is configured to use SSL encryption then check the “Use SSL encryption” box.
  • Pick the Jet_Data_Source codeunit.
  • Pick your default Company.
  • Click Test Connection to ensure connectivity.
  • Click OK.

JetExcel-7
Checkout Upcoming posts for more information.

Development Tips, Excel, Instalation & Configuration, Jet Reports, Report

Enable SOAP Services and identify connection parameters

Jet express calls Web Services (SOAP) when running reports or accessing information from

Microsoft Dynamics NAV 2015. Using the Microsoft Dynamics NAV Server Administration Tool select the instance that you want to use and check the box next to Enable SOAP Services.

If Jet Express will be used outside a secure network then SSL should be enabled for the SOAP Services to help provide security and data integrity for data communications.
JetExcel-5
From the Microsoft Dynamics NAV Server Administration Tool record the

  • Credential Type
  • Server Name
  • Instance (note: for performance reasons, it is strongly recommended that a separate instance be created solely for use by Jet Express)
  • SOAP Services Port
  • Whether SSL is enabled for SOAP Services

This information is required for configuring your data source connection in Jet Express on client machines.

Note – You cannot run both Jet Express and Jet Essentials on the same computer.

Checkout Upcoming posts for more information.

Development Tips, Excel, Instalation & Configuration, Jet Reports, Office Integration, Report

Publishing the Jet Data Source Codeunit to the Web Service

Microsoft Dynamics NAV 2015 includes a “Jet Data Source” codeunit which must be published to enable Jet Essentials or Jet Express to operate. This can be published using the Microsoft Dynamics NAV Role Tailored Client (RTC).

To publish this code unit, inside the RTC go to Departments > Administration > IT Administration > General and select Web Services.

JetExcel-4
Publish the Jet Data Source code unit by selecting New from the Web services ribbon

  • Object Type: Codeunit
  • Object ID: 14125500
  • Service Name: Jet Data Source
  • And check the box to publish.
  • Click OK

Checkout Upcoming posts for more information.

Development Tips, Excel, Instalation & Configuration, Jet Reports, Office Integration, Report

Installing and Publishing the Jet Business Objects on the Microsoft Dynamics Server

To install the .fob file open the Microsoft Dynamics NAV Development Environment and then connect to the database.

  • Open the Object Designer (on the Tools menu, choose Object Designer)
  • Import the .fob file (on the File menu, choose Import)
  • Locate the import file (Jet Reports Objects.fob), and then choose Open.
  • The .fob file includes modified objects. When prompted choose Yes to import all objects.
  • Verify that no objects are to be skipped. Objects are skipped if the version of the object in the database is later than the one in the .fob file.
  • Choose the OK button to import the .fob file.

The .fob file installs a set of business objects in the range of 14125500-14125504 and Table 14125600.
JetExcel-3
Jet Express users must have Read, Insert, Modify, Delete (RIMD-) permissions to Table 4125600 “Jet Cancellation”.

Checkout upcoming posts for more information.

Development Tips, Excel, Instalation & Configuration, Jet Reports, Office Integration, Report

Installing Jet Express for Excel – Navision 2015

Jet Express is an Excel add-in which must be installed each client machine. The client machines must have Excel installed.

Download the current version of Jet Express

  • Download the version of the product that matches your version of Microsoft Office (either 32-bit or 64-bit).
  • Microsoft Office 2007 is 32-bit.
  • If you are using Microsoft Office 2010 you can determine this by selecting the File On your version of Excel.
  • Button in your Excel ribbon and then selecting either Help or Account, depending
  • If you attempt to install the wrong version you will receive an error message and the application will not install.
  • Run the .exe file.
  • If you receive a message asking “Do you want to allow the following product to make
  • Changes on this computer?” select YES.

Once Jet Report is installed, when you open your Excel you will get new Tab as Jet.
JetExcel-2

Checkout upcoming posts for more Information.

Development Tips, Excel, Instalation & Configuration, Jet Reports, Office Integration, Report

Jet Report for Excel – Navision 2015

In my previous posts I introduced with Jet Report for Word.

Please see here. Links below:-

Jet Express for Word Overview & Installation – for Navision 2015

Jet Express for Word – Objects for Navision 2015

What’s New in Jet Reports for Word, How it is different from Navision Word Reports

Customize the Report layout using Jet Express for Word

You can access the resource for Jet Report Excel from this Link.

JetExcel-1

Download the Jet Express Setup & Jet Reports Objects from the site.

Run the Setup to install the Jet Express for Excel.

You may require Activation Code, which you can obtain following the instructions post setup.
Checkout upcoming posts for more details.

Development Tips, Instalation & Configuration, Jet Reports, Office Integration

Jet Express for Word – Objects for Navision 2015

Getting Started for Administrators

Overview

Microsoft introduced a new feature with Dynamics NAV 2015 which makes it easy and inexpensive for partners and end users to create and customize visually attractive document reports in NAV using Microsoft Word.

In collaboration with Microsoft, Jet Reports developed Jet Express for Word – an application that supports this process by providing users an easy-to-use interface inside Microsoft Word to create and modify these documents.

From where to download these objects

If you remember my previous post where I shared the link of download page. See here.

JetReportObjects-1
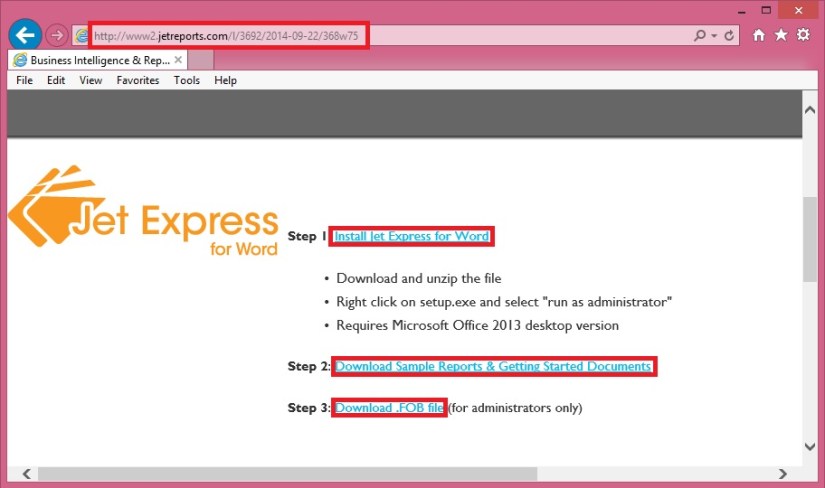
Refer to Step-3 in above screenshot.

Download the Objects from the Link.

Jet Express for Word includes four NAV reports and a set of sample sales documents.

These four NAV reports include:

 Report Number Name
14125500 Sales Order – Jet. Ex. Word
14125501 Sales Invoice – Jet. Ex. Word
14125502 Sales Cr. Memo – Jet. Ex. Word
14125503 Sales Quote – Jet. Ex. Word

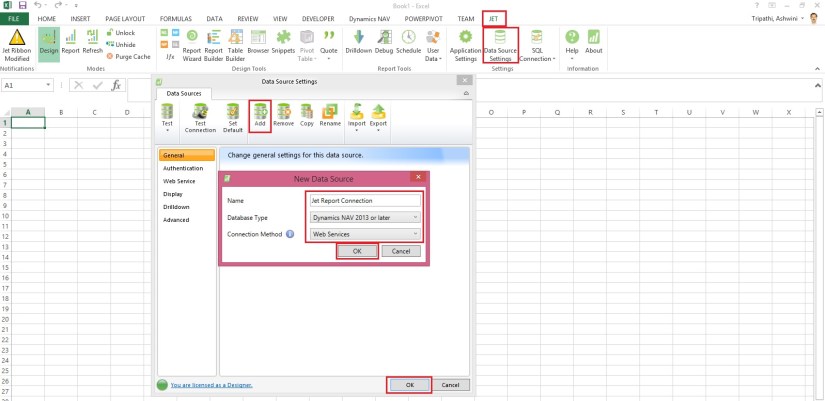
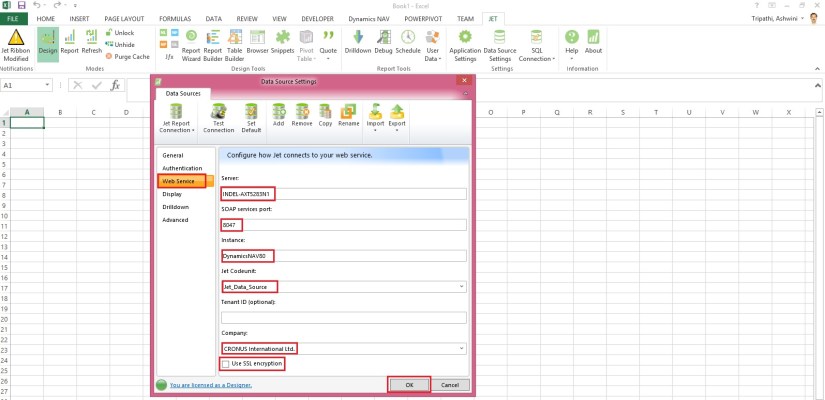
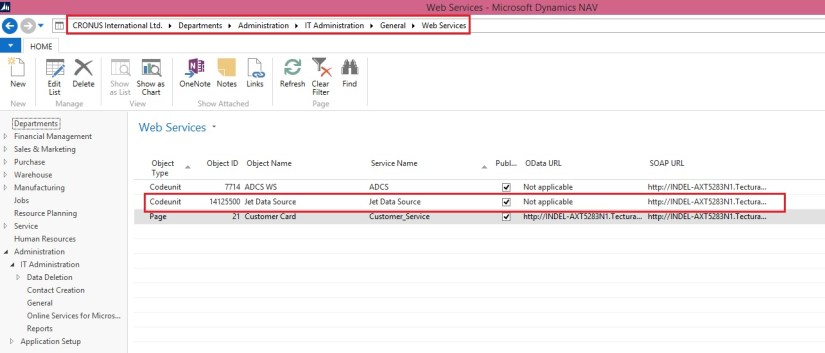
Installing these reports in NAV

These four reports are included in a .FOB file which is available from the Jet Express for Word website.

To install this .FOB file you will need access and permissions to the Microsoft Dynamics NAV Development Environment.

In this application select File > Import… and browse to find the downloaded .fob file.
JetReportObjects-2

JetReportObjects-3

JetReportObjects-4

Uninstalling Jet Express for Word documents

If you need to uninstall the Jet components from the Microsoft Dynamics NAV Server-

  • Open the Microsoft Dynamics NAV Development Environment and then connect to the database
  • Open the Object Designer (on the Tools menu, choose Object Designer)
  • Select All to see all business objects.

Select the business objects which were inserted (listed above), right-click and select Delete. When asked if you want to delete the selected lines click Yes.
JetReportObjects-5