Corfu Navision 2016, Functional Tips, How To, Information, Tip & Tricks

Create Production Orders for/from Sales Order

One of my reader have requested to demonstrate how he can create Sales Order which is directly associated with Sales Order.

Let us start with creating a Sales Order:

ProdOrder-1

Here you can see we don’t have Available Inventory to fulfil the demand of this Order.

ProdOrder-2

To fulfil the demand we will create Production Order for this Order.

Select Planning from Action TAB on Ribbon.

Sales Order Planning Window Opens, Select Create Production Order.

ProdOrder-3

Select the Status for Production Order as desired.

For Order Type you have 2 Options

  1. Item Order – Production Order is created for each Item on Lines
  2. Project Order – Single Production order for Entire Order

Select the desired option and respond to Yes.

ProdOrder-4

I have Selected Released & Project Order in my case.

ProdOrder-5

You can check that Quantity to be produced is reserved for this Order.

There could be the situation where you may have few Inventory available, in that case you need to reserve the quantity from Function before creating Production Order else all quantity will be created. In other case only short quantity will be a quantity of Production Order.

ProdOrder-6

Select the line from available lines in Item Ledger Entries (e.g. on hand inventory) and by using the ‘Reserve from Current Line’ function you can reserve those against the sales order line.  The ‘Reserved Quantity’ then gets updated and you can see the rest in the ‘Unreserved Quantity’ field.

ProdOrder-7

Although in this case entire line is already reserved from the Production Order.

But in case you want to reserve from any available Inventory in hand from Ledger entry.

This was one of the way how you can perform Creating Production Order and Reserving for Sales Order.

We can do the same by another way as below, directly creating Production Order for this Sales Order.

ProdOrder-8

Create a Production Order Select Source Type as Sales Header and Source No as Sales Order No.

Then Refresh the Production Order.

ProdOrder-9


ProdOrder-10


This way we can create and Reserve the Item for required demand.

I will come with more details in my upcoming posts.


Corfu Navision 2016, Demand, Development Tips, Functional Tips, How To, Information, Inventory, MPS, MRP, Tip & Tricks

Basics of Demand, Forecast, MPS & MRP

What is MPS?

MPS term is used for Master Production Schedule. It is used to plan items which have direct demand. Like Sales Order, Service Orders and Forecasts. It is run Weekly based on Orders and forecasts for that period.

What is MRP?

MRP term is used for Material Requirements Planning. It is used to plan items which have dependent demand. Like sub items used to produce FG or are defined in BOM. It is run Daily to expedit parts required to produce the plan.

What is Forecast?

Forecasting allows your company to create “what if” scenarios and efficiently and cost-effectively plan for and meet demand. Accurate forecasting can make a critical difference in customer satisfaction levels with regard to order promising dates and on-time delivery.

The forecasting functionality in the program can be used to create sales or production forecasts, in combination or independently.

What is Demand?

Calculation is done order-by-order, meaning that the order that includes the demand line with the earliest due date or shipment date is considered first, and all other demand lines in that production order, irrespective of their individual due dates or shipment dates, are also calculated for that order. When the calculation is completed, all unfulfilled demand is displayed as planning lines, sorted by the earliest demand date, with the various quantity fields filled in.

Actual demand is calculated from Sales Order, Service Orders, Components Needed, Job Planning Lines.

This demand is compared with the Forcasted demands like defined in Production Forecast.

Regenerative Plan is calculated as per Period, MPS, MRP and other provided parameters.

Lets understand this via a simple Example:

Step-1

Define Forecast for Item A as requirement of 1000 Qty for Jan Month.

Step -2

Run the Regenerative Plan, you will get the Planning for Item A with due date as 1st Jan of 1000 Qty.

Let us see what happens under different demand levels.

Scenario-1

When demand is less than Forecast for the month.

Let us Make a Sales Order for 200 Qty of Item A.

Lets see the impact of this on our Plan.

Sales demand is for 200 Qty

Forecast demand will be for 800 Qty (1000 – 200)

Actual demand in this case is of 200 Qty

If we run our Plan 2 lines will be created as below

a) 200 Qty with due date equivalent to Sales Order date

b) 800 Qty with due date as 1st Jan from Forecast

If we see our Total demand is still 1000 Qty

Scenario-2

When demand is equal to Forecast for the month.

Let us Make a Sales Order for 1000 Qty of Item A.

Lets see the impact of this on our Plan.

Sales demand is for 1000 Qty

Forecast demand will be for 0 Qty (1000 – 1000)

Actual demand in this case is of 1000 Qty

If we run our Plan 1 line will be created as below

a) 1000 Qty with due date equivalent to Sales Order date

If we see our Total demand is still 1000 Qty

Scenario-3

When demand is greater than Forecast for the month.

Let us Make a Sales Order for 1500 Qty of Item A.

Lets see the impact of this on our Plan.

Sales demand is for 1500 Qty

Forecast demand will be for 0 Qty

Actual demand in this case is of 1500 Qty

If we run our Plan 1 line will be created as below

a) 1500 Qty with due date equivalent to Sales Order date

If we see our Total demand is now 1500 Qty

Will comeup with more details in my upcomming posts.

Corfu Navision 2016, Development Tips, How To, Information, Inventory, Tip & Tricks

How Inventory is Calculated in Navision 2016

Today we will see terms used for Inventory and how Inventory is calculated in Navision.

InvProj-1

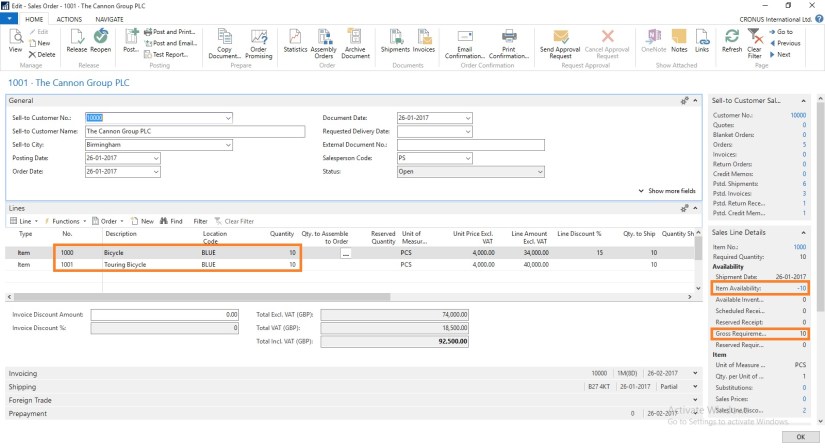
You can find details of Inventory on Item Card itself. Also how much Inventory is available or required at different area in ERP.

InvProj-2

If you open Item Availability by Location you will find in more details. When you drilldown you can find in more details from where these figure comes from.

Scheduled Receipts:

Here all the entries from below area is included:

a) Purchase Orders

b) Transfer Orders

c) Firm Planned Production Order

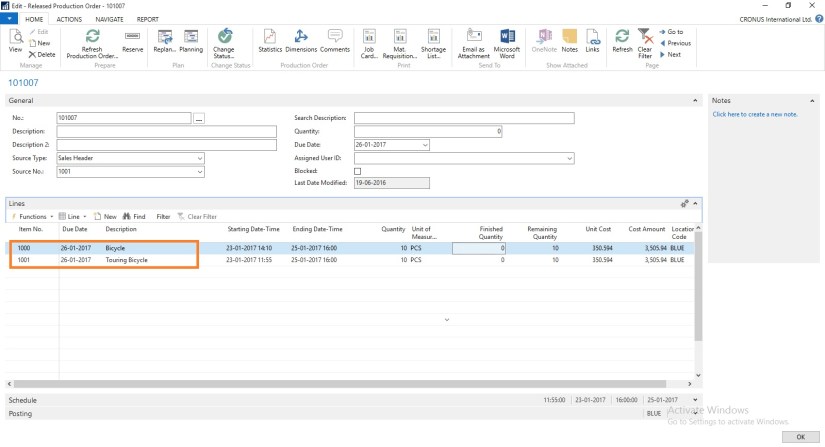
d) Release Production Order

e) Assembly Orders

How Navision calculates?

AvailType::”Scheduled Order Receipt”:
BEGIN
InsertEntry(DATABASE::”Purchase Line“,Item.FIELDNO(“Qty. on Purch. Order”),PurchLine.TABLECAPTION,Item.”Qty. on Purch. Order“);
InsertEntry(DATABASE::”Prod. Order Line“,Item.FIELDNO(“FP Order Receipt (Qty.)”),STRSUBSTNO(Text002,ProdOrderLine.TABLECAPTION),Item.”FP Order Receipt (Qty.)“);
InsertEntry(DATABASE::”Prod. Order Line“,Item.FIELDNO(“Rel. Order Receipt (Qty.)”),STRSUBSTNO(Text003,ProdOrderLine.TABLECAPTION),Item.”Rel. Order Receipt (Qty.)“);
InsertEntry(DATABASE::”Transfer Line“,Item.FIELDNO(“Qty. in Transit”),Item.FIELDCAPTION(“Qty. in Transit”),Item.”Qty. in Transit“);
InsertEntry(DATABASE::”Transfer Line“,Item.FIELDNO(“Trans. Ord. Receipt (Qty.)”),Item.FIELDCAPTION(“Trans. Ord. Receipt (Qty.)”),Item.”Trans. Ord. Receipt (Qty.)“);
InsertEntry(DATABASE::”Sales Line“,0,SalesLine.TABLECAPTION,Item.”Qty. on Sales Return“);
InsertEntry(DATABASE::”Assembly Header“,Item.FIELDNO(“Qty. on Assembly Order”),AssemblyHeader.TABLECAPTION,Item.”Qty. on Assembly Order“);
END;

Planned Receipts:

Here all the entries from below area is included:

a) Planned Production Order

b) Planning Worksheet

c) Requisition Worksheet

How Navision calculates?

AvailType::”Planned Order Receipt”:
BEGIN
InsertEntry(DATABASE::”Requisition Line“,Item.FIELDNO(“Purch. Req. Receipt (Qty.)”),ReqLine.TABLECAPTION,Item.”Purch. Req. Receipt (Qty.)“);
InsertEntry(DATABASE::”Prod. Order Line“,Item.FIELDNO(“Planned Order Receipt (Qty.)”),STRSUBSTNO(Text000,ProdOrderLine.TABLECAPTION),Item.”Planned Order Receipt (Qty.)“);
END;

Gross Requirement:

Here all the entries from below area is included:

a) Sales Order

b) Transfer Order

c) Firm Planned Production Order Components

d) Released Production Order Components

e) Job Planning Lines

f) Service Orders

g) Assembly Orders Components

How Navision calculates?

AvailType::”Gross Requirement”:
BEGIN
InsertEntry(DATABASE::”Sales Line“,Item.FIELDNO(“Qty. on Sales Order”),SalesLine.TABLECAPTION,Item.”Qty. on Sales Order“);
InsertEntry(DATABASE::”Service Line“,Item.FIELDNO(“Qty. on Service Order”),ServLine.TABLECAPTION,Item.”Qty. on Service Order“);
InsertEntry(DATABASE::”Job Planning Line“,Item.FIELDNO(“Qty. on Job Order”),JobPlanningLine.TABLECAPTION,Item.”Qty. on Job Order“);
InsertEntry(DATABASE::”Prod. Order Component“,Item.FIELDNO(“Scheduled Need (Qty.)”),ProdOrderComp.TABLECAPTION,Item.”Scheduled Need (Qty.)“);
InsertEntry(DATABASE::”Planning Component“,Item.FIELDNO(“Planning Issues (Qty.)”),PlanningComponent.TABLECAPTION,Item.”Planning Issues (Qty.)“);
InsertEntry(DATABASE::”Transfer Line“,Item.FIELDNO(“Trans. Ord. Shipment (Qty.)”),Item.FIELDCAPTION(“Trans. Ord. Shipment (Qty.)”),Item.”Trans. Ord. Shipment (Qty.)“);
InsertEntry(DATABASE::”Purchase Line“,0,PurchLine.TABLECAPTION,Item.”Qty. on Purch. Return“);
InsertEntry(DATABASE::”Assembly Line“,Item.FIELDNO(“Qty. on Asm. Component”),AssemblyLine.TABLECAPTION,Item.”Qty. on Asm. Component“);
END;

Planned Order Releases:

How Navision calculates?

AvailType::”Planned Order Release”:
BEGIN
InsertEntry(DATABASE::”Requisition Line“,Item.FIELDNO(“Purch. Req. Release (Qty.)”),ReqLine.TABLECAPTION,Item.”Purch. Req. Release (Qty.)“);
InsertEntry(DATABASE::”Prod. Order Line“,Item.FIELDNO(“Planned Order Release (Qty.)”),STRSUBSTNO(Text001,ProdOrderLine.TABLECAPTION),Item.”Planned Order Release (Qty.)“);
InsertEntry(DATABASE::”Requisition Line“,Item.FIELDNO(“Planning Release (Qty.)”),ReqLine.TABLECAPTION,Item.”Planning Release (Qty.)“);
END;

Finally we can calculate Projected Available Inventory as below formula:

Inventory + Scheduled Receipts + Planned Receipts – Gross Requirement

thats all for today, will come with more information in my upcomming posts.


Extension Package, Functional Tips, How To, Information, Instalation & Configuration, Maderia, Tip & Tricks, Updates

First update of Project “Madeira” is released – June 2016

What does this update includes?


Filter on unprocessed incoming documents


The list of incoming documents is now filtered to show only entries that have not been used to create posted documents with.

When documents are posted, the processed flag is set to Yes, such that incoming documents that have been processed into posted documents are filtered out.

You can choose to view all incoming documents in the list if desired, using the show Show All action.

You can also manually switch the processing flag.


Office Suite notifications are now enabled in Project “Madeira”


In the top right corner, next to the Settings menu, you will notice the bell symbol that you probably already know well from other Office products: That’s the Notifications menu.

Here you will receive notifications such as new mail and calendar reminders directly while working in Project “Madeira”.


New extensions, such as Sana Commerce for Project “Madeira” and ChargeLogic Payments that provides payment and credit card processing capabilities.


In Project “Madeira”, the Extension Management window lists all available extensions. Some extensions are provided by Microsoft, and other extensions are provided by other companies.

With the first update of Project “Madeira”, extensions have been added by other providers, and Madeira refer to the websites that these companies provide for more information.

Sana Commerce is the integrated B2B e-commerce platform for Project “Madeira” that helps wholesale, distribution and manufacturing companies efficiently run their business, improve their customer service and ultimately generate more revenue through easy online order processing and a 24/7 online access of product information. See the Sana Commerce website.

With ChargeLogic Notify, you can automatically deliver customized, targeted emails directly from Project “Madeira” for invoices, orders, shipments, returns, and sales quotes. Clearly provide the exact information you want with the exact look you want to increase customer satisfaction, promote your brand, and drive business. Using a powerful template system and business rules, you’ll be able to create personalized content and custom designs in an email format and send them to all parties associated with a communication. See the ChargeLogic website. .


For further details checkout Link and this Link.


Corfu Navision 2016, Data, Data Model, Development Tips, Dynamics Content Package, Functional Tips, How To, Information, Jet Reports, Permission, Power Bi Content Pack, PowerBI.com, Report, Tip & Tricks

Plug & Play – Power BI and Jet Enterprise in NAV 2016

This is where Power BI and Jet Enterprise really shine – they have the ability to understand NAV because they have little bundles of interpretation packs that can interpret NAV for you!

Checkout more via below shared link :-

http://www.catapulterp.com/plug-and-play-power-bi-and-jet-enterprise-in-nav-2016/

Corfu Navision 2016, Development Tips, How To, Information, Instalation & Configuration, Server, Tip & Tricks

Multilanguage across Conflicting Text Encoding Formats

For more details please see my earlier posts:

Managing Multilanguage support in Navision Overview

How do I translate my ResX Files?

Working with Partner Translation Toolkit

To support users with translated strings across conflicting text encoding formats, you must save the translations to a text file in UTF-8 text encoding format.

This converts the file to Unicode, which Microsoft Dynamics NAV Development Environment cannot import. Instead, you add the files to a dedicated Translations folder on the Microsoft Dynamics NAV Server computer.

The default location of this folder is

C:\Program Files\Microsoft Dynamics NAV\90\Service\Translations.

When you have more than one service instance, there is a Translations folder for each service instance, such as

C:\Program Files\Microsoft Dynamics NAV\90\Service\Instances\MyInstance\Translations.

Microsoft Dynamics NAV Server adds any strings in text files that you place in the relevant Translations folder to the metadata for Microsoft Dynamics NAV.

To add translated strings for a conflicting text encoding format:

In the development environment, export the strings for the objects that you want to translate.

Translate-1

Select the Objects you wish to add translation, Export and save as text file.

Translate the strings in the resulting text file into desired Language by using your preferred translation process.

Translate-2

I have translated following Captions in Khmer language:

  1. For Field Name & Search Name in Table Customer (18)
  2. TextConstant in Report CustList (50000) to display Caption for Name & Search Name
  3. Caption for User defined variable in Page Customer Card (21)

When translations are complete, save the translated strings into a text file in the UTF-8 text encoding format. The extension of the file must be .txt.

It is recommend that you remove the other Language strings from the Unicode file before you copy it to the Microsoft Dynamics NAV Server computer.

Microsoft Dynamics NAV Server queries the Translations folder for updated strings, and for performance reasons the folder should only contain strings that you cannot import into the development environment because of conflicting codepages.

Copy the UTF-8 file to the equivalent of

C:\Program Files\Microsoft Dynamics NAV\90\Service\Translations

on the Microsoft Dynamics NAV Server computer.

When you have more than one service instance, there is a Translations folder for each service instance, such as

C:\Program Files\Microsoft Dynamics NAV\90\Service\Instances\MyInstance\Translations.

Restart the Microsoft Dynamics NAV Server instance.

Microsoft Dynamics NAV Server adds the translated strings in the file to the metadata store for the Microsoft Dynamics NAV deployment.

Now Users of this Microsoft Dynamics NAV Server session can now change the user interface language from English to required Language.

The metadata store is updated whenever you add new strings to the Translations folder and then restart the Microsoft Dynamics NAV Server service instance. Cached strings are not deleted from the metadata store when you restart the service instance.


Let us see the effect of this translation. Let’s run the RTC to see the net effect of same.

[A] Customer List in English However Data Stored in Khmer Language

Translate-3

B] Two Captions Changed in Khmer Language for Name & Search Name

Translate-4

[C] Customer Card in English Language. Selected Captions are changed in Khmer Language

Translate-5

[D] Caption Changed for Name & Search Name to Support Khmer Language also for Field not available in Table the Test Caption

Translate-6

[E] Report Caption in English Language however data in Khmer Language

Translate-7

[F] Report Caption Changed to Khmer Language for Name & Search Name

Translate-8

You can manage Languages using above trick for translate strings across conflicting text encoding formats.

Will comeup with more details in my upcomming posts.


Cumulative Updates, Functional Tips, How To, India Localization, Information, Tip & Tricks

Krishi Kalyan Cess Feature for Microsoft Dynamics NAV 2013 R2 for India Released

Government has introduced a new Cess called ‘Krishi Kalyan Cess (KKC)’ in Finance Act 2016 which will take effect from 01-Jun-2016. It is imposed on all taxable Services at the rate of 0.5%. KKC is not a Cess on Service Tax but it is a tax on taxable services in addition to Service tax. It would be calculated in the same way as Service Tax is being calculated.

Download

IN7.1_TFS167310 – Krishi Kalyan Cess [9.04 MB – EXE]

Installation

Before this update can be installed, the following prerequisites are required:
Microsoft Dynamics ® NAV 2013 R2 India
Pre-requisites

  • NAV 2013 R2 RTM Database (Version 7.10.35473)
  • Import below Hotfixes sequentially
No. TFSID Fixes Description
1 TFS353595 TDS Zero Percent
2 TFS354411 FVU 3.9-4.1 and TDS Zero Pct
3 HF377555 GL Inconsistency
4 TFS160375 Swachh Bharat Cess


License Requirement

No new objects have been added through this update. Licensing refresh is not required.


Setup

The following fields are added to Service Tax Setup , setup values given below

S. No Field Description Value
1. KK Cess % 0.5
2. KK Cess Payable Account Balance  Sheet Account under Liabilities and Account Type = Posting
3. KK Cess Payable Interim Balance  Sheet Account under Liabilities and Account Type = Posting
4. KK Cess Receivable Interim Account Balance  Sheet Account under Assets and Account Type = Posting
5. KK Cess Receivable Account Balance  Sheet Account under Assets and Account Type = Posting
6. KK Cess Expense Account Income Statement Account and Account Type = Posting

For detailed information you can check this Link.


Development Tips, Functional Tips, How To, Maderia, Tip & Tricks

Setup Send Documents by Email in Madeira

To enable emails from within Project “Madeira”, start the Set Up Email assisted setup on the Home page. We have already seen this in our previous post, you can find it here.

To offer your customers to pay for sales electronically using a payment service, such as PayPal, you can also have the PayPal information and hyperlink inserted in the email body. We have already covered this in our previous post, you can find it here.

From all supported documents, you initiate emailing by choosing the Send action, on posted documents, or the Post and Send action, on non-posted documents.

Let us Setup document-specific email body for sales invoices.

From the search page find Report Selections Sales:

SetupEmail-10

Fill the Value as shown in below screen in same sequence.

SetupEmail-11

If you want to offer customers to pay for sales electronically, you can set up the related payment service, such as PayPal, and then have the PayPal information and hyperlink inserted in the email body as well. We have already covered this in our previous post, you can find it here.

Will come up with more details & feature explaination in my upcomming posts.


Development Tips, Functional Tips, How To, Maderia, Tip & Tricks

How do I process Sales Return? – In Maderia

We have seen in our previous post the feature where if a posted sales invoice has not yet been paid, then you can use the Correct or Cancel functions on the posted sales invoice to automatically reverse the involved transactions.

There could be the situation where customer wants partial refund or return of sales.

You can create the Credit Memo from the Posted Sales Invoice, which will create the Credit Memo for you and leave to you to modify and post the credit memo.

Most fields on the sales credit memo header are filled with the information from the posted sales invoice. You can edit all the fields, with new information that reflects the return agreement.

You can apply the Customer Entries via selecting the line with the posted sales document that you want to apply the sales credit memo to.

The posted sales documents that you applied the credit memo to are now reversed, and a refund payment can be created for the customer.

The sales credit memo is removed and replaced with a new document in the list of posted sales credit memos.

Let us see how we can achieve this in Madeira.


CorrectCancelSalesInvoice-12

Select the Sales Invoice and open it for action.

CorrectCancelSalesInvoice-13

Select Create Corrective Credit Memo.

CorrectCancelSalesInvoice-14

Perform the required correction and choose Apply Entries.

CorrectCancelSalesInvoice-15

Select the document to which you want this Credit Memo to be adjusted.

CorrectCancelSalesInvoice-16

Once Application is done, Post the Credit Memo.

Respond to Yes to post the Credit Memo.

Respond to Yes to Open the posted Credit Memo.

CorrectCancelSalesInvoice-17

This is the posted Credit Memo for the Invoice.

Let us check the Ledger for this Customer:

CorrectCancelSalesInvoice-18

Here you can see the net effect of the Credit Memo on Invoice.

Thats all for this post will come up with more features and details in my upcomming posts.


Development Tips, Functional Tips, How To, Maderia, Tip & Tricks

Correct or Cancel Unpaid Sales Invoices – in Madeira

Sometimes Invoices are posted in mistake or customer demands changes in invoice after posting.

Once the payment is initiated, partially or fully paid correction or cancellation is not allowed from Posted Sales Invoice itself. In such case you need to follow traditional way of doing so by passing Sales Credit Memo to Cancel the Sale and reimburse to customer manually.


What happens when you select Correct Action?

The Posted Invoice for which you say correct that invoice gets cancelled and new Sales Invoice with same information is created.

Naturally to maintain the integrity of data new Sales Invoice is created with new Document No.

A Sales Credit Memo for previous Invoice is created to void the effect of initial posted Sales Invoice.

The Canceled and Paid is marked on initial posted Sales Invoice document.


What happens when you select Cancel Action?

The Posted Invoice for which you say correct that invoice gets cancelled.

A Sales Credit Memo for previous Invoice is created to void the effect of initial posted Sales Invoice.

The Canceled and Paid is marked on initial posted Sales Invoice document.


Important Points:-

If the Canceled check box is selected, then you cannot correct or cancel the posted sales invoice because it has already been corrected or canceled.

Once the payment is initiated, partially or fully paid correction or cancellation is not allowed from Posted Sales Invoice itself.


Let us see how it works in Madeira:-

Login with your credentials to Madeira project.


CorrectCancelSalesInvoice-1

From the Navigation Bar choose Sales.

CorrectCancelSalesInvoice-2

Select Posted Sales Invoice. And choose to open the posted Sales Invoice.

CorrectCancelSalesInvoice-3

Select Correct to Modify the Invoice.

CorrectCancelSalesInvoice-4

Select Yes to continue with the process.

CorrectCancelSalesInvoice-5

Make the required modification to the Invoice and post it.

CorrectCancelSalesInvoice-6

Select Yes to continue with posting.

CorrectCancelSalesInvoice-7

Select Yes to continue.

CorrectCancelSalesInvoice-8

This is new modified Invoice that got posted.

Let us move to the original Invoice which we corrected.

CorrectCancelSalesInvoice-9

Select Show Corrective Credit Memo.

CorrectCancelSalesInvoice-10

This is the Credit Memo posted against the Invoice which we corrected.

CorrectCancelSalesInvoice-11

You can see the Closed and Canceled is Marked to TRUE.