Development Tips, Jet Reports, Office Integration, Report

What’s New in Jet Reports for Word, How it is different from Navision Word Reports

Before we compare both the way of creating report in word, the features I would be suggesting you to review the posts which I have posted earlier Word Document Reports and Custom Layouts to refresh the concept of creating reports in Word.

Let’s start with comparing how it is different from Navision Word Report.

Create a custom layout for the report you wish to use

In your NAV client navigate to Report Layout Selection (Administration/IT Administration/ Reports).

Microsoft Dynamics NAV 2015 includes several sample Word reports including:

14125500             Sales Order – Jet Ex. Word

14125501             Sales Invoice – Jet Ex. Word

14125502             Sales Cr. Memo – Jet Ex. Word

14125504             Sales Quote – Jet Ex. Word

I have filtered the above Reports.

Select the report that you wish to customize. (I am Using 14125500 for this example)
CustomiseJetReport-1
Click Custom Layouts.

 To create a new Report Layout, click New.

A pop-up window will appear and allow you to choose the layout type.

Check the Insert Word Layout box and click OK.

CustomiseJetReport-2

CustomiseJetReport-3

In the Report Layouts window, you can change the Description.

Click OK

In the NAV Custom Report Layouts window, highlight the layout you wish to use and click the Import Layout button from the ribbon.

Browse to the Jet Express for Word Sample Documents, choose the template you want and click Open
CustomiseJetReport-4
Click Edit Layout to customize this layout.

CustomiseJetReport-5

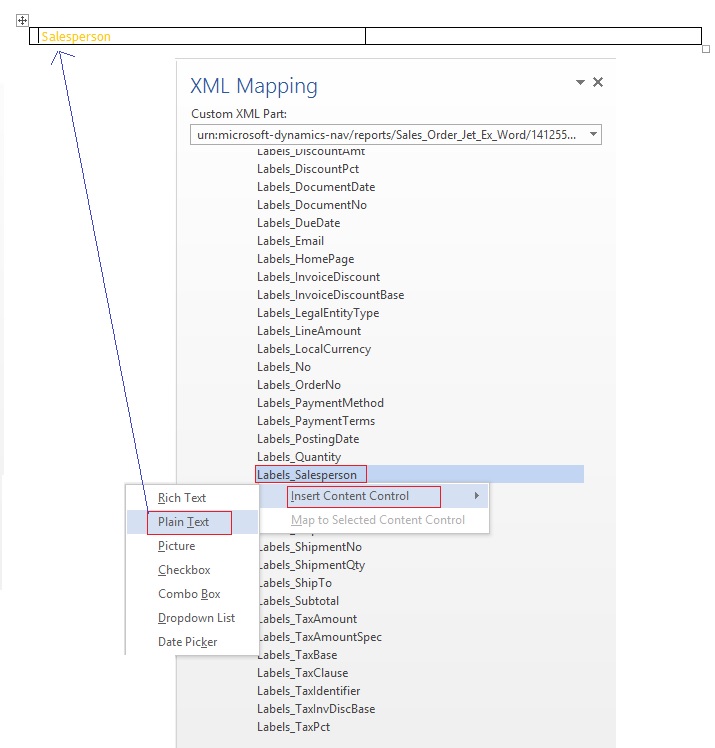
Above screenshot show how to Access the XML part of the Report.

Left side shows Jet->Design

Right side shows Developer->XML Mapping Pane

If you remember In Navision word Report we use to select the Custom XML Part from the dropdown to access the available fields, Labels etc.

Whereas if we see In Jet Report this is not required.

Also you may have observed that Jet Report Pane Have search option, which makes easy to find desired fields rather than scrolling through the XML Nodes to access the desired Fields.
CustomiseJetReport-6

You may observe in above picture that I have typed the part of the Field I am looking for and Jet Report Pane suggested that Similar to what I typed there is a Field “Salesperson” and it available under 2 heads Labels & Header data items.

If I require to insert the Labels or Fields, Place the cursor at desired place where you want that Field to be inserted and Double Click to the Field from Jet Report Pane.
CustomiseJetReport-7
Where as to perform same action in Navision Word Place the cursor where we wish to Insert the Field then we use to Scroll to the Field we wish to insert then we perform step Right Click->Insert Content Control->Plain Text
CustomiseJetReport-8
I will come up with more details in my next post. We will see how we can design the Report Using Jet Report fast and easily.

Also some Best Practice, Tip & Tricks while using Jet Reports.

How To, Instalation & Configuration

How to: Test the ADCS Connection

The following procedure demonstrates how to use Windows Services and Telnet to test your Automated Data Capture System connection.

Before you can begin, you must install the ADCS component as part of a customized installation of Microsoft Dynamics NAV. For more information, see my earlier post Installing ADCS

To configure and start the Microsoft Dynamics NAV VT100 Plugin service

From the Windows Start menu, in the Start Search box, enter services.msc, and then press the Enter key. The Services window opens.

Right-click the Microsoft Dynamics NAV VT100Plugin service, and then choose Properties.

To specify the user account that the service can use to log on, choose the Log On tab.
ADCS-11
To specify an account, choose This account, choose Browse, and then specify a user account in the Select User dialog box. When you are finished, choose the OK button. The format is as follows:

<Domain>\<Windows User ID>

Note: To complete testing, you must also add the same user to Microsoft Dynamics NAV, with an appropriate permission set.

Type the password for the user account in Password and in Confirm password, and then choose the OK button.

On the General tab, choose Start.

To verify that the service is running

Start the Windows Event Viewer. From the Windows Start menu, in the Start Search box, enter eventvwr.msc, and then press the Enter key.

In the Windows Logs console tree, choose Application, and then locate event information for the Microsoft Dynamics NAV VT100 Plugin.
ADCS-12
Testing Your Connection

In the following procedure, you will open a terminal connection and use HyperTerminal to simulate using handheld devices. HyperTerminal is a program that you can use to connect to other computers, Telnet sites, bulletin board systems (BBSs), online services, and host computers. HyperTerminal connections are made using a modem, a null modem cable (used to emulate modem communication), or an Ethernet connection.

Note: HyperTerminal is no longer included with Windows. You can usually find a free downloadable version on the Internet.

To test your ADCS connection

Start your HyperTerminal application.

Enter a name for the connection. Choose the OK button.

In the Connect Using list, select TCP/IP (Winsock).

The following table describes the details of a local installation on one machine.

Detail Description Example
Host Address IP address of the machine that is running the VT100 Plug-in service. localhost
Port Number Port number that the VT100 Plug-in is listening on. 6666

Choose the OK button. The HyperTerminal window opens.
ADCS-13
Enter a user ID and password. Press Enter after every step.
ADCS-14
Select a warehouse activity option. For example, enter 1 in the Choose field if you want to simulate working with pick documents.
ADCS-15
You can review the data about warehouse picks in Microsoft Dynamics NAV. For example, you can use the data in the CRONUS International Ltd. demonstration database to send information from and to Microsoft Dynamics NAV.

Note: To see the interaction between Microsoft Dynamics NAV and ADCS, in CRONUS International Ltd., you can use warehouse activities that are located in the White warehouse. It is preconfigured to use ADCS.

How To, Instalation & Configuration

How to: Configure ADCS Options

Before you can work with Automated Data Capture Systems (ADCS), you have to configure Microsoft Dynamics NAV by modifying the VT100Plugin configuration file.

Important: Modification of the configuration file should only be performed by a system administrator.

To modify and update the ADCS configuration file for the terminal listener

Locate and open the NavisionVT100Plugin.exe.config configuration file. It is typically located in the following location: C:\Program Files (x86)\Microsoft Dynamics NAV\80\Automated Data Capture System.
ADCS-9
For the Terminal element, update the attributes in the configuration file using attributes as described in the following table. You specify the attribute values in quotation marks.

Attribute Description
listenIP Required. IP address that specifies where to listen for terminal connections.
listenPort Required. Positive integer that specifies the port number to listen for terminal connections.
stylesheet Required. Path to transformation style sheet, which transforms warehouse functions to terminal keycodes. Two style sheets are provided with the ADCS installation.
screenLines Optional. Positive integer that specifies the number of screen lines. The default is 5.
screenWidth Optional. Positive integer that specifies the screen width. The default is 30.
codePage Optional. Positive integer that specifies the codepage. The default is the system codepage defined in HKey_Local_Machine\SYSTEM\CurrentControlSet\Control\Nls\CodePage\ACP.
terminalTimeout Optional. Positive integer that specifies the terminal time-out in milliseconds. The default is 65000 and cannot be fewer than 6000.
debugDirectory Optional. Output directory for debug data.

For the Endpoints element, update the attributes in the configuration file and modify an endpoint to support your processes. You can also add more endpoints. The following table provides some options.

Attribute Description
defaultType Optional. defaultType is an attribute of the Endpoints element. It specifies what type of endpoint to use when no type is specified, if you want to customize it. The default is the NavEndpoint type.
name Required. Endpoint name. The name must be unique.
url Required. Endpoint URL address.

Note: This attribute does not have to be included if the clientEndpointName attribute is specified.

type Optional. Fully qualified name of a non-default endpoint.
clientEndpointName Optional. Windows Communications Foundation client endpoint configuration name. If specified, a WCF configuration with the specified name must exist.

The following example describes the XML for a Terminal element and the Endpoints element. It adds one endpoint for Microsoft Dynamics NAV.

In my case the config file will be as below:
ADCS-10

======================================================================

<?xml version=”1.0″?>

<configuration>

<configSections>

<section name=”VT100″ type=”Microsoft.Dynamics.Nav.Adcs.Configuration.VT100ConfigurationSection, Microsoft.Dynamics.Nav.VT100Plugin”/>

</configSections>

<VT100>

<Warehouse>

<Endpoints>

<add name=”NavWSEndpoint” url=”http://indel-axt5283n1.tecturacorp.net:8047/DynamicsNAV80/WS/CRONUS%20International%20Ltd./Codeunit/ADCS”/&gt;

<!– Azure deployment example: –>

<!–<add name=”NavWSEndpoint” url=”https://CloudService:7047/DynamicsNAV/WS/CRONUS%20International%20Ltd/Codeunit/ADCS&#8221; UserName=”NavUser” Password=”NavUserPassword” />–>

</Endpoints>

</Warehouse>

<Terminal listenPort=”6666″ listenIP=”127.0.0.1″ stylesheet=”VT100_W2k_and_OtherClients.xsl”/>

</VT100>

<startup><supportedRuntime version=”v4.0″ sku=”.NETFramework,Version=v4.5″/></startup></configuration>

=============================================================================

Security

By default, the NavEndpoint uses the security settings that you have specified for web services generally. You can configure additional security by changing the configuration of Microsoft Dynamics NAV Server and matching that configuration in the VT100Plugin configuration service.

How To, Instalation & Configuration

How to: Enable Web Services for ADCS

To use Automated Data Capture System, you must enable the ADCS web service.

To enable and publish the ADCS web service

Start the RoleTailored client.

In the Search box, enter Web Services, and then choose the related link.

On the Home tab, choose New.

In the Web Services window, enter the following information on a new line:

Field Value
Object Type Codeunit
Object ID 7714
Service Name ADCS

Important: It is required that you name the service ADCS.

Select the Published check box.

Choose the OK button.
ADCS-7
To verify that the web service has been published

In a web browser window, enter a URL in the following format: http://<web services path>/Services. The following example demonstrates the results.

In my case:

http://indel-axt5283n1.tecturacorp.net:8047/DynamicsNAV80/WS/Services

You see the following XML information if the ADCS web service is published.
ADCS-8

To verify that the codeunit is performing as expected, enter a URL in the following format: http://<web services path>/Codeunit/<Service Name>.

http://indel-axt5283n1.tecturacorp.net:8047/DynamicsNAV80/WS/CRONUS%20International%20Ltd./Codeunit/ADCS

Information about the ADCS web service is displayed.

How To, Instalation & Configuration

How to: Add Users for ADCS

You can add any user as a user of an Automated Data Capture System (ADCS). When you do this, the user must also provide a password. Optionally, you can also provide a connection that identifies the ADCS user as a warehouse employee. The ADCS user password can be different from the Windows logon password of the user.

To add an ADCS user

In the Search box, enter ADCS Users, and then choose the related link.

On the Home tab, choose New to add a new user.

In the Name field, enter a name for the user. The name cannot contain more than 20 characters, including spaces.

In the Password field, enter a password. The password is masked.
ADCS-5
To indicate that a warehouse employee is an ADCS user

In the Search box, enter Warehouse Employees, and then choose the related link.

If needed, add a new warehouse employee

On the Home tab, in the Manage group, choose Edit List.

Select a warehouse employee from the list. In the ADCS User field, choose the drop-down arrow, and then select the name of an ADCS user from the list.

Note : The default warehouse for the employee should be one that uses ADCS
ADCS-6

Development Tips, How To

How to: Install a Windows Client Control Add-in Assembly

Microsoft Dynamics NAV Windows client control add-ins are provided in one or more Microsoft Framework .NET-based assemblies, which are .dll files. Control add-in assemblies must be installed on the following computers:

  • Computers that are running the Microsoft Dynamics NAV Windows client. Any Microsoft Dynamics NAV Windows client instance that will use the control add-ins, must be installed with the control add-in assemblies. Control add-in assemblies are not installed with the default Microsoft Dynamics NAV Windows client installation.
  • Computer that is running the Microsoft Dynamics NAV Development Environment. After a control add-in is installed, you use the development environment to register the control add-in the Client Add-in table in the Microsoft Dynamics NAV database and set it up on pages.

Optionally, if a control add-in has the same name as the assembly, you can install the assembly on the computer that is running Microsoft Dynamics NAV Server instead of the client computer.

To install control add-in assemblies on the Microsoft Dynamics NAV Windows client

  • If needed, install the Microsoft Dynamics NAV Windows client on the computer.
  • On the computer that is running the Microsoft Dynamics NAV Windows client, copy the assemblies that contain the control add-ins to the Add-ins folder of the Microsoft Dynamics NAV Windows client installation.
    • By default, the path of this folder is C:\Program Files (x86)\Microsoft Dynamics NAV\80\RoleTailored Client\Add-ins.

You can also include assemblies in a subfolder of the Add-ins folder. This can be useful if you have multiple assemblies and dependencies.

To install control add-in assemblies on the development environment computer

  • If needed, install the development environment on the computer.
  • On the computer that is running the development environment, create a folder named Add-in in the development environment installation folder.
    • By default, the path of this folder is C:\Program Files\Microsoft Dynamics NAV\80\Classic. If the Add-in folder already exists, then ignore this step.
  • Copy the assemblies that contain the control add-ins to the Add-ins folder.

You can also include assemblies in a subfolder of the Add-ins folder. This can be useful if you have multiple assemblies and dependencies.

Installing Control Add-ins on Microsoft Dynamics Server for Automatic Deployment

If a control add-in has the same name as the assembly, then you can install the assembly on computer that is running Microsoft Dynamics NAV Server. When an operation from the client requires the control add-in, Microsoft Dynamics NAV Server automatically deploys the assembly to a temporary folder on the client computer.

For example, if Microsoft Dynamics NAV Windows client opens a page that contains a control add-in, Microsoft Dynamics NAV Server will find the control add-in assembly by name in the Add-ins folder. Then, it deploys the assembly to the client computer in the %TEMP%\Microsoft Dynamics NAV\Add-Ins folder of the user who is running the client. The deployed assembly will be then be used whenever the page is opened.

Similarly, if the development environment requires a control add-in, for example, when you compile an object, then the control add-in assembly will be deployed by the Microsoft Dynamics NAV Server to the local temporary folder for the current user on the computer that is running the development environment.

To be deployed, an assembly must comply with the following Microsoft Dynamics NAV Server configuration settings: Chunk Size, Max Upload Size, and Prohibited File Types.

If the control add-in assembly is updated and its version number changes, Microsoft Dynamics NAV Server will deploy the updated assembly to the client computer the next time that the client requests the assembly. The updated assembly is put in a subfolder of the %TEMP%\Microsoft Dynamics NAV\Add-Ins folder, where the subfolder has the assembly’s version number as its name. This implementation means that you do have to remove the older versions of assemblies that are stored on the client computer.

Before Microsoft Dynamics NAV Server deploys an assembly to a client, the client looks for the assembly in the local Add-ins folder (for example, C:\Program Files (x86)\Microsoft Dynamics NAV\80\RoleTailored Client\Add-ins). If the assembly is not found, then the client will request the assembly from Microsoft Dynamics NAV Server.

To install the control add-in on Microsoft Dynamics NAV Server

  • On the computer that is running the Microsoft Dynamics NAV Server, copy the assembly that contains the control add-in to the Add-ins folder of the Microsoft Dynamics NAV Server installation.

By default, the path is C:\Program Files\Microsoft Dynamics NAV\80\Service\Add-ins.

Development Tips, How To

How to: Set .NET Framework Types to Run on the Microsoft Dynamics NAV Windows Client or Microsoft Dynamics NAV Server Computers

Here is the brief description for how to set .NET Framework objects that are instantiated by DotNet variables to target either the Microsoft Dynamics NAV Windows client or Microsoft Dynamics NAV Server.

By default, a type is set to target Microsoft Dynamics NAV Server. However, you can set the type to target the Microsoft Dynamics NAV Windows client.

Setting the .NET Framework Type to Target the Microsoft Dynamics NAV Windows Client

To set a .NET Framework type instance to target the Microsoft Dynamics NAV Windows client, you must complete the following tasks:

  • Set the DotNet variable for the .NET Framework type to target the Microsoft Dynamics NAV Windows client.
  • Copy the .NET Framework assembly to the computer that is running the Microsoft Dynamics NAV Windows client.

You must copy the assembly to each computer that is running the Microsoft Dynamics NAV Windows client. If the assembly is included in the global assembly cache, then you do not have to do this task.

For the Microsoft Dynamics NAV Web client, you cannot implement Microsoft .NET Framework interoperability objects that target the client.

To set the .NET Framework type to target the Microsoft Dynamics NAV Windows client

  • In Object Designer, open the C/AL code of the Microsoft Dynamics NAV object that uses .NET Framework interoperability.
  • Do one of the following steps:
    • For a global variable, on the View menu, choose C/AL Globals.
    • For a local variable, select the trigger that uses the variable, and then on the View menu, choose C/AL Locals.
    • On the Variables tab, select the DotNet variable, and then on the View menu, choose Properties.
    • In the Properties window, set the RunOnClient property to Yes

To copy a .NET Framework assembly to a computer that is running the Microsoft Dynamics NAV Windows client

    • On the computer that is running the Microsoft Dynamics NAV Windows client, copy the.NET Framework assembly to the Add-ins folder of the Microsoft Dynamics NAV Windows client installation.

By default, the path of this folder is C:\Program Files\Microsoft Dynamics NAV\80\RoleTailored Client\Add-ins or C:\Program Files (x86)\Microsoft Dynamics NAV\80\RoleTailored Client\Add-ins.

You can also put assemblies in a subfolder of the Add-ins folder. This can be useful when you have multiple versions of the same assemblies and dependencies.

Setting the .NET Framework Type to Target Microsoft Dynamics NAV Server

To set a .NET Framework type instance to target Microsoft Dynamics NAV Server, you must complete the following tasks:

  • Set the variable for the NET Framework type to target Microsoft Dynamics NAV Server.
  • Copy the .NET Framework assembly to the computer that is running Microsoft Dynamics NAV Server.

If the assembly is included in the global assembly cache of the computer that is running Microsoft Dynamics NAV Server, then you do not have to do this task.

To set the .NET Framework type to target Microsoft Dynamics NAV Server

  • In the development environment, in Object Designer, open the object that uses the .NET Framework variable.
  • Do one of the following steps:
    • For a global variable, on the View menu, choose C/AL Globals.
    • For a local variable, in the C/AL Editor, select the trigger that uses the DotNet variable, and then on the View menu, choose C/AL Locals.
    • On the Variables tab, select the NET Framework variable type, and then on the View menu, choose Properties.
    • In the Properties window, set the RunOnClient property to No

To copy a .NET Framework assembly to the computer that is running Microsoft Dynamics NAV Server

    • On the computer that is running Microsoft Dynamics NAV Server, copy the.NET Framework assembly to the Add-ins folder of the Microsoft Dynamics NAV Server installation folder.

By default, the path of the Microsoft Dynamics NAV Server installation folder is C:\Program Files\Microsoft Dynamics NAV\80\Service\Add-ins.

You can also put assemblies in a subfolder of the Add-ins folder. This can be useful when you have multiple assemblies and dependencies.

If you are working in the development environment, to compile and test Microsoft Dynamics NAV objects, you must also copy the assembly to the Add-ins folder of the Microsoft Dynamics NAV Windows client installation on the computer that is running the development environment. By default, the path of this folder is C:\Program Files\Microsoft Dynamics NAV\80\RoleTailored Client\Add-ins or C:\Program Files (x86)\Microsoft Dynamics NAV\80\RoleTailored Client\Add-ins.

Development Tips

How to list Virtual Tables in Navision

You may have seen several posts listing the Virtual tables. Most of they say you create page/form and type in one by one table id in Range (2000000001.. 2000000200) and find the Virtual Tables and note them.

Today I will demo you easy way for getting this list with no additional efforts.

You will get below table list in every posts. I have listed tables below in Nav-2015.

Object Designer Virtual Itself from Virtual Table
Type ID Name   Object Type Object ID Object Name
Yes Table 2000000001 Object
1 2000000004 Permission Set Table 2000000004 Permission Set
1 2000000005 Permission Table 2000000005 Permission
1 2000000006 Company Table 2000000006 Company
Yes Table 2000000007 Date
Yes Table 2000000009 Session
Yes Table 2000000020 Drive
Yes Table 2000000022 File
Yes Table 2000000026 Integer
Yes Table 2000000028 Table Information
Yes Table 2000000029 System Object
Yes Table 2000000038 AllObj
Yes Table 2000000039 Printer
Yes Table 2000000040 License Information
Yes Table 2000000041 Field
Yes Table 2000000043 License Permission
Yes Table 2000000044 Permission Range
Yes Table 2000000045 Windows Language
Yes Table 2000000048 Database
Yes Table 2000000049 Code Coverage
1 2000000053 Access Control Table 2000000053 Access Control
Yes Table 2000000055 SID – Account ID
Yes Table 2000000058 AllObjWithCaption
Yes Table 2000000063 Key
1 2000000065 Send-To Program Table 2000000065 Send-To Program
1 2000000066 Style Sheet Table 2000000066 Style Sheet
1 2000000067 User Default Style Sheet Table 2000000067 User Default Style Sheet
1 2000000068 Record Link Table 2000000068 Record Link
1 2000000069 Client Add-in Table 2000000069 Client Add-in
1 2000000071 Object Metadata Table 2000000071 Object Metadata
1 2000000072 Profile Table 2000000072 Profile
1 2000000073 User Personalization Table 2000000073 User Personalization
1 2000000074 Profile Metadata Table 2000000074 Profile Metadata
1 2000000075 User Metadata Table 2000000075 User Metadata
1 2000000076 Web Service Table 2000000076 Web Service
1 2000000078 Chart Table 2000000078 Chart
1 2000000079 Object Tracking Table 2000000079 Object Tracking
1 2000000080 Page Data Personalization Table 2000000080 Page Data Personalization
1 2000000100 Debugger Breakpoint Table 2000000100 Debugger Breakpoint
Yes Table 2000000101 Debugger Call Stack
Yes Table 2000000102 Debugger Variable
Yes Table 2000000103 Debugger Watch Value
1 2000000104 Debugger Watch Table 2000000104 Debugger Watch
1 2000000110 Active Session Table 2000000110 Active Session
1 2000000111 Session Event Table 2000000111 Session Event
1 2000000112 Server Instance Table 2000000112 Server Instance
1 2000000114 Document Service Table 2000000114 Document Service
1 2000000120 User Table 2000000120 User
1 2000000121 User Property Table 2000000121 User Property
1 2000000130 Device Table 2000000130 Device
Yes Table 2000000135 Table Synch. Setup

All marked as Yes in above table under Virtual column are all the Virtual Tables.

I have not type one by one in the Page/form to get this list.

The Virtual table itself in Navision lists the Virtual tables in Navision. List can be different depending on the Version of Navision you see them.

Today I will share you smart way of finding this list of Virtual tables.

Next time you need not to do so hard work to list all the Virtual tables.

Here too you need to create a list page but you will not be required to key in the id of tables one by one, in fact only one table id which will give answers to your query.
VirtualTables-1
Save and execute your Page/Form.

VirtualTables-2
Now go to object Designer. Copy all the tables with id in range defined above and paste in Excel.

Copy above table list in Excel side by side and compare as above table shown in beginning of the post. All those which don’t match are your Virtual tables.

So easy, if anything is available why to waste effort for same.

It always good to share what you know with community, by this way we keep learning from each other.

Stay tuned for many such Tips.

Development Tips

How to create and install a test certificate for the Microsoft Dynamics NAV Server computer

To start with this exercise you need to first create certificate and certificate revocation list, if not yet created refer to previous post.

Previous Step Link- How to create a root CA and a private key file by using the makecert.exe utility

Previous Step Link- How to create certificate revocation list for the root certification authority

Let’s start with this exercise:

  • At the command prompt, type the following command:

makecert -sk NavServiceCert -iv RootNavServiceCA.pvk -n “CN=NavServiceCert” -ic RootNavServiceCA.cer -sr localmachine -ss my -sky exchange -pe NavServiceCert.cer

Note

This command specifies the subject’s certificate name as NavServiceCert. You need this certificate name when you configure the Microsoft Dynamics NAV Windows client or Microsoft Dynamics NAV Web Server components.

Certificate-13

  • When you are prompted, enter the password that you used to create the root CA.
  • Select the Trusted Root Certificate Authorities node, and then refresh the snap-in.

You now have the NavServiceCert.cer certificate file in your temporary folder. The certificate is installed under the Personal node in the Certificates Snap-in.

Certificate-14
In next step we will now grant access to the certificate’s private key to the service account on computer running Microsoft Dynamics NAV Server.

Next Step Link- How to grant access to the certificate’s private key to the service account for the Microsoft Dynamics NAV Server computer