Development Tips, Excel, Instalation & Configuration, Jet Reports, Office Integration, Report

Installing and Publishing the Jet Business Objects on the Microsoft Dynamics Server

To install the .fob file open the Microsoft Dynamics NAV Development Environment and then connect to the database.

  • Open the Object Designer (on the Tools menu, choose Object Designer)
  • Import the .fob file (on the File menu, choose Import)
  • Locate the import file (Jet Reports Objects.fob), and then choose Open.
  • The .fob file includes modified objects. When prompted choose Yes to import all objects.
  • Verify that no objects are to be skipped. Objects are skipped if the version of the object in the database is later than the one in the .fob file.
  • Choose the OK button to import the .fob file.

The .fob file installs a set of business objects in the range of 14125500-14125504 and Table 14125600.
JetExcel-3
Jet Express users must have Read, Insert, Modify, Delete (RIMD-) permissions to Table 4125600 “Jet Cancellation”.

Checkout upcoming posts for more information.

Development Tips, Excel, Instalation & Configuration, Jet Reports, Office Integration, Report

Installing Jet Express for Excel – Navision 2015

Jet Express is an Excel add-in which must be installed each client machine. The client machines must have Excel installed.

Download the current version of Jet Express

  • Download the version of the product that matches your version of Microsoft Office (either 32-bit or 64-bit).
  • Microsoft Office 2007 is 32-bit.
  • If you are using Microsoft Office 2010 you can determine this by selecting the File On your version of Excel.
  • Button in your Excel ribbon and then selecting either Help or Account, depending
  • If you attempt to install the wrong version you will receive an error message and the application will not install.
  • Run the .exe file.
  • If you receive a message asking “Do you want to allow the following product to make
  • Changes on this computer?” select YES.

Once Jet Report is installed, when you open your Excel you will get new Tab as Jet.
JetExcel-2

Checkout upcoming posts for more Information.

Development Tips, Excel, Instalation & Configuration, Jet Reports, Office Integration, Report

Jet Report for Excel – Navision 2015

In my previous posts I introduced with Jet Report for Word.

Please see here. Links below:-

Jet Express for Word Overview & Installation – for Navision 2015

Jet Express for Word – Objects for Navision 2015

What’s New in Jet Reports for Word, How it is different from Navision Word Reports

Customize the Report layout using Jet Express for Word

You can access the resource for Jet Report Excel from this Link.

JetExcel-1

Download the Jet Express Setup & Jet Reports Objects from the site.

Run the Setup to install the Jet Express for Excel.

You may require Activation Code, which you can obtain following the instructions post setup.
Checkout upcoming posts for more details.

Development Tips, Jet Reports, Office Integration, Report

Customize the Report layout using Jet Express for Word

Click Edit Layout to customize this layout
JetReportDesign-1

The Jet Express for Word action panel may automatically open when this word file is opened.

If not, select the Jet Ribbon

Click on the Design icon

This presents a tree hierarchy of the fields from the selected report. 
JetReportDesign-2

Click on the icons on the hierarchy to expand or contract the lists.

The Search field makes it easy to find the fields you need.

Labels – NAV reports which were created by Jet Reports include a section for Labels. These fields are the descriptions of the fields themselves.

If you have multiple languages in your NAV instance, these labels can be helpful for creating multi-language documents.

Other Groupings – NAV reports which were created by Jet Reports include sections for Company, Customer, etc. These fields include the values of the fields.

The user can select from fields including Header or Lines in the hierarchy and insert an item, typically into a table in the Word document.
JetReportDesign-3

To add a field select the desired location in the Word document and double-click on the field.

Alternatively, you can select the field and click on the Insert button in the Jet Express for Word action panel.

To Add a picture to a document, right-click on the item and select Insert Picture
JetReportDesign-4

The Lines fields are also inserted as text and can be replicated by a Right-click, and choosing “Insert Repeater”.

Repeating items (such as Sales lines on a Sales order) can be added to a document.
JetReportDesign-5

Best practice for this is to create a table in Word that is two rows high.

The first row contains the Labels of the fields that you wish to include.

The second row contains the values of the fields.

Select the entire second row- include the area just to the right of the last column.

Right-click on the item in the hierarchy that you want to repeat and select Insert

To delete an item, click on it, and then click on its Title.
JetReportDesign-6
When you click on the Title it will change color.

Then press the Delete Button on your keyboard.

Note: It’s important to select the Title when deleting to avoid any leftover data.

When you have completed your changes Save your Word document
JetReportDesign-7
This will return you to NAV and prompt you to import the report layout changes.
JetReportDesign-8
Click Yes

You can Run Report to review your changes.
JetReportDesign-9
Here is the output for the report below.
JetReportDesign-10
We are done with customization of the report using Jet Reports.

I will come up with more details in my upcoming posts.

Development Tips, Jet Reports, Office Integration, Report

What’s New in Jet Reports for Word, How it is different from Navision Word Reports

Before we compare both the way of creating report in word, the features I would be suggesting you to review the posts which I have posted earlier Word Document Reports and Custom Layouts to refresh the concept of creating reports in Word.

Let’s start with comparing how it is different from Navision Word Report.

Create a custom layout for the report you wish to use

In your NAV client navigate to Report Layout Selection (Administration/IT Administration/ Reports).

Microsoft Dynamics NAV 2015 includes several sample Word reports including:

14125500             Sales Order – Jet Ex. Word

14125501             Sales Invoice – Jet Ex. Word

14125502             Sales Cr. Memo – Jet Ex. Word

14125504             Sales Quote – Jet Ex. Word

I have filtered the above Reports.

Select the report that you wish to customize. (I am Using 14125500 for this example)
CustomiseJetReport-1
Click Custom Layouts.

 To create a new Report Layout, click New.

A pop-up window will appear and allow you to choose the layout type.

Check the Insert Word Layout box and click OK.

CustomiseJetReport-2

CustomiseJetReport-3

In the Report Layouts window, you can change the Description.

Click OK

In the NAV Custom Report Layouts window, highlight the layout you wish to use and click the Import Layout button from the ribbon.

Browse to the Jet Express for Word Sample Documents, choose the template you want and click Open
CustomiseJetReport-4
Click Edit Layout to customize this layout.

CustomiseJetReport-5

Above screenshot show how to Access the XML part of the Report.

Left side shows Jet->Design

Right side shows Developer->XML Mapping Pane

If you remember In Navision word Report we use to select the Custom XML Part from the dropdown to access the available fields, Labels etc.

Whereas if we see In Jet Report this is not required.

Also you may have observed that Jet Report Pane Have search option, which makes easy to find desired fields rather than scrolling through the XML Nodes to access the desired Fields.
CustomiseJetReport-6

You may observe in above picture that I have typed the part of the Field I am looking for and Jet Report Pane suggested that Similar to what I typed there is a Field “Salesperson” and it available under 2 heads Labels & Header data items.

If I require to insert the Labels or Fields, Place the cursor at desired place where you want that Field to be inserted and Double Click to the Field from Jet Report Pane.
CustomiseJetReport-7
Where as to perform same action in Navision Word Place the cursor where we wish to Insert the Field then we use to Scroll to the Field we wish to insert then we perform step Right Click->Insert Content Control->Plain Text
CustomiseJetReport-8
I will come up with more details in my next post. We will see how we can design the Report Using Jet Report fast and easily.

Also some Best Practice, Tip & Tricks while using Jet Reports.

Development Tips, Instalation & Configuration, Jet Reports, Office Integration

Jet Express for Word – Objects for Navision 2015

Getting Started for Administrators

Overview

Microsoft introduced a new feature with Dynamics NAV 2015 which makes it easy and inexpensive for partners and end users to create and customize visually attractive document reports in NAV using Microsoft Word.

In collaboration with Microsoft, Jet Reports developed Jet Express for Word – an application that supports this process by providing users an easy-to-use interface inside Microsoft Word to create and modify these documents.

From where to download these objects

If you remember my previous post where I shared the link of download page. See here.

JetReportObjects-1
Refer to Step-3 in above screenshot.

Download the Objects from the Link.

Jet Express for Word includes four NAV reports and a set of sample sales documents.

These four NAV reports include:

 Report Number Name
14125500 Sales Order – Jet. Ex. Word
14125501 Sales Invoice – Jet. Ex. Word
14125502 Sales Cr. Memo – Jet. Ex. Word
14125503 Sales Quote – Jet. Ex. Word

Installing these reports in NAV

These four reports are included in a .FOB file which is available from the Jet Express for Word website.

To install this .FOB file you will need access and permissions to the Microsoft Dynamics NAV Development Environment.

In this application select File > Import… and browse to find the downloaded .fob file.
JetReportObjects-2

JetReportObjects-3

JetReportObjects-4

Uninstalling Jet Express for Word documents

If you need to uninstall the Jet components from the Microsoft Dynamics NAV Server-

  • Open the Microsoft Dynamics NAV Development Environment and then connect to the database
  • Open the Object Designer (on the Tools menu, choose Object Designer)
  • Select All to see all business objects.

Select the business objects which were inserted (listed above), right-click and select Delete. When asked if you want to delete the selected lines click Yes.
JetReportObjects-5

Development Tips, Instalation & Configuration, Jet Reports, Office Integration, Report

Jet Express for Word Overview & Installation – for Navision 2015

Jet Express for Word is a new feature available to Microsoft Dynamics users which makes it easy for end users to design documents in Microsoft Word. This feature is part of Jet Express for Microsoft Dynamics NAV and is available to Microsoft Dynamics NAV 2015 users.

Modify Reports in Microsoft Word

Need to change the layout of an invoice or credit memo? Just open the document in Microsoft Word to make changes in a program you already know—no programming required.

Provided you already have reports developed by the Navision professionals. You can only make Layout, Look & Feel changes. For any business logic or including/excluding fields in report will be handled from Navision only as we do.

Design with Flair

You can use document templates that provided by Jet Reports, templates from the Office Store, or create a document from scratch. Add company logos, change fonts, modify fields and customize for multiple regions easily.

Easy to Use

The simple interface allows you to customize or create document layouts using Microsoft Word. Your fields appear in clear text and the search feature makes it quick to add the fields you need.

New functionality in Microsoft Dynamics NAV 2015 allows you to import these document layouts into NAV and run them from within the NAV client.

Software Requirements

  • Microsoft Dynamics NAV 2015
  • Office 2013 Desktop Edition

Supported Languages

  • English, Danish, Dutch, French, German and Spanish
  • More languages will be added soon

Where to get Jet Report Installation Files

You can use this Link, Visit to Jet Reports site here.

JetReportInstallation-1

JetReportInstallation-2

– Download the Jet_Express_for_Word_Installer.zip file

– Right-click the zipped file and select “Extract All”

– Right-click the file “setup.exe” and choose “Run as administrator”

JetReportInstallation-3

JetReportInstallation-4

JetReportInstallation-5

Verifying the Installation

Open the Word and you will find one more TAB in Ribbon. [JET]

JetReportInstallation-6

Just in case you don’t find the Tab, Follow below set to enable the same, provided your Installation was successful in previous step without any error.

JetReportInstallation-7

Developer -> COM Add-Ins

Check if Jet Express for Word is enabled, if not select it and say OK.

If already enabled but still you don’t see, disable and enable again. Restart your word now you will be able to see the JET TAB.

I will come up with more information in my upcoming posts.

Instalation & Configuration

ADCS Overview

The Automated Data Capture System (ADCS) solution provides a way for Microsoft Dynamics NAV to communicate with handheld devices through web services. You can test your solution by using the VT100 plug-in.

Note: MS recommend that you install Microsoft Dynamics NAV Server and the VT100 plug-in on separate computers.

Overview and Architecture

ADCS enables you to accurately capture data for inbound, outbound, and internal documents, primarily for warehouse activities.

For example, you can have users scan the bar codes of items in your warehouse as they perform daily tasks, and that information is recorded from these handheld device activities in Microsoft Dynamics NAV.
ADCS-16
Microsoft Dynamics NAV Server processes the data coming to in from the handheld devices via the plug-in and sends the appropriate response back to the handheld devices via the plug-in.

An XML format is used to send and receive the data.

The VT100 plug-in makes sure that the response from Microsoft Dynamics NAV is directed to the correct handheld device. This reduces the load on the server.

The VT100 plug-in provides the link between the server and the Access Points for the handheld devices and acts as a virtual Telnet server.

All connection requests and data transmissions are handled by this service, and the incoming native protocol is transformed into standard XML that the server can interpret.

After a request has been transformed, the request is forwarded by the VT100 plug-in to the server.

When a reply is received, it is converted from XML into the native protocol of the handheld device.

Function keys are mapped using an XSLT file that you can modify. After the data has been transformed and formatted, it is forwarded to the handheld device.

Design Overview

The following illustration provides a simple diagram of ADCS. The part of the illustration that is shaded, which does not include ADCS, represents what could be developed.
ADCS-17
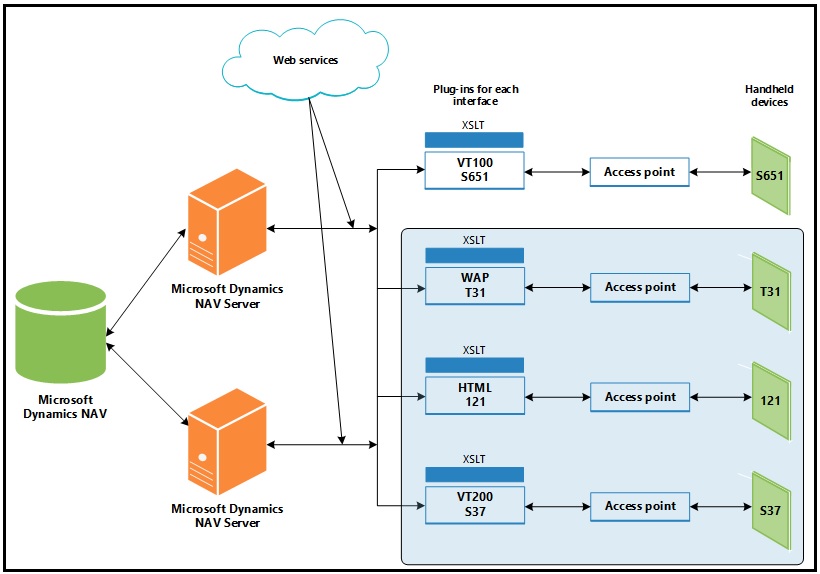
Consider the following when you deploy an ADCS solution:

You can configure multiple instances of Microsoft Dynamics NAV Server on a single computer, but each instance can only access one company.

Therefore, if you want to access several companies from the same computer, you must configure several Microsoft Dynamics NAV Server instances for NAS Services.

You can only install one instance of the VT100 plug-in on a single computer. The VT100 plug-in can only serve one company but it can communicate with multiple instances of Microsoft Dynamics NAV Server.

This means that all of the instances of the server that use the same VT100 plug-in can only access the same company.

If you want to communicate with more than one company, you must install the VT100 plug-in on more than one computer, one for each company.

Each of the VT100 plug-in installations must then use a separate Microsoft Dynamics NAV Server to access one of the companies.

Note: You can also install the VT100 plug-in multiple times on the same computer, one for each company.

Supported Devices

An ADCS device includes devices such as bar code readers or optical character readers that are used to mechanize the entry of information into the database.

All character-based handheld devices that have a VT100 interface will work with ADCS, although you may have to implement minor adjustments with some models.

When you use a handheld device, you must be able to connect either the Access Point or the RF terminal to the IP or port address of the ADCS server.

If you want to use a graphics-based handheld device, you will have to develop your own plug-in.

You can connect multiple handheld devices to the VT100 plug-in.

However, if performance becomes an issue, you can always add an additional Microsoft Dynamics NAV Server and direct the VT100 plug-in to also connect with the new server to improve performance.

For Step wise Step Installation & Configuration, please follow below posts in order listed below:

Automated Data Capture System Requirements

Installing ADCS

How to: Add Users for ADCS

How to: Enable Web Services for ADCS

How to: Configure ADCS Options

How to: Test the ADCS Connection

How To, Instalation & Configuration

How to: Test the ADCS Connection

The following procedure demonstrates how to use Windows Services and Telnet to test your Automated Data Capture System connection.

Before you can begin, you must install the ADCS component as part of a customized installation of Microsoft Dynamics NAV. For more information, see my earlier post Installing ADCS

To configure and start the Microsoft Dynamics NAV VT100 Plugin service

From the Windows Start menu, in the Start Search box, enter services.msc, and then press the Enter key. The Services window opens.

Right-click the Microsoft Dynamics NAV VT100Plugin service, and then choose Properties.

To specify the user account that the service can use to log on, choose the Log On tab.
ADCS-11
To specify an account, choose This account, choose Browse, and then specify a user account in the Select User dialog box. When you are finished, choose the OK button. The format is as follows:

<Domain>\<Windows User ID>

Note: To complete testing, you must also add the same user to Microsoft Dynamics NAV, with an appropriate permission set.

Type the password for the user account in Password and in Confirm password, and then choose the OK button.

On the General tab, choose Start.

To verify that the service is running

Start the Windows Event Viewer. From the Windows Start menu, in the Start Search box, enter eventvwr.msc, and then press the Enter key.

In the Windows Logs console tree, choose Application, and then locate event information for the Microsoft Dynamics NAV VT100 Plugin.
ADCS-12
Testing Your Connection

In the following procedure, you will open a terminal connection and use HyperTerminal to simulate using handheld devices. HyperTerminal is a program that you can use to connect to other computers, Telnet sites, bulletin board systems (BBSs), online services, and host computers. HyperTerminal connections are made using a modem, a null modem cable (used to emulate modem communication), or an Ethernet connection.

Note: HyperTerminal is no longer included with Windows. You can usually find a free downloadable version on the Internet.

To test your ADCS connection

Start your HyperTerminal application.

Enter a name for the connection. Choose the OK button.

In the Connect Using list, select TCP/IP (Winsock).

The following table describes the details of a local installation on one machine.

Detail Description Example
Host Address IP address of the machine that is running the VT100 Plug-in service. localhost
Port Number Port number that the VT100 Plug-in is listening on. 6666

Choose the OK button. The HyperTerminal window opens.
ADCS-13
Enter a user ID and password. Press Enter after every step.
ADCS-14
Select a warehouse activity option. For example, enter 1 in the Choose field if you want to simulate working with pick documents.
ADCS-15
You can review the data about warehouse picks in Microsoft Dynamics NAV. For example, you can use the data in the CRONUS International Ltd. demonstration database to send information from and to Microsoft Dynamics NAV.

Note: To see the interaction between Microsoft Dynamics NAV and ADCS, in CRONUS International Ltd., you can use warehouse activities that are located in the White warehouse. It is preconfigured to use ADCS.

How To, Instalation & Configuration

How to: Configure ADCS Options

Before you can work with Automated Data Capture Systems (ADCS), you have to configure Microsoft Dynamics NAV by modifying the VT100Plugin configuration file.

Important: Modification of the configuration file should only be performed by a system administrator.

To modify and update the ADCS configuration file for the terminal listener

Locate and open the NavisionVT100Plugin.exe.config configuration file. It is typically located in the following location: C:\Program Files (x86)\Microsoft Dynamics NAV\80\Automated Data Capture System.
ADCS-9
For the Terminal element, update the attributes in the configuration file using attributes as described in the following table. You specify the attribute values in quotation marks.

Attribute Description
listenIP Required. IP address that specifies where to listen for terminal connections.
listenPort Required. Positive integer that specifies the port number to listen for terminal connections.
stylesheet Required. Path to transformation style sheet, which transforms warehouse functions to terminal keycodes. Two style sheets are provided with the ADCS installation.
screenLines Optional. Positive integer that specifies the number of screen lines. The default is 5.
screenWidth Optional. Positive integer that specifies the screen width. The default is 30.
codePage Optional. Positive integer that specifies the codepage. The default is the system codepage defined in HKey_Local_Machine\SYSTEM\CurrentControlSet\Control\Nls\CodePage\ACP.
terminalTimeout Optional. Positive integer that specifies the terminal time-out in milliseconds. The default is 65000 and cannot be fewer than 6000.
debugDirectory Optional. Output directory for debug data.

For the Endpoints element, update the attributes in the configuration file and modify an endpoint to support your processes. You can also add more endpoints. The following table provides some options.

Attribute Description
defaultType Optional. defaultType is an attribute of the Endpoints element. It specifies what type of endpoint to use when no type is specified, if you want to customize it. The default is the NavEndpoint type.
name Required. Endpoint name. The name must be unique.
url Required. Endpoint URL address.

Note: This attribute does not have to be included if the clientEndpointName attribute is specified.

type Optional. Fully qualified name of a non-default endpoint.
clientEndpointName Optional. Windows Communications Foundation client endpoint configuration name. If specified, a WCF configuration with the specified name must exist.

The following example describes the XML for a Terminal element and the Endpoints element. It adds one endpoint for Microsoft Dynamics NAV.

In my case the config file will be as below:
ADCS-10

======================================================================

<?xml version=”1.0″?>

<configuration>

<configSections>

<section name=”VT100″ type=”Microsoft.Dynamics.Nav.Adcs.Configuration.VT100ConfigurationSection, Microsoft.Dynamics.Nav.VT100Plugin”/>

</configSections>

<VT100>

<Warehouse>

<Endpoints>

<add name=”NavWSEndpoint” url=”http://indel-axt5283n1.tecturacorp.net:8047/DynamicsNAV80/WS/CRONUS%20International%20Ltd./Codeunit/ADCS”/&gt;

<!– Azure deployment example: –>

<!–<add name=”NavWSEndpoint” url=”https://CloudService:7047/DynamicsNAV/WS/CRONUS%20International%20Ltd/Codeunit/ADCS&#8221; UserName=”NavUser” Password=”NavUserPassword” />–>

</Endpoints>

</Warehouse>

<Terminal listenPort=”6666″ listenIP=”127.0.0.1″ stylesheet=”VT100_W2k_and_OtherClients.xsl”/>

</VT100>

<startup><supportedRuntime version=”v4.0″ sku=”.NETFramework,Version=v4.5″/></startup></configuration>

=============================================================================

Security

By default, the NavEndpoint uses the security settings that you have specified for web services generally. You can configure additional security by changing the configuration of Microsoft Dynamics NAV Server and matching that configuration in the VT100Plugin configuration service.