Development Tips, Excel, How To, Jet Reports, Office Integration, Report

Using Jet Report NL Function

 
Returns fields or record keys from a table based on filters. Duplicates report templates.
 
Note:
If the NL function is making copies of a template, it must be the only function in the cell.
The functions =-NL(“Rows”) and =NL(“Rows”)*-1 are not valid.
 
NLFunction-1
 
Example:

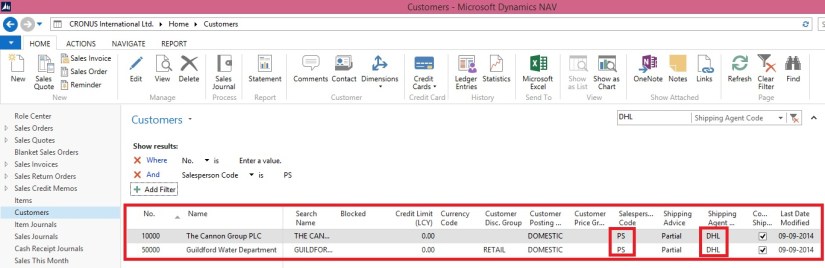
=NL(“Rows”,”Customer”,,”Salesperson Code”,”PS”,”Shipping Agent Code”,”DHL”)

This NL returns the record key for all the Customer with Salesperson Code = ‘PS’ and Shipping Agent Code as ‘DHL’
 
NLFunction-2

If you specify multiple filters, they combine in a logical AND.
 
NLFunction-3

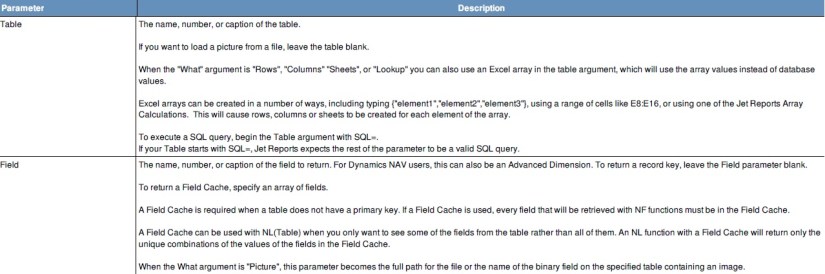
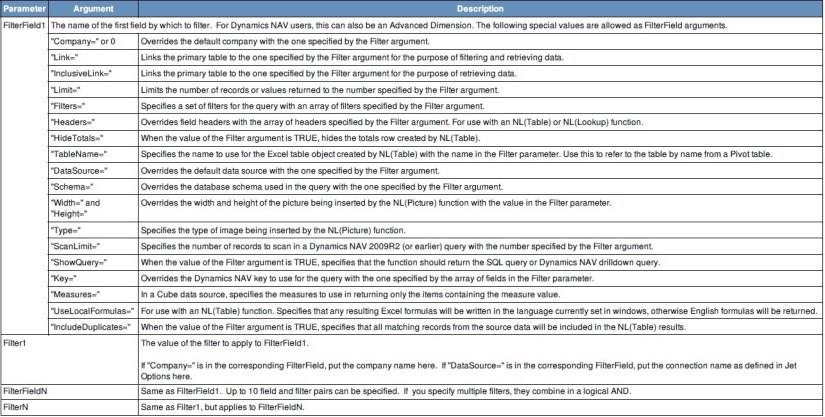
NL Function Parameters & Arguments with brief Description.
 
NLFunction-4
NLFunction-5
NLFunction-6

Navision Cronus NL Function Examples:

This NL that returns the record key for all of the customers in the Customer table who are in the City of Boston with a Balance less than zero

=NL(“Rows”,”Customer”,,”Balance”,”<0″,”City”,”Boston”)

This NL returns the Customer Name from sales quote number 10000. This NL can only return one record so the “What” parameter is blank

=NL(,”Sales Header”,”Name”,”No.”,”10000″,”Document Type”,”Quote”)

This NL returns information for a company other than the default one in the Options screen

=NL(“Rows”,”Customer”,,”0″,”CRONUS USA, Inc.”)

This NL returns information for a company other than the one in the Options screen using a connection other than the default.

=NL(“Rows”,”Customer”,,”0″,”CRONUS USA, Inc.”,”DataSource=”,”2″)

This NL creates sheets called “US”,”CANADA” and “MEXICO” using an array in the table field

=NL(“Sheets”,{“US”,”CANADA”,”MEXICO”})

This NL creates lookup values for use with Report Options for each item in cells F5 through F15.

=NL(“Lookup”,F5:F15,”My Values”)


See my upcoming posts for more details and uses of this function.


Development Tips, Instalation & Configuration, Jet Reports, Office Integration, Report

Using the Jet Ribbon Jet Essentials 2015 Update 1 for Navision 2015

Jet ribbon in Excel has been modified to make it easier to use.
JetRibbon-1

Some items have been moved so as to provide better grouping of related items.  Other (less-common) items do not display by default.

Additionally, the Function Wizard (“Jfx”) has been replaced by four smaller icons…
JetRibbon-2

which allow you to easily select what type of Jet function you would like to place in your report.

You have a great deal of control over which items appear on the ribbon.  Simply go to the “Jet Ribbon” section of the Jet Essentials Application Settings..
JetRibbon-3

Place a check next to those items you do want on the ribbon and uncheck those that you do not want to see.

Checkout Upcoming posts for more information.

Development Tips, Excel, Instalation & Configuration, Jet Reports, Office Integration, Report

Uninstalling Jet Express

If you need to uninstall Jet express from a client machine-

From the Start Menu select Programs and Features find the Jet Express application, right click and select Uninstall.

If you need to uninstall the Jet components from the Microsoft Dynamics NAV 2015 Server- 

  • Open the Microsoft Dynamics NAV Development Environment and then connect to the database
  • Open the Object Designer (on the Tools menu, choose Object Designer)
  • Select all to see all business objects.
  • Select all the business objects in the 14125500-509 range, right-click and select delete.

When asked if you want to delete the selected lines click yes.

Also remove the Web Service Entry too.

Also remove the Navision Instance, if created dedicated for Jet.

Checkout Upcoming posts for more information.

Development Tips, Excel, Instalation & Configuration, Jet Reports, Office Integration, Report

Specify your Jet Interface Language

You can specify the language of your Jet Express interface.

  • Select Application Settings from the Jet Ribbon
  • Select the Language tab or General tab depending upon version you are using.
  • Pick the user interface language that you wish to use.
  • Click OK

JetExcel-9
You will need to restart Excel for the user interface language change to take effect.

Checkout Upcoming posts for more information.

Development Tips, Excel, Instalation & Configuration, Jet Reports, Office Integration, Report

Configuring a Data Source in Jet Express

Select Data Source Settings from the Jet Ribbon

Use the Data Source Version drop down button and select “Dynamics NAV 2013 and later”.

JetExcel-6

Select the Web Service Tab

  • Enter the Server, SOAP Services Port and Instance.
  • If your Web Service is configured to use SSL encryption then check the “Use SSL encryption” box.
  • Pick the Jet_Data_Source codeunit.
  • Pick your default Company.
  • Click Test Connection to ensure connectivity.
  • Click OK.

JetExcel-7
Checkout Upcoming posts for more information.

Development Tips, Excel, Instalation & Configuration, Jet Reports, Office Integration, Report

Publishing the Jet Data Source Codeunit to the Web Service

Microsoft Dynamics NAV 2015 includes a “Jet Data Source” codeunit which must be published to enable Jet Essentials or Jet Express to operate. This can be published using the Microsoft Dynamics NAV Role Tailored Client (RTC).

To publish this code unit, inside the RTC go to Departments > Administration > IT Administration > General and select Web Services.

JetExcel-4
Publish the Jet Data Source code unit by selecting New from the Web services ribbon

  • Object Type: Codeunit
  • Object ID: 14125500
  • Service Name: Jet Data Source
  • And check the box to publish.
  • Click OK

Checkout Upcoming posts for more information.

Development Tips, Excel, Instalation & Configuration, Jet Reports, Office Integration, Report

Installing and Publishing the Jet Business Objects on the Microsoft Dynamics Server

To install the .fob file open the Microsoft Dynamics NAV Development Environment and then connect to the database.

  • Open the Object Designer (on the Tools menu, choose Object Designer)
  • Import the .fob file (on the File menu, choose Import)
  • Locate the import file (Jet Reports Objects.fob), and then choose Open.
  • The .fob file includes modified objects. When prompted choose Yes to import all objects.
  • Verify that no objects are to be skipped. Objects are skipped if the version of the object in the database is later than the one in the .fob file.
  • Choose the OK button to import the .fob file.

The .fob file installs a set of business objects in the range of 14125500-14125504 and Table 14125600.
JetExcel-3
Jet Express users must have Read, Insert, Modify, Delete (RIMD-) permissions to Table 4125600 “Jet Cancellation”.

Checkout upcoming posts for more information.

Development Tips, Excel, Instalation & Configuration, Jet Reports, Office Integration, Report

Installing Jet Express for Excel – Navision 2015

Jet Express is an Excel add-in which must be installed each client machine. The client machines must have Excel installed.

Download the current version of Jet Express

  • Download the version of the product that matches your version of Microsoft Office (either 32-bit or 64-bit).
  • Microsoft Office 2007 is 32-bit.
  • If you are using Microsoft Office 2010 you can determine this by selecting the File On your version of Excel.
  • Button in your Excel ribbon and then selecting either Help or Account, depending
  • If you attempt to install the wrong version you will receive an error message and the application will not install.
  • Run the .exe file.
  • If you receive a message asking “Do you want to allow the following product to make
  • Changes on this computer?” select YES.

Once Jet Report is installed, when you open your Excel you will get new Tab as Jet.
JetExcel-2

Checkout upcoming posts for more Information.

Development Tips, Excel, Instalation & Configuration, Jet Reports, Office Integration, Report

Jet Report for Excel – Navision 2015

In my previous posts I introduced with Jet Report for Word.

Please see here. Links below:-

Jet Express for Word Overview & Installation – for Navision 2015

Jet Express for Word – Objects for Navision 2015

What’s New in Jet Reports for Word, How it is different from Navision Word Reports

Customize the Report layout using Jet Express for Word

You can access the resource for Jet Report Excel from this Link.

JetExcel-1

Download the Jet Express Setup & Jet Reports Objects from the site.

Run the Setup to install the Jet Express for Excel.

You may require Activation Code, which you can obtain following the instructions post setup.
Checkout upcoming posts for more details.

Development Tips, Jet Reports, Office Integration, Report

Customize the Report layout using Jet Express for Word

Click Edit Layout to customize this layout
JetReportDesign-1

The Jet Express for Word action panel may automatically open when this word file is opened.

If not, select the Jet Ribbon

Click on the Design icon

This presents a tree hierarchy of the fields from the selected report. 
JetReportDesign-2

Click on the icons on the hierarchy to expand or contract the lists.

The Search field makes it easy to find the fields you need.

Labels – NAV reports which were created by Jet Reports include a section for Labels. These fields are the descriptions of the fields themselves.

If you have multiple languages in your NAV instance, these labels can be helpful for creating multi-language documents.

Other Groupings – NAV reports which were created by Jet Reports include sections for Company, Customer, etc. These fields include the values of the fields.

The user can select from fields including Header or Lines in the hierarchy and insert an item, typically into a table in the Word document.
JetReportDesign-3

To add a field select the desired location in the Word document and double-click on the field.

Alternatively, you can select the field and click on the Insert button in the Jet Express for Word action panel.

To Add a picture to a document, right-click on the item and select Insert Picture
JetReportDesign-4

The Lines fields are also inserted as text and can be replicated by a Right-click, and choosing “Insert Repeater”.

Repeating items (such as Sales lines on a Sales order) can be added to a document.
JetReportDesign-5

Best practice for this is to create a table in Word that is two rows high.

The first row contains the Labels of the fields that you wish to include.

The second row contains the values of the fields.

Select the entire second row- include the area just to the right of the last column.

Right-click on the item in the hierarchy that you want to repeat and select Insert

To delete an item, click on it, and then click on its Title.
JetReportDesign-6
When you click on the Title it will change color.

Then press the Delete Button on your keyboard.

Note: It’s important to select the Title when deleting to avoid any leftover data.

When you have completed your changes Save your Word document
JetReportDesign-7
This will return you to NAV and prompt you to import the report layout changes.
JetReportDesign-8
Click Yes

You can Run Report to review your changes.
JetReportDesign-9
Here is the output for the report below.
JetReportDesign-10
We are done with customization of the report using Jet Reports.

I will come up with more details in my upcoming posts.