Development Tips

Filtering on Dimension Values

Microsoft Dynamics NAV supports unlimited dimensions and unlimited dimension values. You can create as many as you want, and you can use those all across the application.

However two of these dimensions have got special treatment by setting them up them as global dimensions.

Why special? Answer could be because the global dimensions values are stored directly on the records they belong to. All other dimension values are stored in a separate table.

This means that you can filter on these two dimensions. In many places in the standard application, these Global Dimension are used on Filter fields that can be used to filter FlowFields.

However, to get any data on any of the other dimensions, you would have to rely on Analysis Views to retrieve the information.

In Microsoft Dynamics NAV 2013 onwards version, the dimensions functionality has been heavily redesigned.

Instead of storing all individual dimension values for each record in separate tables, each unique combination of dimensions and values gets an ID, and this dimension set ID is stored directly on the record that those values belong to.

With this change, all information about dimensions and their values are directly stored on the record.

Since all the required information is stored on the record, though somewhat indirectly, it will now be possible to filter on any dimension and any dimension value. As it turns out, it is, and it’s not that hard to do.

As mentioned, the records contain dimension set IDs, which are integers that represent the combination of dimension values for a specific record. The biggest problem is to convert a typical filter on a dimension into a filter of dimension set IDs.

Fortunately, we already have a few functions in Microsoft Dynamics NAV that can provide that information. With these functions in mind, we can build a logic where you can input any combination of dimensions and dimension values in the form of filters, and you can then calculate the corresponding set of dimension set IDs. With all of these IDs, we can build one long filter string and use it to filter on the dimension set ID field. This enables, with relative ease, direct filtering on Dimension Values.

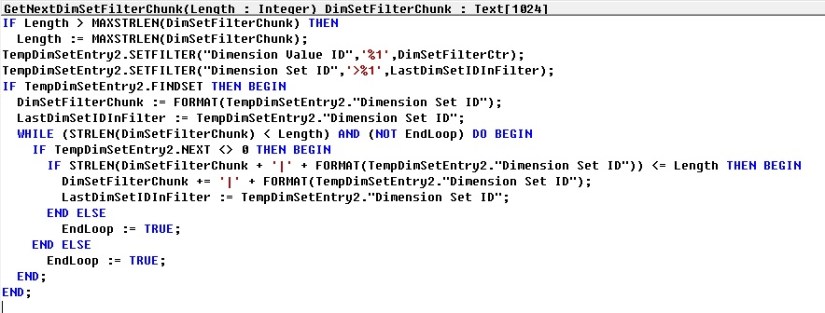
In Codeunit 408 – DimensionManagement we have functions which can help us getting our task done:

  • GetDimSetIDsForFilter

DimFilter-1

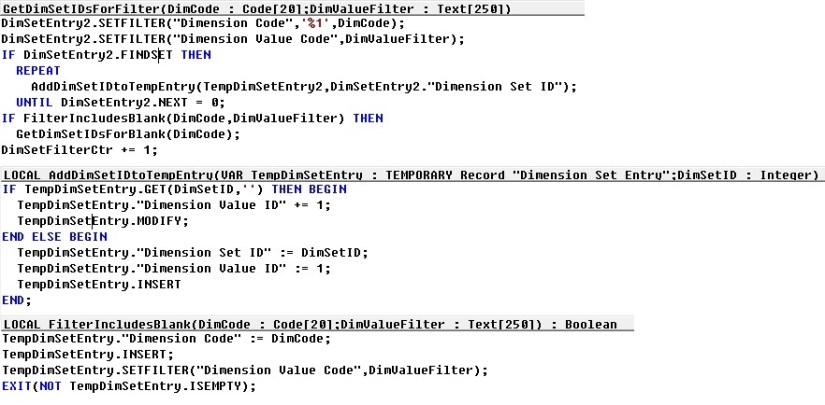
  • GetNextDimSetFilterChunk

DimFilter-2

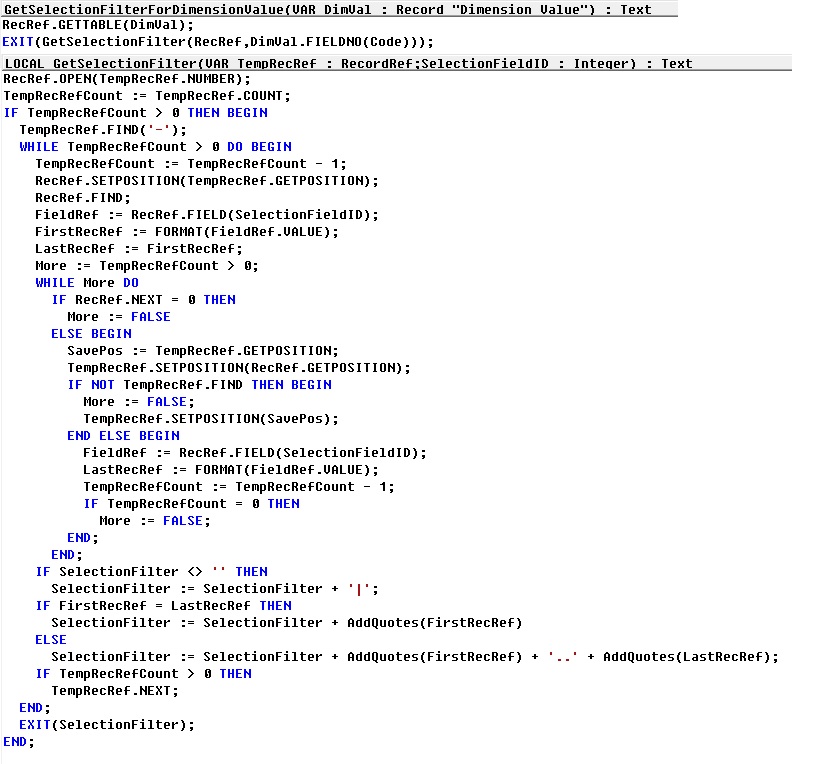
In Codeunit 46 – SelectionFilterManagement we have functions which can help us getting our task done:

  • GetSelectionFilterForDimensionValue

DimFilter-3

Using these functions we can build our logic to retrieve the required records from tables filtering on Dim Set ID field.

Let’s see the pseudocode of logic to get our work done.

This logic applies to Dimension table. With all values for which filter need to be applied.
DimFilter-4

Before executing above piece of code we have to prepare a Dimension Value record with [Dimension Code + Code (filter)] values with all the required filters we wish to apply filter for.

We can also find out which records do not have a value for one or more dimensions, for this we will add [Dimension Code] but for [Code] we will not provide the value/filter or blank.

Make sure when you define variables of Dimension & Dimension Value don’t forget to set Temporary property to Yes.

Development Tips, How To

How to: Install a Windows Client Control Add-in Assembly

Microsoft Dynamics NAV Windows client control add-ins are provided in one or more Microsoft Framework .NET-based assemblies, which are .dll files. Control add-in assemblies must be installed on the following computers:

  • Computers that are running the Microsoft Dynamics NAV Windows client. Any Microsoft Dynamics NAV Windows client instance that will use the control add-ins, must be installed with the control add-in assemblies. Control add-in assemblies are not installed with the default Microsoft Dynamics NAV Windows client installation.
  • Computer that is running the Microsoft Dynamics NAV Development Environment. After a control add-in is installed, you use the development environment to register the control add-in the Client Add-in table in the Microsoft Dynamics NAV database and set it up on pages.

Optionally, if a control add-in has the same name as the assembly, you can install the assembly on the computer that is running Microsoft Dynamics NAV Server instead of the client computer.

To install control add-in assemblies on the Microsoft Dynamics NAV Windows client

  • If needed, install the Microsoft Dynamics NAV Windows client on the computer.
  • On the computer that is running the Microsoft Dynamics NAV Windows client, copy the assemblies that contain the control add-ins to the Add-ins folder of the Microsoft Dynamics NAV Windows client installation.
    • By default, the path of this folder is C:\Program Files (x86)\Microsoft Dynamics NAV\80\RoleTailored Client\Add-ins.

You can also include assemblies in a subfolder of the Add-ins folder. This can be useful if you have multiple assemblies and dependencies.

To install control add-in assemblies on the development environment computer

  • If needed, install the development environment on the computer.
  • On the computer that is running the development environment, create a folder named Add-in in the development environment installation folder.
    • By default, the path of this folder is C:\Program Files\Microsoft Dynamics NAV\80\Classic. If the Add-in folder already exists, then ignore this step.
  • Copy the assemblies that contain the control add-ins to the Add-ins folder.

You can also include assemblies in a subfolder of the Add-ins folder. This can be useful if you have multiple assemblies and dependencies.

Installing Control Add-ins on Microsoft Dynamics Server for Automatic Deployment

If a control add-in has the same name as the assembly, then you can install the assembly on computer that is running Microsoft Dynamics NAV Server. When an operation from the client requires the control add-in, Microsoft Dynamics NAV Server automatically deploys the assembly to a temporary folder on the client computer.

For example, if Microsoft Dynamics NAV Windows client opens a page that contains a control add-in, Microsoft Dynamics NAV Server will find the control add-in assembly by name in the Add-ins folder. Then, it deploys the assembly to the client computer in the %TEMP%\Microsoft Dynamics NAV\Add-Ins folder of the user who is running the client. The deployed assembly will be then be used whenever the page is opened.

Similarly, if the development environment requires a control add-in, for example, when you compile an object, then the control add-in assembly will be deployed by the Microsoft Dynamics NAV Server to the local temporary folder for the current user on the computer that is running the development environment.

To be deployed, an assembly must comply with the following Microsoft Dynamics NAV Server configuration settings: Chunk Size, Max Upload Size, and Prohibited File Types.

If the control add-in assembly is updated and its version number changes, Microsoft Dynamics NAV Server will deploy the updated assembly to the client computer the next time that the client requests the assembly. The updated assembly is put in a subfolder of the %TEMP%\Microsoft Dynamics NAV\Add-Ins folder, where the subfolder has the assembly’s version number as its name. This implementation means that you do have to remove the older versions of assemblies that are stored on the client computer.

Before Microsoft Dynamics NAV Server deploys an assembly to a client, the client looks for the assembly in the local Add-ins folder (for example, C:\Program Files (x86)\Microsoft Dynamics NAV\80\RoleTailored Client\Add-ins). If the assembly is not found, then the client will request the assembly from Microsoft Dynamics NAV Server.

To install the control add-in on Microsoft Dynamics NAV Server

  • On the computer that is running the Microsoft Dynamics NAV Server, copy the assembly that contains the control add-in to the Add-ins folder of the Microsoft Dynamics NAV Server installation.

By default, the path is C:\Program Files\Microsoft Dynamics NAV\80\Service\Add-ins.

Development Tips, How To

How to: Set .NET Framework Types to Run on the Microsoft Dynamics NAV Windows Client or Microsoft Dynamics NAV Server Computers

Here is the brief description for how to set .NET Framework objects that are instantiated by DotNet variables to target either the Microsoft Dynamics NAV Windows client or Microsoft Dynamics NAV Server.

By default, a type is set to target Microsoft Dynamics NAV Server. However, you can set the type to target the Microsoft Dynamics NAV Windows client.

Setting the .NET Framework Type to Target the Microsoft Dynamics NAV Windows Client

To set a .NET Framework type instance to target the Microsoft Dynamics NAV Windows client, you must complete the following tasks:

  • Set the DotNet variable for the .NET Framework type to target the Microsoft Dynamics NAV Windows client.
  • Copy the .NET Framework assembly to the computer that is running the Microsoft Dynamics NAV Windows client.

You must copy the assembly to each computer that is running the Microsoft Dynamics NAV Windows client. If the assembly is included in the global assembly cache, then you do not have to do this task.

For the Microsoft Dynamics NAV Web client, you cannot implement Microsoft .NET Framework interoperability objects that target the client.

To set the .NET Framework type to target the Microsoft Dynamics NAV Windows client

  • In Object Designer, open the C/AL code of the Microsoft Dynamics NAV object that uses .NET Framework interoperability.
  • Do one of the following steps:
    • For a global variable, on the View menu, choose C/AL Globals.
    • For a local variable, select the trigger that uses the variable, and then on the View menu, choose C/AL Locals.
    • On the Variables tab, select the DotNet variable, and then on the View menu, choose Properties.
    • In the Properties window, set the RunOnClient property to Yes

To copy a .NET Framework assembly to a computer that is running the Microsoft Dynamics NAV Windows client

    • On the computer that is running the Microsoft Dynamics NAV Windows client, copy the.NET Framework assembly to the Add-ins folder of the Microsoft Dynamics NAV Windows client installation.

By default, the path of this folder is C:\Program Files\Microsoft Dynamics NAV\80\RoleTailored Client\Add-ins or C:\Program Files (x86)\Microsoft Dynamics NAV\80\RoleTailored Client\Add-ins.

You can also put assemblies in a subfolder of the Add-ins folder. This can be useful when you have multiple versions of the same assemblies and dependencies.

Setting the .NET Framework Type to Target Microsoft Dynamics NAV Server

To set a .NET Framework type instance to target Microsoft Dynamics NAV Server, you must complete the following tasks:

  • Set the variable for the NET Framework type to target Microsoft Dynamics NAV Server.
  • Copy the .NET Framework assembly to the computer that is running Microsoft Dynamics NAV Server.

If the assembly is included in the global assembly cache of the computer that is running Microsoft Dynamics NAV Server, then you do not have to do this task.

To set the .NET Framework type to target Microsoft Dynamics NAV Server

  • In the development environment, in Object Designer, open the object that uses the .NET Framework variable.
  • Do one of the following steps:
    • For a global variable, on the View menu, choose C/AL Globals.
    • For a local variable, in the C/AL Editor, select the trigger that uses the DotNet variable, and then on the View menu, choose C/AL Locals.
    • On the Variables tab, select the NET Framework variable type, and then on the View menu, choose Properties.
    • In the Properties window, set the RunOnClient property to No

To copy a .NET Framework assembly to the computer that is running Microsoft Dynamics NAV Server

    • On the computer that is running Microsoft Dynamics NAV Server, copy the.NET Framework assembly to the Add-ins folder of the Microsoft Dynamics NAV Server installation folder.

By default, the path of the Microsoft Dynamics NAV Server installation folder is C:\Program Files\Microsoft Dynamics NAV\80\Service\Add-ins.

You can also put assemblies in a subfolder of the Add-ins folder. This can be useful when you have multiple assemblies and dependencies.

If you are working in the development environment, to compile and test Microsoft Dynamics NAV objects, you must also copy the assembly to the Add-ins folder of the Microsoft Dynamics NAV Windows client installation on the computer that is running the development environment. By default, the path of this folder is C:\Program Files\Microsoft Dynamics NAV\80\RoleTailored Client\Add-ins or C:\Program Files (x86)\Microsoft Dynamics NAV\80\RoleTailored Client\Add-ins.

Development Tips

Automatic Deployment of Microsoft .NET Framework Interoperability and Control Add-in Assemblies

Microsoft Dynamics NAV 2015 makes it easier for the system administrators to deploy client-side assemblies for .NET Framework interoperability and client control add-ins on computers that are running the Microsoft Dynamics NAV Windows client or Microsoft Dynamics NAV Development Environment.

You can now install the assemblies in the Add-ins folder on the computer that is running Microsoft Dynamics NAV Server. By default, this is the C:\Program Files\Microsoft Dynamics NAV\80\Service\Add-ins folder.

When an operation from the client requires an assembly, Microsoft Dynamics NAV Server automatically deploys the assembly to a temporary folder on the client computer.

For example, if Microsoft Dynamics NAV Windows client opens a page that contains a control add-in, Microsoft Dynamics NAV Server will find the control add-in assembly by name in the Add-ins folder. Then, it deploys the assembly to the client computer in the %TEMP%\Microsoft Dynamics NAV\Add-Ins folder of the user who is running the client. Subsequently, the deployed assembly will be used whenever the page is opened.

Similarly, if the development environment requires a control add-in, for example, when you compile an object, then the control add-in assembly will be deployed by the Microsoft Dynamics NAV Server to the local temporary folder for the current user on the computer that is running the development environment.

Important:

To be deployed, an assembly must comply with the following Microsoft Dynamics NAV Server configuration settings: Chunk Size, Max Upload Size, and Prohibited File Types.

If a .NET Framework interoperability or control add-in assembly is updated and its version number changes, Microsoft Dynamics NAV Server will deploy the updated assembly to the client computer the next time that the client requests the assembly. The updated assembly is put in a subfolder of the %TEMP%\Microsoft Dynamics NAV\Add-Ins folder, where the subfolder has the assembly’s version number as its name. This implementation means that you do have to remove the older versions of assemblies that are stored on the client computer.

To support compatibility with earlier version of Microsoft Dynamics NAV, before Microsoft Dynamics NAV Server deploys an assembly to a client, the client looks for the assembly in the local Add-ins folder (for example, C:\Program Files (x86)\Microsoft Dynamics NAV\80\RoleTailored Client\Add-ins). If the assembly is not found, then the client will request the assembly from Microsoft Dynamics NAV Server.

Javascript-based client add-ins have been using this deployment technique since Microsoft Dynamics NAV 2013 R2.

Batch Job, Development Tips, Functional Tips

Adjust Item Costs/Prices… batch job

Just purchase one material on different rates with different vendors and consume it in manufacturing or do the negative adjustment and then run the batch job to see the effect.

The batch job is in the inventory section of Finance Module.

BatchJob-1
All this Batch does is updating the CARD Costs and Prices for an Item; it really has no connection to the costs posted to inventory, and in terms of Sales only affects the default sales price of an item. A better name might be “Item Card Cost/Price Update”
BatchJob-2
To test an example, run the batch on a test database, leave the defaults, but change the Adjustment factor to 1.1.
BatchJob-3
When you run this, all the Item Card Prices will be increased by 10%
BatchJob-4

Most of the processes relating to costing, discuss posted documents and entries. Like Posted Sales Invoice and Posted Purchase receipt and Item ledger entry and Value Entry and General Ledger and GL entries. All these tables (and others) are used to calculate the actual costs and prices in Navision, and are what is used for Accounting reporting such as financial Statements. This is all covered under Inventory Costing. The batch processes (periodic Activities) “Post Inventory Cost to G/L” and “Adjust Cost – Item Entries” all belongs in this category. But on the other side BEFORE you post anything you need to do setup, and amongst all the setup, are the fields on the Item card which ARE NOT POSTED to the GL, but are used as the default values before posting. For example Unit Price from the Item card is copied into the Line of a Sales Order as a SUGGESTED sales price. But you can change it here and post a different price. Most of the numbers that you see on the Item card are just defaults or suggestions; they are not the final number that is posted to the GL. All of this is covered by Inventory Setup, and includes the Batch Process “Adjust Item Costs/Prices”.

If you check the code you will find that:
BatchJob-5
In summary

Inventory Setup is what you do to setup Item Costs and Prices BEFORE they hit the GL. (including “Adjust Item Costs/Prices”). Inventory Costing is what you do with entries AFTER they are posted to correct any changes due to the difference between Expected costs and actual costs.
Just go through these steps and you will know what this batch job does-

1. Create a new Item. Complete all the fields with Unit cost and Unit price. Take a note of all the values you write.

2. Create a purchase order for any quantity with Unit cost other than what is on item card and post the order as received & invoiced.

3. Create a sales order with any quantity other than that of Item card and post as shipped and invoiced.

4. Check the invoicing tab on item card and make a note of all values.

5. Repeat steps 2 and 3 for two-three times by changing the cost and prices every time (also note the values)

6. Now run Adjust cost-item entries and check the Invoicing tab on card. The Cost fields must have updated, but not the prices.

7. Now run Adjust item-cost prices with adjustment factor 1.5 and check the values. The Unit price over the card must have been updated with 50%.

You can see that the batch job is used to change the prices (Sales prices) of items. After running this batch job, every time when you make a Sales order, the updated Price will be copied to Sales Order field “Unit price Excluding VAT”.
BatchJob-6

Above listed all fields can be adjusted accordingly, specifying Adjustment Factor and Rounding Method.

Similarly it works for SKU also.

Give it a try to understand it more precisely. Follow above steps defined above.

Development Tips

UI Elements Removal

Depending on the setting in the UI Elements Removal field in the Microsoft Dynamics NAV Server Administration tool, only UI elements on objects in the license or on objects that the user has permissions for will appear in the user interface.

For UI elements without a direct relation, you can use the AccessByPermission property to set a value for a table field or UI element that determines the permission mask for an object that a user must have to see and access the related page fields or UI element in the client

To make full use of the LicenseFileAndUserPermissions option in the UI Elements Removal field, it is recommended that you assign the special FOUNDATION permission set to the user along with the relevant application permission sets that define which application objects the user will access. In addition, you must make sure that the user’s application permission sets grant all the functionality access that is not granted by the FOUNDATION permission set alone

A couple of the application permission sets that are provided by Microsoft Dynamics NAV are adapted to support the FOUNDATION permission set for demonstration purposes. To experience how UI elements are removed for a user performing the task to create and edit a new customer, you can create a sample user interface based on the provided permission sets.

For more details see my earlier post AccessByPermission Property – in Navision 2015

Development Tips

Database Schema Synchronization

Microsoft Dynamics NAV 2015 introduces several improvements to the table schema synchronization process that improve performance and make it more explicit and controllable. The improvements give you with the flexibility to decide when and how the table changes are synchronized with corresponding tables in the SQL Server.

In Microsoft Dynamics NAV 2015, changes to the database schema are no longer synchronized automatically to the database when a client connects to a Microsoft Dynamics NAV Server instance. Instead, you specify when to synchronize schema changes in the development environment or the Microsoft Dynamics NAV 2015 Administration Shell.

For example, when you change a table object and compile the table, you can choose to synchronize the change to the database immediately or later. In a production environment, you apply changes to the database schema by running the Sync-NAVTenant Windows PowerShell cmdlet with the Mode parameter set to the relevant synchronization mode.

The schema synchronization design provides the following features and benefits:

  • On-demand schema synchronization and monitoring As a developer or system administrator, from the development environment or Microsoft Dynamics NAV 2015 Administration Shell, you control when to perform the schema synchronization and how to synchronize table changes.This enables you to plan and schedule the schema synchronization on a case-by-case basis. Additionally, you can monitor the progress and state of the business (tenant) database at any time.
  • Non-blocking and increased productivity Schema synchronization has become more granular. You perform schema synchronization for a single table or for all tables at the same time. When one table is being synchronized, you are no longer blocked from making changes to other tables.
  • Capability to provide additional instructions in upgrade codeunits By using upgrade codeunits, you can provide instruction for the schema synchronization to perform additional tasks, such as automatically moving or copying data into upgrade tables, validating the table changes before applying them, or forcefully applying them when it is required.

Please check my earlier post on this topic for more detailed information.

Schema Synchronization in Microsoft Dynamics Navision 2015

Data Upgrade Codeunit in Navision 2015 Part-1

Data Upgrade Codeunit in Navision 2015 Part-2

Development Tips

Data Upgrade – in Navision 2015

Microsoft Dynamics NAV 2015 introduces a new way of running the data upgrade logic that migrates data from the old table structure of an earlier Microsoft Dynamics NAV version to the new table structure of the current version.

The data upgrade process is now prepared and run with the help of new type of codeunit called the upgrade codeunit. The data upgrade process has been enhanced significantly to optimize the performance and provide developers with a superior tool for testing, automating, tracking progress and troubleshooting the data upgrade code. The new data upgrade approach has the following benefits and features:

  • Simplifies the upgrade environment because all steps are performed by the latest version of the Microsoft Dynamics NAV.
  • Increases the data upgrade performance because it is possible to run upgrade functions of upgrade codeunits in parallel (at the same time) and across companies.
  • Reduces the amount of code that is required to handle the data upgrade because several operations are now executed automatically by Microsoft Dynamics NAV Server.
  • Minimizes the number of manual actions that must be performed during the data upgrade, which makes the data upgrade process less error-prone.
  • Uses familiar upgrade toolkit design concepts, such as upgrade tables and upgrade functions.
  • Includes end-to-end sample Windows PowerShell scripts that perform a complete data upgrade.

Please check my earlier post on this topic for more detailed information.

Schema Synchronization in Microsoft Dynamics Navision 2015

Data Upgrade Codeunit in Navision 2015 Part-1

Data Upgrade Codeunit in Navision 2015 Part-2

Development Tips

Page Properties Not Supported by Microsoft Dynamics NAV Web Client

Most page properties that are supported in the Microsoft Dynamics NAV Windows client are also supported in the Microsoft Dynamics NAV Web client.

There are some properties that are not supported by Microsoft Dynamics NAV Web client and other properties that are either partially supported or behave differently in the Microsoft Dynamics NAV Windows client.

Unsupported Properties

The properties that are not supported by the Microsoft Dynamics NAV Web client. When a page that contains an unsupported property is displayed in a browser, the property is ignored. You do not receive an error but the property does not affect the page.

  • ChartPartID Property
  • ColumnSpan Property
  • ControlAddin Property
  • FreezeColumnID Property
  • RowSpan Property
  • RefreshOnActivate Property
  • ShowAsTree Property
  • Style Property
  • StyleExpr Property
  • SystemPartID Property

Partially Supported Properties

The properties that either do not have all the capabilities in the Microsoft Dynamics NAV Web client as they do in Microsoft Dynamics NAV Windows client or they behave differently than in the Microsoft Dynamics NAV Windows client.

  • AssistEdit Property
  • DrillDown Property
  • DrillDownPageID Property
  • GroupType Property
  • Importance Property
  • IndentationControls Property
  • PageType Property
  • PartType Property
Comment or Uncomment Selection, Development Tips

Development Environment Enhancements – in Navision 2015

Auto-generating of C/AL variable and parameter names for complex data types

In the C/AL Globals and C/AL Locals windows, when you add a variable or parameter that has the data type Codeunit, Page, Testpage, Report, Query, or XMLport, the Name field will be automatically generated just by setting the DataType and SubType fields. The generated name is based on the name that is assigned to the associated Microsoft Dynamics NAV object. You can change the generated name as you want.
DevelopmentEnvironmentEnhancement-1

Commenting and uncommenting multiple lines of C/AL Code

The development environment includes the Comment Selection and Uncomment Selection options, which enable you to comment and uncomment multiple lines of C/AL code with the click of a button.

For more information, see my earlier post Commenting and uncommenting multiple lines of C/AL Code

Non-default property values are bold

Microsoft Dynamics NAV objects have many properties that you can view and set from the Properties window in the development environment. Property values that are not the default value of the property appear as bold in the Properties window.
DevelopmentEnvironmentEnhancement-2

C/AL functions are local by default

Unlike in earlier Microsoft Dynamics NAV versions, now when you create a function in the C/AL code of a Microsoft Dynamics NAV object, such as a codeunit or page, the function is set as a local function by default. By default, the Local property of new functions is now set to Yes instead of to No. Being local means that the function is not accessible outside the object in which is it defined.