Data Model, Development Tips, Excel, How To, PowerPivot, Report

Add Excel Sheet/Table to the PowerPivot Data Model

Download the Excel file from the link provided in previous post.

Import data using copy and paste from Excel sheet or other source for PowerPivot Data Model.

Open the Workbook:

ExcelData-3

Select sheet one by one and Add to Data model of PowerPivot.

ExcelData-4

Make sure all Table/Sheet is added to Data Model of PowerPivot.

I have create a sample Excel File for you which you can down load from the Shared Path using link: http://1drv.ms/1GpZFd4

This file have couple of sheets having data related to Olympics which I have compiled from MS Office support site.

You can find the link on the Menu of my blogsite too to access the shared files.

I will be using this file for couple of walkthrough in my upcoming posts.

Development Tips, Excel, How To, PowerPivot, Report

Add Slicers to PivotTables in PowerPivot

Recall from my earlier post Creating My First Report using PowerPivot in which we created a Items Vs Customer Sales matrix report.

I am going to use same report to demonstrate how we can add slicer to this report.

Slicers are one-click filtering controls that narrow the portion of a data set shown in PivotTables and PivotCharts. Slicers can be used in both Microsoft Excel workbooks and PowerPivot workbooks, to interactively filter and analyze data.
PowerPivot-30

Open the report we created in our previous post.

From Insert Tab select Slicer in the ribbon.
PowerPivot-31

Choose the source Connection/Data model and respond Open.

Select the Customer Table.

Select the Country/Region Code field and OK.
PowerPivot-32

A Slicer will be added to the sheet.

Re-size to fit and drag the Slicer to position at desired location on sheet.

You can give desired Caption to your Slicer by editing the Slicer Caption.

Most important is to select the pivot table on which this Slicer will operate.

Select Report Connection, and from preceding window select the PivotTable.
PowerPivot-33
Above is the screenshot with applied filter on Country/Region Code = DE.

Stay tuned to know more options, I will come up with more details in my upcoming posts.

Till then keep practicing.

Development Tips

AccessByPermission Property – in Navision 2015

Sets a value for a table field or UI element that determines the permission mask for an object that a user must have to see and access the related page fields or UI element in the client. The UI element will be removed at runtime if the user does not have permissions to a certain object as specified in the Access by Permission window.

AccessByPermission-1
AccessByPermission-2
AccessByPermission-3

Depending on the setting in the UI Elements Removal field in the Microsoft Dynamics NAV Server Administration tool, only user interface (UI) elements on objects in the license or on objects that the user has permissions to will appear in the user interface.

AccessByPermission-4

To make full use of the LicenseFileAndUserPermissions option in the UI Elements Removal field, it is recommended that you assign the special permission set, FOUNDATION, along with the relevant permission sets that define which application objects the user will access.

AccessByPermission-5

The majority of the permission sets that are provided with the CRONUS demonstration database cannot be combined with the FOUNDATION permission set to fully use the UI Elements Removal feature. You must first create or edit the relevant permission sets to avoid that the user is blocked from performing the involved tasks. You must first create or edit the relevant permission sets to avoid that the user is blocked from performing the involved tasks.

If you only use the LicenseFile option in the UI Elements Removal field, then you do not have to edit any permission sets as they will not affect which UI elements are removed.

To specify when UI elements are removed
  1. Open the Microsoft Dynamics NAV Server Administration
  2. In the UI Elements Removal field, choose the relevant option as described in the following table.
Option Description
None All UI elements are displayed, even if the license file does not include the related object and the user does not have permissions to the related object.
LicenseFile A UI element is removed if the related object is not included in the license file.
LicenseFileAndUserPermissions A UI element is removed if the related object is not included in the license file and the user does not have permissions to the object as defined in the AccessByPermission property for the related UI element.

By default, this option is selected.

AccessByPermission-6

When you configure user interfaces in Microsoft Dynamics NAV, you should make sure that the UI Elements Removal field is set to its default, LicenseFileAndUserPermissions, so that you only see the relevant UI elements in the Customize window.

When you develop in Microsoft Dynamics NAV, you should make sure that the UI Elements Removal field is set to its default, None, to make sure that all UI elements are visible when you review your development in the UI.

All types of UI elements will be removed if they relate to objects that are not included in the license or the user does not have the required permission to the objects:

  • Fields
  • Actions
  • Page parts

UI elements that are directly related to an object through the TableRelation or the CalcFormula property can be removed automatically according to the license file and/or user permissions.

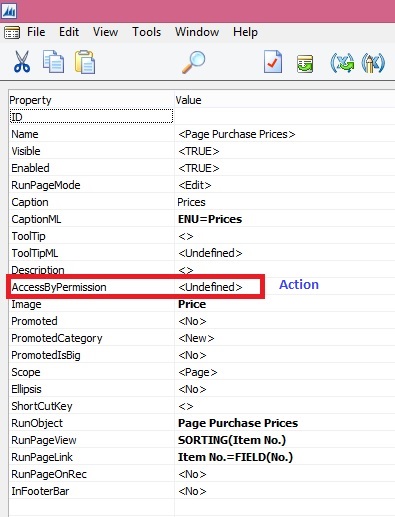
For UI elements that are not directly related to an object, you can use the AccessByPermission property to remove the element according to the user’s permission to a related object

All types of UI elements will be removed if they relate to an object to which the user does not have the required permissions:

Fields on pages, including FactBoxes

Actions on pages, including toolbars and navigation panes

Page parts, such as Lines FastTabs

Note

To use this property, the UI Elements Removal field in the Microsoft Dynamics NAV Server Administration tool must be set to LicenseFile or LicenseFileAndUserPermissions.

This Property Applies To

Fields in tables (affecting all related fields on pages)

Fields on pages

Actions on pages

MenuSuite items

Page parts, such as a Lines FastTab

Property Value

When you choose the AssistEdit button, the Access By Permission window opens. Fill the fields as described in the following table.

Field Description
Object Type Specify the type of object to which permission is required to display the UI element.
Object ID Specify the object to which permission is required to display the UI element.
Read Specify if Read permission is required to display the UI element.
or Insert Specify if Insert permission is required to display the UI element.
or Modify Specify if Modify permission is required to display the UI element.
or Delete Specify if Delete permission is required to display the UI element.
or Execute Specify if Execute permission is required to display the UI element.

AccessByPermission-7

Note

If multiple permissions are selected, then one or the other applies.

Example: Remove the Unit Price field if the user does not have permission to the Sales Price table

Open table 27, Item Card, with the Table Designer.

View the properties of field 18, Unit Price.

For the AccessByPermission property, choose the AssistEdit button in the Value field.

In the Access By Permission window, fill the fields as described in the following table.

Field Description
Object Type TableData
Object ID Sales Price
Read Select
Insert Select
Modify Leave blank
Delete Leave blank
Execute Leave blank

Close the Access By Permission window and save the changes on table 27.

All instances of the Unit Price field on pages are now removed if the user does have Read or Insert permission to the Sales Price table.

AccessByPermission-8

Important

If you defined the property for a table field, then all instances of the field on pages are removed. To override the property on an individual page field, delete the permission value after the = sign in the Value field. Do NOT delete the whole string as that will be replicated on the property of the table field.

Note

To use the LicenseFileAndUserPermissions option in the UI Elements Removal field, you must assign the special FOUNDATION permission set to the user along with the relevant application permission sets that define which application objects the user will access. Unlike the BASIC permission set, the FOUNDATION permission set only grants access to application setup and system tables and requires that other assigned permission sets define which specific application objects can be accessed.

Not all of the 167 default permission sets that are provided with Microsoft Dynamics NAV are ready to support the FOUNDATION permission set to remove UI elements according to user permissions. You must therefore edit the relevant permission sets as explained in the following procedures.

To experience how UI elements are removed for a user performing the task to create and edit a new customer, you can create a sample user interface based on default permission sets provided with Microsoft Dynamics NAV.

Special Permission Sets

The following permission sets have special definitions that you should be aware of as you implement permissions and security for Microsoft Dynamics NAV users.

Permission set Definition
SUPER Can read, use, update, and delete all data and all application objects in the scope of your license. Microsoft Dynamics NAV requires that at least one user be assigned this permission set in each database.

You cannot modify permissions for the SUPER permission set.

SUPER (DATA) Can read, use, update, and delete all data. You typically assign this permission set to an accounting manager who needs to work with all data but does not need to change Microsoft Dynamics NAV.

This permission set does not give access to the Object Designer.

SECURITY Can create new users and assign them the same permission sets. Must be able to access the User, User Property, Permission Set, and Access Control tables.

For example, you can create a SECURITY permission set that includes the four required tables and any additional permissions that you want to include. You can then assign this permission set to a user who is a department administrator. This user can then administer permissions for other users in their department.

Only a user who has the SUPER permission set can create and modify a SECURITY permission set. Users who have this permission set can assign the same permissions to other users, but they cannot assign themselves the SUPER permission set.

BASIC Grants Read access to almost all application tables and all system tables.

The main purpose of this permission set is to enable the client to open and show all pages.

When you create a new database, you must import the BASIC permission set from an XML file.

FOUNDATION A prerequisite for all other permission sets. The FOUNDATION permission set grants access to system tables and application setup tables that are required for most application features to work.

Note

This permission set is recommended when using the UI Elements Removal feature to automatically remove UI elements according to user permissions.

Development Tips

Data Upgrade Codeunit in Navision 2015 – Part -2

We have seen how to create Upgrade code unit in our previous post.

Please go through it, if not seen earlier the Data Upgrade Codeunit in Navision 2015 – Part -1 here 

Let us continue from where we left our previous post.

We have created the Upgrade code unit to copy the data to upgrade table while performing destructive changes to My Sales Customer table.

We removed certain fields from the My Sales Customer table and the related information was moved to UPG My Sales Customer table.

Now it’s time to move these information to actual table we create for this purpose My Detailed Customer Entry table.

Although in this example this table will be exact copy of UPG My Sales Customer table, so simply we need to copy records to My Detailed Customer Entry table.

But some time we may require to add certain more field’s value while moving the data Like Entry No, Posting date to maintain the data integrity. Like think of some Service type of information you are maintaining then the same set of record may repeat number of times on different dates, then in this case we will require to add certain fields like Entry No. and Posting Dates.

Let us assume we will be maintain data of My Detailed Customer Entry in incremental way as of situation on every transaction. Balances will be maintained as of when transaction was performed.

Although this example is not feasible or practice but still we are continuing to just see how to write Upgrade Function for such purpose.

Our today’s task is to design and run data upgrade function to move data from the upgrade table to its new location.

Now the fields are deleted from the My Sales Customer table and the data is saved in the UPG My Sales table. The next step is to create the new table where the data will reside (My Detailed Customer Entry) and move the data into that table.

Let’s create the table to be used for recording of all future Customer Balances and to accommodate the data we already had in the My Sales Customer table and which we moved into the UPG My Customer table.

  • In the Object Designer select the Tables button and then select New button to create a new table
  • Define the table layout based on the layout shown in the Screenshot.

Upgrade Codeunit 2 - 1

  • In the Dev. Environment menu, select File-Save action to save the table.
  • On the Save dialogue, define ID, Name = My Detailed Customer Entry, and select OK to save the table.
  • Close the table editor.

We will now create a new function which will contain the code to migrate the data from the upgrade table to the new table.

Note that the FunctionType property of the newly created function is set to “Upgrade”. This is how the NAV server can later figure out which function from the upgrade codeunit it must execute.

The function marked as “Upgrade” function can call functions marked as “Normal” if necessary.

  • In the Object Designer select the Codeunits button, select codeunit 50000 UPGTK Codeunit and then select the Design button.
  • In the Dev. Environment menu, select View-C/AL Globals action and in the form which is opened select the Functions tab.
  • Enter the name of the function, e.g. UpgradeCustomerDetails

Upgrade Codeunit 2 - 2

  • Select the UpgradeCustomerDetails function on the Functions tab and then select the Locals button to define function parameters.
  • On the C/AL Locals form, select Variables tab and add 3 local variables as shown in the Screenshot section.
  • Close the C/AL Locals and C/AL Globals forms to return to the C/AL Editor.

Upgrade Codeunit 2 - 3

The code we add to the UpgradeCustomerDetails function will copy the data from the UPG My Sales Customer table to the My Detailed Customer Entry table and then clean up the UPG Vehicle table.

  • Code like the Screenshot into the UpgradeCustomerDetails function.

//>> Upgrade Code

EntryNo := 1;

WITH UpgCustomer DO BEGIN

IF FINDSET THEN

REPEAT

DetailedCustomerEntry.INIT;

DetailedCustomerEntry.”Entry No.” := EntryNo;

DetailedCustomerEntry.”Customer No.” := “Customer No.”;

DetailedCustomerEntry.”As of Date” := today;

DetailedCustomerEntry.”Last SO Value” := “Last SO Value”;

DetailedCustomerEntry.”Last Invoiced Value” := “Last Invoiced Value”;

DetailedCustomerEntry.”Total Outstanding Value” := “Total Outstanding Value”;

DetailedCustomerEntry.INSERT;

EntryNo := EntryNo + 1;

UNTIL NEXT = 0;

DELETEALL;

END;

//<<Upgrade Code

  • In the Dev. Environment menu, select File-Save action to save the codeunit.
  • On the Save dialogue select OK button.
  • Close the codeunit editor.

Upgrade Codeunit 2 - 4

  • In the Dev. Environment menu select Tools – Data Upgrade – Start… action.
  • Agree to the confirmation dialogue.
  • In the Start Data Upgrade window select the OK button.

You can start the data upgrade process from the Dev. Environment, or from Microsoft Dynamics NAV 2015 Administration Shell, using Start-NAVDataUpgrade cmdlet.

The NAV server will locate all upgrade codeunits and will invoke all upgrade functions within these codeunits for all companies in the database.

If you have multiple upgrade functions in your upgrade codeunit, you can choose to execute them in parallel or in sequence. You can also choose to stop at first error, or continue execution of other functions, see the list of all failed ones, fix them and start them again using the Data Upgrade – Resume… action.

  • In the Dev. Environment menu select Tools – Data Upgrade – Start… action.
  • Agree to the confirmation dialogue.
  • In the Start Data Upgrade window select the OK button.

Upgrade Codeunit 2 - 5

Upgrade Codeunit 2 - 6

  • In the Object Designer select the Tables button, then select table My Detailed Customer Entry and select Run button

Upgrade Codeunit 2 - 7

You can see that the data from the upgrade table was successfully transferred into the new table.

Now since our data is sitting in its right place, now we can remove objects we are using for Upgrade purpose.

Now the data upgrade is completed and we need to remove the objects used within that process.

Force-delete the upgrade table, since the data was already transferred into the new table.

Delete the upgrade codeunit to make sure the old synchronization instructions defined in it are not used by the NAV server when you decide to change the My Sales Customer table again. Alternatively (if you want to reuse the upgrade codeunit later) you can choose to change the type of the GetTableSynchSetup function to “Normal”.

Upgrade Codeunit 2 - 8

Now we are done with our Upgrade project.

Conclusion

This set of demonstrations have provide you the insight, new way of running the data upgrade in Microsoft Dynamics NAV 2015 by involving the schema synchronization and upgrade codeunits.

The new approach:

  • Simplifies the upgrade environment, since all steps are performed by the latest version of the product.
  • Increases the data upgrade performance, since it is possible to parallelize execution of the data upgrade functions within the upgrade codeunit and across companies.
  • Reduces the amount of code to be written to handle the data upgrade, since some actions are now executed automatically by the NAV Server.
  • Allows data upgrade to be invoked by the NAV server, minimizing the number of manual actions which should be performed during the data upgrade.
  • Uses familiar upgrade toolkit design concepts (e.g. upgrade tables, upgrade functions).
Development Tips

Schema Synchronization in Microsoft Dynamics Navision 2015

NAV 2015 provides you with flexibility of deciding when and how your table changes should be synchronized with corresponding SQL tables.

What is table synchronization?

SchemaSync-1

NAV 2013 R2:- Schema synchronization executes automatically on any connection to the Server.

NAV 2015:- Schema synchronization executes on demand by the Server.

Way the Synchronization works:

  1. Per Table Synchronization
  2. Synchronizing schema changes for all tables

SchemaSync-2

Now let us see how it works:

SchemaSync-3

Add/Modify/Delete Fields (change table definition) we will be prompted for Synchronizing the Schema.

It gives three options description is self-explanatory.

Some time we have to do major changes to the tables which takes lots of time to sync, we can postpone the sync process by selecting Later. Once we are done with all of our changes we can go with synchronization in one go.

SchemaSync-4

We get same options.

New option Check Only….

SchemaSync-5

This option will only report outcome and will not Sync the Schema.

Since we have just added new field so no risk as reported by above check.

Now I will delete one field from the table and let’s see what result comes.

SchemaSync-6

Summary of the 3 options as below:

SchemaSync-7

When data loss is reported while changes in table definition is referred as destructive changes.

SchemaSync-8

You use upgrade codeunits when you make changes to a table definition, either from the Microsoft Dynamics NAV Development Environment or during an upgrade. Upgrade codeunits migrate existing business data from the old table structure into the new table structure. An upgrade codeunit serves the following purposes:

  • Provides instructions for how to handle data changes to a table during schema synchronization.
  • Provides the logic for migrating existing data in the business data table from the old format to the new format after schema synchronization.

A typical example of when to use an upgrade codeunit is when you remove a field from a table definition and you do not want to lose the existing data in the business data table. Instead, you want to use it somewhere else in the new application.

You implement upgrade codeunits when you make destructive changes to tables in Microsoft Dynamics NAV Development Environment. After you have created an upgrade codeunit to handle table changes, you can use it when you upgrade data from an earlier version of Microsoft Dynamics NAV to the current version. A single upgrade codeunit will typically contain table schema synchronization instructions and data migration logic for multiple tables that have changed from one version of Microsoft Dynamics NAV to another.

SchemaSync-9

I will come back on this topic in another post with more details.

And many more options like PowerShell Sync with above options.

Benefits:-

Perform on demand – transparency -> As developer and system administrator, you are in control when to call the schema synchronization and how to synchronize table changes. You can invoke it, plan for it and schedule for it on a case by case basis. You can also monitor its progress and monitor the state of your database (tenant).

Not blocking other changes – productivity -> Schema Synchronization has become more granular. It can be performed per table object as well as for all table changes at once. When one table is being synchronized you are no longer blocked, and you can continue making changes to other tables.

Opened for additional instructions – flexibility -> Using upgrade codeunits you can provide input for the schema synchronization to do extra tasks, like automatically moving or copying data into upgrade tables, checking the changes or forcefully applying them where necessary. (Will come up with more details on this in my next post)