Development Tips

Testing Best Practices

There is always trade-off between Quality & Quantity of deliverables.

Sometimes small Partners don’t want to invest on resources and time for their deliverables to make big profits.

Sometimes customers are not interested in paying more for their customizations requested, their after they keep investing on recursive fixes for their solutions.

Sometime requirement is not well aligned with Business Logic and the process keeps refining over the time.

Which leads to arguments on Product capability and Partner Quality of work.

Whatsoever may be the reason but before any piece of code is moved to the Production environment should be well tested and accepted by the clients/customers.

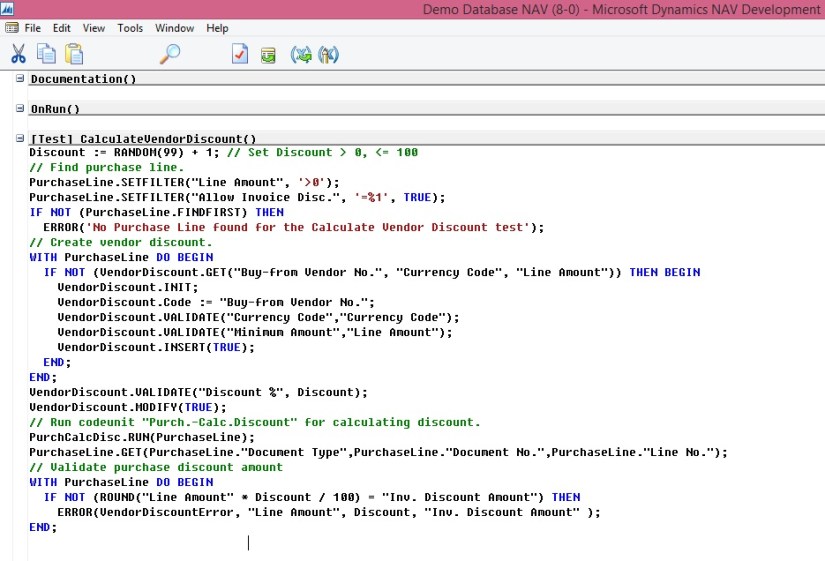
Microsoft recommends the following best practices for designing your application tests:

  • Test code should be kept separate from the code that is being tested. That way, you can release the tested code to a production environment without releasing the test code.
  • Test code should test that the code being tested works as intended both under successful and failing conditions. These are called positive and negative tests. The positive tests validate that the code being tested works as intended under successful conditions. The negative tests validate that the code being tested work as intended under failing conditions.
    • In positive tests, the test function should validate the results of application calls, such as return values, state changes, or database transactions.
    • In negative tests, the test function should validate that the intended errors occur, error messages are presented, and the data has the expected values.
  • Automated tests should not require user intervention.
  • Tests should leave the system in the same well-known state as when the test started so that you can re-run the test or run other tests in any order and always start from the same state.
  • Test execution and reporting should be fast and able to integrate with the test management system so that the tests can be used as check-in tests or other build verification tests, which typically run on unattended servers.
  • Create test functions that follow the same pattern:
    • Initialize and set up the conditions for the test.
    • Invoke the business logic that you want to test.
    • Validate that the business logic performed as expected.

For more details see below Links:

Creating a Test Codeunit and Test Function
Creating a Test Runner Codeunit
Adding a Test to a Test Runner Codeunit

Development Tips

Adding a Test to a Test Runner Codeunit

How to add a line to test runner codeunit that runs the new TestVendorDiscount codeunit.

The test runner codeunit runs all the test codeunits that you may have created to test the other customized functionality.

To add a test to a test runner codeunit

  • In the development environment, on the Tools menu, choose Object Designer.
  • In Object Designer, choose Codeunit, select the existing test runner codeunit, and then choose the Design button.
  • In the C/AL Editor, in the OnRun function, add the following code.

CODEUNIT.RUN(CODEUNIT::TestVendorDiscount);

  • On the File menu, choose Save.

For more details see below posts:

Creating a Test Codeunit and Test Function
Creating a Test Runner Codeunit

Development Tips

Creating a Test Runner Codeunit

Follow below Steps to Create Test Runner

  • In the development environment, on the Tools menu, choose Object Designer.
  • In Object Designer, choose Codeunit, and then choose New.
  • On the View menu, choose Properties.
  • In the Properties window, in the Subtype field, select TestRunner to specify that this is a test runner codeunit.
  • In the TestIsolation field, specify which changes to that you want to roll back. You can choose from the following values:
    • Disabled
    • Codeunit
    • Function

TestCu-5

Value Description
Disabled Do not roll back any changes to the database. Tests are not isolated from each other.This is the default value.
Codeunit Roll back all changes to the database after each test codeunit executes.
Function Roll back all changes to the database after each test function executes.

It is recommend that you design tests to be independent of each other. Tests might read from and write to the same database, which means that tests can interact with each other.

If tests interact, then you may experience incorrect test results.

To eliminate test interactions, use the TestIsolation property to roll back changes to the database after each test function or after each test codeunit.

If you specify that you want to roll back database changes, then all database changes are rolled back, including changes that were explicitly committed to the database during the test by using the COMMIT function.

  • In the C/AL Editor, in the OnRun function, enter code to run the test codeunits. For example, the following code in the OnRun function of a test runner codeunit runs test codeunits.

CODEUNIT.RUN(CODEUNIT::TestVendorDiscount);

Note
You may want to define your test suite in a table and then write code in the OnRun function of the test runner codeunit to iterate through items in the table and run each test codeunit.
  • (optional) To create an OnBeforeTestRun trigger, do the following steps:
    • On the View menu, choose C/AL Globals.
    • In the C/AL Globals window, on the Functions tab, on a new line in the Name field, enter OnBeforeTestRun, and then choose Locals.
    • In the C/AL Locals window, on the Parameters tab, enter the following.

TestCu-6

    • In the C/AL Locals window, on the Return Value tab, enter the following

TestCu-7

    • Close the C/AL Locals window.
    • In the C/AL Editor, in the OnBeforeTestRun trigger, enter code that executes before each test function. Typically, the code in the OnBeforeTestRun function determines if the test function should execute and returns true if it should. Otherwise, the trigger returns false. The OnBeforeTestRun trigger may also initialize logging variables. For example, the following code initializes a logging variable and returns true to indicate that the test function should execute. This example requires that you create the following global variable.

TestCu-8

  • (optional) Do the following steps to create an OnAfterTestRun trigger:
    • On the View menu, choose C/AL Globals.
    • In the C/AL Globals window, on the Functions tab, on a new line in the Name field, enter OnAfterTestRun, and then choose Locals.
    • In the C/AL Locals window, on the Parameters tab, enter the following.

TestCu-9

    • Close the C/AL Locals window.
    • In the C/AL Editor, in the OnAfterTestRun trigger, enter code that executes after each test function. For example, the following code logs the results of the tests to the test reporting system. This example requires that you create a record variable named log.

TestCu-10

TestCu-11

log.INIT;

log.UnitId := CodeunitId;

log.Unit := CodeunitName;

log.Func := FunctionName;

log.Before := Before;

log.After := CURRENTDATETIME;

If Success THEN

log.Status := log.Status::Success

ELSE BEGIN

log.Status := log.Status::Failure;

IF FunctionName <> ” THEN

log.Message := GETLASTERRORTEXT;

END

log.INSERT(true);

Note

If you implement the OnAfterTestRun trigger, then it suppresses the automatic display of the results message after the test codeunit runs.

  • On the File menu, choose Save.
  • In the Save As window, in the ID field, enter an ID and in the Name field, enter a name for the codeunit. Verify that the Compiled check box is selected, and then choose OK.

For more details see also below posts:

Creating a Test Codeunit and Test Function
Adding a Test to a Test Runner Codeunit

Development Tips

Creating a Test Codeunit and Test Function

Let’s creates the test function, which tests the Purch-Calc.Discount functionality, to this test codeunit.

To create the test codeunit and test function

  • In the development environment, on the Tools menu, choose Object Designer.
  • In Object Designer, choose Codeunit, and then choose New.
  • On the View menu, choose Properties.
  • In the Properties window, in the Subtype field, select Test to specify that this is a test codeunit.
  • On the View menu, choose C/AL Globals.
  • In the C/AL Globals window, on the Functions tab, enter CalculateVendorDiscount. This is the name of the test function.

TestCU-1

Note
By default, functions that you add to test codeunits have the FunctionType property set to Test.
  • On the Functions tab, choose Locals.
  • In the C/AL Locals window, on the Variables tab, enter the following variables, which you will use in the CalculateVendorDiscount test function.

TestCU-2

Important

Be sure to create these variables on the Variables tab, not on the Parameters tab. If you create them on the Parameters tab, then you get an error when you compile that says the test method signature is invalid

  • In the C/AL Locals window, on the Text Constants tab, in the Name field, enter VendorDiscountError. In the ConstValue field, enter Vendor Discount Error – Line Amount: %1, Discount: %2, Discount Amount: %3.

TestCU-3

  • Close the C/AL Locals window and the C/AL Globals window.
  • In the C/AL Editor, in the CalculateVendorDiscount function, enter the following code.

TestCU-4

You can copy above code from below:

Discount := RANDOM(99) + 1; // Set Discount > 0, <= 100

// Find purchase line.

PurchaseLine.SETFILTER(“Line Amount”, ‘>0’);

PurchaseLine.SETFILTER(“Allow Invoice Disc.”, ‘=%1’, TRUE);

IF NOT (PurchaseLine.FINDFIRST) THEN

ERROR(‘No Purchase Line found for the Calculate Vendor Discount test’);

// Create vendor discount.

WITH PurchaseLine DO BEGIN

IF NOT (VendorDiscount.GET(“Buy-from Vendor No.”, “Currency Code”, “Line Amount”)) THEN BEGIN

VendorDiscount.INIT;

VendorDiscount.Code := “Buy-from Vendor No.”;

VendorDiscount.VALIDATE(“Currency Code”,”Currency Code”);

VendorDiscount.VALIDATE(“Minimum Amount”,”Line Amount”);

VendorDiscount.INSERT(TRUE);

END;

END;

VendorDiscount.VALIDATE(“Discount %”, Discount);

VendorDiscount.MODIFY(TRUE);

// Run codeunit “Purch.-Calc.Discount” for calculating discount.

PurchCalcDisc.RUN(PurchaseLine);

PurchaseLine.GET(PurchaseLine.”Document Type”,PurchaseLine.”Document No.”,PurchaseLine.”Line No.”);

// Validate purchase discount amount

WITH PurchaseLine DO BEGIN

IF NOT (ROUND(“Line Amount” * Discount / 100) = “Inv. Discount Amount”) THEN

ERROR(VendorDiscountError, “Line Amount”, Discount, “Inv. Discount Amount” );

END;

The code in this test function prepares the test data by setting a random discount amount, getting a record from the Purchase Line table that satisfies two filters, and creating a record in the Vendor Invoice Disc. table with the random discount amount.

Next, it runs the Purch-Calc.Discount codeunit, which contains the code that is being tested. Finally, it validates the results of running the Purch-Calc.Discount codeunit and raises an error if the results are not as expected.

Note

This test code does not guarantee that the state of the database after you run the test is the same as the state of the database before you run the test.

  • On the File menu, choose Save.
  • In the Save As window, in the ID field, enter ID. In the Name field, enter TestVendorDiscount. Verify that the Compiled check box is selected, and then choose the OK button.

Now create additional test functions in the TestVendorDiscount test codeunit to test other aspects of vendor discounts.

These test functions should include negative tests, which validate that the code being tested works as intended under failing conditions.

For more details See below posts:

Creating a Test Runner Codeunit
Adding a Test to a Test Runner Codeunit

Development Tips

Defining Action Scope for Microsoft Dynamics NAV Pages – in Navision 2015

When developing pages for Microsoft Dynamics NAV Tablet client that include a repeater control, it is useful to be able to define whether the actions available on a page apply to the whole page or are related to the repeater control on the page. The purpose of the Scope property is to enable application developers to add row-specific actions to the shortcut menu which is available to the user on each line. This gives users a more direct way to invoke actions that relate to the selected row/line.

This is the case when you have, for example, Line Comments which are related to a line, but appear in the ribbon. You can specify the scope of action by setting the Scope property on the page action to be either Page or Repeater.

Specifies the scope of the action to be either page-specific, or specific to a repeater control. The Scope property has two options; Page and Repeater.

The Scope property is only used on pages that include a repeater control and it offers a way to determine the scope of an action to be the page or to be specific to the repeater control. The default behaviour of the Scope property is Page.

Let’s see how to do the same:

  • Open a Page which have repeaters for example I am using Page 42 Sales Order.

ScopeProperty

  • Select View Page Action.
  • Select the Action for which you wish to change the Scope Property, for example I have selected the Statistics for demo purpose.

The Scope property has the following effect:

  • On a Microsoft Dynamics NAV Windows client, the Scope property has no effect. All actions are shown in the ribbon.
  • On a Microsoft Dynamics NAV Web client, if the Scope property is set to Page, the action will be shown in the ribbon. If the Scope property is set to Repeater the action will be shown in both the repeater control and in the ribbon.
  • On a Microsoft Dynamics NAV Tablet client, if the Scope property is set to Page the action will be shown in the page action menu. If the Scope property is set to Repeater, the action is moved from the page action menu to the repeater control shortcut menu.
Development Tips

Creating File Attachment to Mail for Report

We generally get requirements from clients to send report output as attachment to the mail.

In Microsoft Dynamics Navision 2015 this feature is available at most of the places, but we can design for other earlier versions too.

Long-time back I was having this requirement from one of my client, those days I scanned lots of website and tried lots of method. This one I found compact and easy to use. Their after whenever I get similar requirements I prefer using this.

Today I wish to share the same with others, as I have used it in my several implementations and found it working perfect and tested with several clients.

Let’s see this, it could help someone getting his work done in easy way and can save lots of time from hit and try with several methods.

First step, I will create a function which will help us generating the file on Service tier and down load to local temporary folder, so that we can easily access and attach to our mail.

Let’s give it a meaningful name like: DownloadToClientFileName

I will define two parameters for this Function as below:

Var Name DataType Subtype Length
No ServerFileName Text 250
No ToFile Text 250

I will define Return Value of Function as: Text of Length 250

I will define Local Variables for Function as below:

Name DataType Subtype Length
ClientFileName Text 250
objScript Automation ‘Microsoft Script Control 1.0’.ScriptControl
CR Text 1

Now we will write Code for the Function as below:

ClientFileName := ToFile;

IF NOT DOWNLOAD(ServerFileName, ”, ‘<TEMP>’,”, ClientFileName) THEN

EXIT(”);

IF CREATE(objScript,TRUE,TRUE) THEN

BEGIN

CR := ‘ ‘; CR[1] := 13;

objScript.Language := ‘VBScript’;

objScript.AddCode(

‘function RenameTempFile(fromFile, toFile)’+CR+

‘set fso = createobject(“Scripting.FileSystemObject”)’+CR+

‘set x = createobject(“Scriptlet.TypeLib”)’+CR+

‘path = fso.getparentfoldername(fromFile)’+CR+

‘toPath = path+”\”+left(x.GUID,38)’+CR+

‘fso.CreateFolder toPath’+CR+

‘fso.MoveFile fromFile, toPath+”\”+toFile’+CR+

‘RenameTempFile = toPath’+CR+

‘end function’);

ClientFileName := objScript.Eval(‘RenameTempFile(“‘+ClientFileName+'”,”‘+ToFile+'”)’);

ClientFileName := ClientFileName+’\’+ToFile;

END;

EXIT(ClientFileName);

Second Step, I will write code to call this function to attach the file to Mail and send using SMTP as below:

//SMTP is an Variable of Codeunit SMTP Mail

SMTP.CreateMessage(SenderName,SenderAddress,Recipient,Subject,Body,TRUE);

//SenderName,SenderAddress,Recipent is an email addresses

SMTP.AppendBody(Body);

CLEAR(MailReport);

//MailReport is Variable for Report of which output we want to use as attachment.

//Name & ToFile is Text type variable of Length 250

Name := STRSUBSTNO(‘Estimate No. %1.pdf’, SalesHeader.”No.”);

//Creating File Name

ToFile := Name;

FileName := TEMPORARYPATH + ToFile;

//We are using temporarypath OS Variable to get the path for file

MailReport.SetMailFilters(SalesHeader);

MailReport.SAVEASPDF(FileName);

ToFile := DownloadToClientFileName(FileName, ToFile);

SMTP.AddAttachment(ToFile);

FILE.ERASE(FileName);

SMTP.Send;

Now you can create a template function and use where ever require.

Functional Tips

Defining Discount & Sales Price for an Item

This set of demonstration will present the new, simplified way of setting sales prices and discounts for items in Microsoft Dynamics NAV 2015.
SPND-1

  • On the Role Center, choose Items to open the list of existing items.
  • Select item 1000, and then, on the Home tab, in the Manage group, choose Edit.
  • In the Item Card window, on the Sales Prices and Line Discounts FastTab, create a new line.

SPND-2

Set a Discount for an Item

  • On the line, set the following values:

Line Type: Sales Line Discount

Sales Type: All Customers

Type: Item Disc. Group

Minimum Quantity: 50

Line Discount %: 30.00

Starting Date: August 1 2015.

Ending Date : Sep 1 2015

  • Choose the OK button

Pick an existing item, for example, item number 1000.

Set a 30 percent line discount for the item for all customers who buy 50 or more of these items in one invoice. The discount will be valid from Aug 1, 2015 to Sep 1, 2015.
SPND-3
Set a Sales Price for an Item

  • On the line, set the following values:

Line Type: Sales Price

Sales Type: Customer

Sales Code: No. 10000

Type: Item

Minimum Quantity: 30

Unit Price: 3200.

  • Choose the OK button

Pick an existing item

Set a lower sales price for this item, for a specific customer, with the condition that the customer buys 30 or more of these items in one invoice.
SPND-4

Report

Managing Report Layouts

Microsoft Dynamics NAV 2015 enables reports to have a single built-in RDLC and Word layout, shared among tenants, as well as any number of customized layouts per tenant.

To browse and manage which layout is currently used for a given report, a new Report Layout Selection list page has been introduced.

We will use the Report Layout Selection page to switch between and run the RDLC and Word layouts that are shipped as part of the new Sales Invoice report 1306.

  • Open Report Layout Selection page by doing one of the following:
  • In the Search box, enter Report Layout Selection, and then choose the related link.
  • In the navigation pane, choose Departments, Administration, IT Administration, Reports, and then Report Layout Selection.
  • In the Small Business Role Center, on the Actions tab, choose Setup, Company Information, and then choose Report Layouts.
  • Ensure that the Company Name field is set to the correct company because reports layouts are company-specific.

ReportLayout-2

ReportLayout-3

The Report Layout Selection page lists all of the reports that are available for the company that is specified in the Company field at the top of the window.

The Selected Layout field specifies the layout that is currently used for a given report.

A report can be set up with more than one report layout, which you can then switch among as needed.

Depending on the layouts that are available for a report, you can choose to use a built-in RDLC layout, a built-in Word layout, or a custom layout.

From the Report Layout Selection page, it is also possible to manage custom layouts for reports.

  • In the list, locate the document report 1306 Sales – Invoice by doing one of the following:
  • Scroll down through the list.
  • Filter on the Report ID equal to 1306.
  • Select the row for report 1306.
  • Choose the down arrow in the Selected Layout field to show the options (RDLC, Word, and Custom).

ReportLayout-4

First we will have a look at the new report 1306 Sales – Invoice, which has a built-in RDLC and Word layout. Out of the box, it does not have any custom layouts – we will add these in later posts.

As you can see, the RDLC (built-in) is typically the layout that selected by default. This can, however, be controlled by using the Default Layout property on the specific report object in Microsoft Dynamics NAV Development Environment.

Notice that the page also contains a Custom Layouts FactBox. This lists any available custom layouts for a selected report in the list. If there are no custom layouts for the report, then you will have to create one first.

  • In the row for report 1306, set the Selected Layout field to RDLC (built-in).
  • On the Home tab, in the Report group, choose Run Report.
  • In the resulting report request page, use default values, and then select the Print button and choose PDF.
  • Open and inspect the resulting PDF file for report, which is based on the RDLC layout.

We will now select and run the built-in RDLC layout for report 1306 Sales – Invoice from the Report Layout Selection list page.

ReportLayout-5

ReportLayout-6

  • In the Report Layout Selection page, select the line for report 1306, and then set the Selected Layout field to Word (built-in).
  • On the Home tab, in the Report group, choose Run Report.
  • In the resulting report request page, use default values, and the select the Print button and choose PDF. [Note: This might not work for all client setups because it relies on server-side PDF conversion. As an alternative, use the Preview option on the request page, which will result in a Word document.)
  • Open and inspect the resulting PDF file for the report, which is based on the Word layout

Finally, we will change the layout to the built-in Word layout and then run the report.

ReportLayout-7

ReportLayout-8

Report

Using Report Selector to run Report

The required steps to use the reports are shown:

  • Open the Report Selection – for example Sales page by doing one of the following:
  • In the Search box, enter Report Selection – Sales, and then choose the related link.
  • In the navigation pane, choose Departments, Administration, IT Administration, and then Reports.

In the Report Selection – Sales window, do the following:

  • Set the Usage field to Invoice.
  • In the Report ID field, replace 206 with 1306 (an New Mini Document Report.in 2015)
  • Choose the OK button.

ReportSelector

Set up the report selection to run report 1306 instead of report 206 when printing invoices.

Report

Word Document Reports and Custom Layouts

Reporting functionality has been greatly improved in Microsoft Dynamics NAV 2015 by adding support for defining report layouts in Word, and enabling end users to create custom RLDC and Word layouts for their reports. These two features make it easier to create visually pleasing document reports, as well as allow end users to modify reports to their liking with as little partner involvement as desired.

Today I am sharing again all the posts from earlier archive, if you missed you can find all of them below.

Soon I will come up with more posts on this topic. Till then go through below links and develop your skills so that we can take up few more complex ones.

  1. How many types of Layout is supported in NAV 2015?
  2. How to. Specify the Default Built-in Report Layout
  3. Import and Export a Word Report Layout
  4. Add Fields from a Report Dataset to a Word Report Layout
  5. Adding Image Fields
  6. Removing Label and Data Fields
  7. To create a Word report layout for a report
  8. Designing Report Layouts from the Microsoft Dynamics NAV Development Environment
  9. Creating my first Word List Report in Navision 2015
  10. To modify the Word report layout
  11. Creating Custom Word Layout for Document Reports in Navision 2015
  12. Creating Word Mail Merge Report in Microsoft Dynamics Navision 2015
  13. The New Report Scheduling feature for end users running reports in Microsoft Dynamics Navision 2015