Convert to PDF, Development Tips, How To, Information, Office Integration, Tip & Tricks, Word

Converting Office Files into PDF from Navision

Today in this post i will walkthrough how we can convert any MS Office File into PDF.

It have been many time required to convert any attached file with the record in Navision to PDF format.

To perform this action we will require a tool which can be downloaded from:

OfficeToPDF download link :- http://officetopdf.codeplex.com/releases/view/118190

Extract and save the OfficeToPDF.exe file to some Folder.

For this Walkthrough i have created a Field in Customer Table to save the File Path of the Office File which we want to convert into PDF.

PDFConvMerge-1

You can add Dialog box to select the File from the specified Folder.

For this demo i have kept it simple Text Field where you can add your File Path and Office File Name. It is assumed that only Office File will be attached here.

For Setup purpose i have created one Setup Table & Page where we will store our other required Folder paths.

PDFConvMerge-2

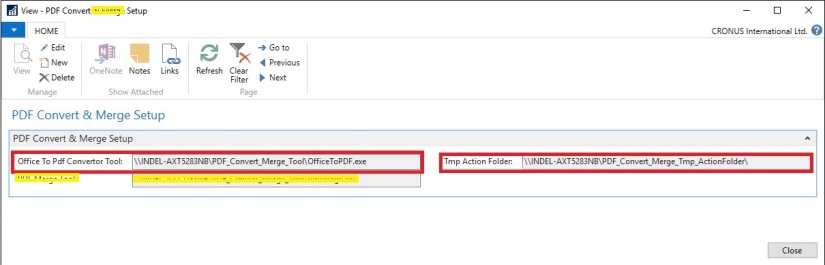
Here we have given provision to save the Path of the Office to PDF Convertor Tool file Path & Temporay working Folder.

I have used the shared folder for all the paths so that it is not system specific, also make sure you give required permission on this folder for all the operating accounts.

Now our Next task will be to write a function which will perform this conversion part.

PDFConvMerge-3

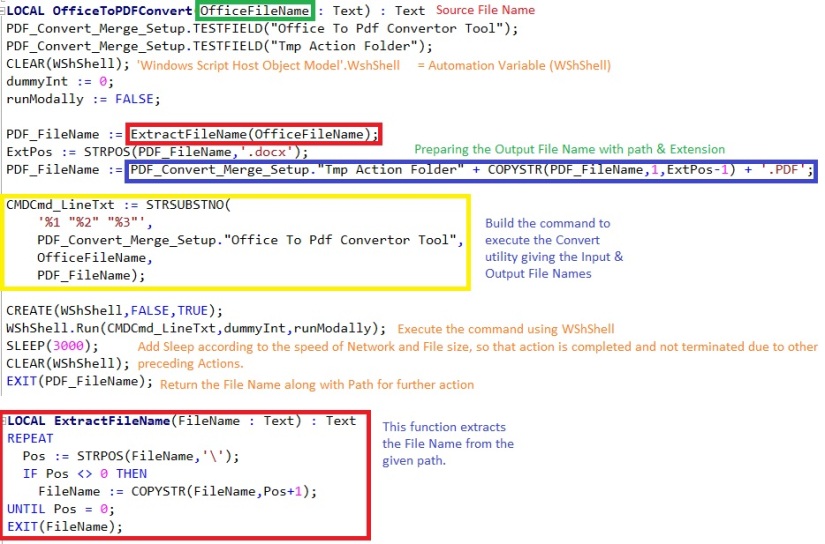
Above Function Takes the File Name from the Customer Card we stored above on Customer Card. Takes the Path of the Office To PDF Convertor Utility and Tmp working Folder.

Prepares the PDF file Name along with Path stored in Setup.

Prepares the command to invoke Convert Utility using WsShell and returns the PDF file File Name along with path as defined in the Setup.

Now you can use this File for futher purpose as required.

To keep it simple no additional code of test and other required routine task is not added.

Now you know the Logic you can tweak the functionality as per your requirement.

I will comeup with more information in my up comming posts, till then keep exploring and learning.


Corfu Navision 2016, Development Tips, How To, Information, Report, Tip & Tricks

Controlling User wise Report Print & Save As… Permission


It is always asked from several users to have a control on Printing of reports from Preview.

Normally you have two options to print the Report in Navision.

  • From Request Page

PrintPreview1

  • From Print Preview

PrintPreview2

If you check document Reports you will notice that you don’t have option to Print the Report from Preview, but you can print from Request Page.

Why it doesn’t allow in such Reports?

It is because these report uses statement like:

IF NOT CurrReport.PREVIEW THEN

If the C/AL code for the report uses the PREVIEW function to disable printing from the preview, then users cannot change the display mode to print layout.

Using these option I have tried to disable Printing of Report from Request Page and Print Preview.

PrintPreview3


Add a Boolean type Field in User Setup Table & Page as shown above.

Now the report which we want to restrict from printing we will add piece of code.

Although there are other ways to do this but to keep it simple I have followed this approach. Once you are ok with logic you can implement the same in your way, in fact more better way than this sample demo.

PrintPreview4

If I run the report by setting Allow Report Printing to FALSE, it will not show me the Print & Save as Option on Preview.

PrintPreview5

Also if I Try to Print or Save As… from Request Page it will Flag me an error as above.

So now you know the logic behind it, what you are waiting for. Give your user to control the Printing & Save As… option.

Now in last Cumulative Updates also Microsoft added option to control this,  but it is at Service Level, if you want to control at user Level this is one option, wait for any further Cumulative Update in which Microsoft may add this capability or explore and find any other option and share with others.

That’s all for this post. I will come up with more details in my upcoming posts.

Till then keep exploring & learning.


Corfu Navision 2016, Cumulative Updates, India Localization, Information, Updates

NAV 2016 – Indian Localization Released in August 2016

Product: Microsoft Dynamics NAV
Version: NAV 2016

Released Features (Find CustomerSource Links)

Title                                                                                                     Internal Reference
Additional Depreciation under Income Tax                                        167285
Krishi Kalyan Cess feature for Microsoft Dynamics NAV 2016      167286
New File Validation Utility (Version 5.0) for TDS                               167288

Enhancement of e TDS (Form 26Q & Form 27Q) feature for Microsoft Dynamics NAV 2016 – India

https://mbs.microsoft.com/partnersource/global/deployment/downloads/tax-regulatory-updates/msdnav2016enhancementform2627q

This release addresses the changes brought in by versions of FVU ranging from 4.3 to 5.0 released time to time by the Income tax department. It includes incorporating necessary validations along with updating e TDS files of Form 26Q and Form 27Q generated by the application to ensure compatibility with the latest FVU (5.0) hosted in NSDL website.

Krishi Kalyan Cess feature for Microsoft Dynamics NAV 2016 – India

https://mbs.microsoft.com/customersource/Global/NAV/downloads/tax-regulatory-updates/Krishi_Kalyan_Cess_feature_for_Microsoft_Dynamics_NAV_2016_India
Government has introduced a new Cess called ‘Krishi Kalyan Cess (KKC)’ in Finance Act 2016 which will take effect from 01-Jun-2016. It is imposed on all taxable Services at the rate of 0.5%. KKC is not a Cess on Service Tax but it is a tax on taxable services in addition to Service tax. It would be calculated in the same way as Service Tax is being calculated.?

Enhancement of Additional Depreciation Feature for Microsoft Dynamics NAV 2016 – India

https://mbs.microsoft.com/partnersource/global/deployment/downloads/tax-regulatory-updates/msdnav2016enhancedepIndia

This release facilitates carry forward of additional depreciation to the subsequent year in case the asset is acquired and put to use for less than 180days during a financial year.?

Cumulative Updates, Information

Cumulative Update 10 for Microsoft Dynamics NAV 2016 (Build 46621)- Released in Aug 2016

This cumulative update includes all hotfixes and regulatory features that have been released for Microsoft Dynamics NAV 2016, including hotfixes and regulatory features that were released in previous cumulative updates.

This cumulative update replaces previously released cumulative updates. You should always install the latest cumulative update.

It may be necessary to update your license after implementing this hotfix to gain access to new objects included in this or a previous cumulative update (this only applies to customer licenses).

For a list of cumulative updates released for Microsoft Dynamics NAV 2016, see released cumulative updates for Microsoft Dynamics NAV 2016  (https://support.microsoft.com/kb/3108728/ ) . Cumulative updates are intended for new and existing customers who are running Microsoft Dynamics NAV 2016.

For more details see below link, Partner/Customer Source required.

https://mbs2.microsoft.com/Knowledgebase/kbdisplay.aspx?scid=kb,en-us,3182131


Cumulative Updates, Information

Cumulative Update 22 for Microsoft Dynamics NAV 2015 (Build 46580)- Released in Aug 2016

This cumulative update includes all hotfixes and regulatory features that have been released for Microsoft Dynamics NAV 2015, including hotfixes and regulatory features that were released in previous cumulative updates.

Note You must convert the database if you are upgrading to this cumulative update from a cumulative update earlier than cumulative update 9 (build 41779). For more information, see Converting a Database (https://msdn.microsoft.com/en-us/library/dn271650(v=nav.80).aspx) in Help for Microsoft Dynamics NAV.

This cumulative update replaces previously released cumulative updates. You should always install the latest cumulative update.

It may be necessary to update your license after implementing this hotfix to gain access to new objects included in this or a previous cumulative update (this only applies to customer licenses).

For a list of cumulative updates released for Microsoft Dynamics NAV 2015, see released cumulative updates for Microsoft Dynamics NAV 2015  (https://support.microsoft.com/kb/3014609/ ) . Cumulative updates are intended for new and existing customers who are running Microsoft Dynamics NAV 2015.

For more details see below link, Partner/Customer Source required.

https://mbs2.microsoft.com/Knowledgebase/kbdisplay.aspx?scid=kb,en-us,3182130

Cumulative Updates, Information

Cumulative Update 34 for Microsoft Dynamics NAV 2013 R2 (Build 46577)- Released in Aug 2016

This cumulative update includes all hotfixes and regulatory features that have been released for Microsoft Dynamics NAV 2013 R2, including hotfixes and regulatory features that were released in previous cumulative updates.

This Cumulative Update replaces previously released cumulative updates. You should always install the latest cumulative update.

Note Implementing this cumulative update will require a database upgrade.

Licenses versioning

Microsoft Dynamics NAV 2013 R2 cumulative updates and license key versioning:

  • Microsoft Dynamics NAV 2013 R2 license keys are backward compatible with Microsoft Dynamics NAV 2013 instances.
  • Microsoft Dynamics NAV 2013 license keys may not be used with Microsoft Dynamics NAV 2013 R2 instances. Microsoft Dynamics NAV 2013 license keys will not work with Microsoft Dynamics NAV 2013 R2 CU10 (or later) instances.
  • Microsoft Dynamics NAV 2013 and Microsoft Dynamics NAV 2013 R2 license keys are not forward compatible with Microsoft Dynamics NAV 2015 instances.

More details is made available in the October 2014 release of the Microsoft Dynamics Perpetual Licensing Guide.

It may be necessary to update your license after implementing this hotfix to gain access to new objects included in this or a previous cumulative update (this only applies to customer licenses).

For a list of cumulative updates released for Microsoft Dynamics NAV 2013 R2, see released cumulative updates for Microsoft Dynamics NAV 2013 R2  (https://support.microsoft.com/kb/2914930/ ) . For a complete list of all hotfixes released in cumulative updates for Microsoft Dynamics NAV 2013 R2, view the following CustomerSource and PartnerSource pages:

CustomerSource
PartnerSource

Cumulative updates are intended for new and existing customers who are running Microsoft Dynamics NAV 2013 R2.

For more details see below link Partner/Customer Source required.

https://mbs2.microsoft.com/Knowledgebase/kbdisplay.aspx?scid=kb,en-us,3182128


Cumulative Updates, Information

Cumulative Update 41 for Microsoft Dynamics NAV 2013 (Build 46576)- Released in Aug 2016

This cumulative update includes all hotfixes and regulatory features that have been released for Microsoft Dynamics NAV 2013, including hotfixes and regulatory features that were released in previous cumulative updates.

This cumulative update replaces previously released cumulative updates. You should always install the latest cumulative update.

It may be necessary to update your license after implementing this hotfix to gain access to new objects included in this or a previous cumulative update (this only applies to customer licenses).

For a list of cumulative updates released for Microsoft Dynamics NAV 2013, see released cumulative updates for Microsoft Dynamics NAV 2013  (https://support.microsoft.com/kb/2842257/ ) . For a complete list of all hotfixes released in cumulative updates for Microsoft Dynamics NAV 2013, view the following CustomerSource and PartnerSource pages:

CustomerSource
PartnerSource

Cumulative updates are intended for new and existing customers who are running Microsoft Dynamics NAV 2013.

For more details see below link Partner/Customer Source is Required.

https://mbs2.microsoft.com/Knowledgebase/kbdisplay.aspx?scid=kb,en-us,3182126


Data, How To, Information, Tip & Tricks, What's New

Save General Journals as Standard Journal in Navision

Do you Know you can save the General Journal as Standard Journal and retrive edit and post it later.

Many of time we pass entries of same Nature, Like Rent, Salary, Bills etc.. just an example you can decide upon which entries you post frequently and club it as Standard Journal to save your time.

You can create once and retrive it every month or when ever required and Post it in future/later.This can serve you as template for future use.

Let us see how we can use this feature.

StdGen-1

Open your General Journal.

Make entries which you do oftenly. Don’t put Postng Date & Document No. Complete your all entries.

Next we will save this as Standard Journal for future use.

From Action choose Save as Standard Journal.

StdGen-2

Give Code & Name for your Journal Template.

If Amounts are fixed every time you can enter them too and while Save choose Save Amount.

No Let us review the entry that we saved.

From Action Choose Get Standard Journal.

This will display you all Saved Standard General Journals.

StdGen-3

Select the required Journal Code and Click on Edit.

StdGen-4

This is what is Saved in your Standard Journal.

Let use return to the Standard Journal List.

Select desired/ earlier saved Std. Journal and Click on OK.

StdGen-5

Confirmation of Std. Journal retrived and Journals created in General Journal Page.

StdGen-6

Your General Journal gets populated with values you saved to Std. Journal.

Have you Noticed, Posting Date as your Work Date and Next Document No. from your assigned No. Series is populated Automatically.

StdGen-7

Fill the Amount and any other required fields and Post the Journal.

Next time when again you wish to post similar entries just retrive it and continue.

Thats all for todays Post, What you are waiting for give it a try.

I will comeup with more details in my upcoming Posts, till then keep exploring and Learning.


Data, Development Tips, How To, Information, Tip & Tricks

Creating Views – to Save Filtered Lists in NAV

Do you Know you can save the Page as View with filters.

Many of time we access to Page and apply same set of Filters to fetch our data. You can save the same for quick retrival of data applying the filters automatically in future access.

You save the Page with Filters as View.

Let us see small example how to achieve it.

First we will open the List Page in my case i am having one customized Customer List.

FilteredView-1

Suppose this is the Page which i use for Balances Retrival each month and on daily basis.

I Enter Filter as Balance > 5000 & Current Month Filter whenever i wish to check balances for my reporting or followup purpose.

For Date Filter i use (-CM..CM) sothat when i open this view next month it takes the appropriate Filter for that month.

FilteredView-2

Click on the Page Name post applying all the required Filters.

Select Save View as.

Give the Name for the View.

Select the Location to save the View.

On Confirmation respond as Yes.

FilteredView-3

Your View will be Saved, You can create as much Views as desired using different Filters.

FilteredView-4

Small and good Feature.

What you are waiting for give it a try.

I will comeup with more information in my upcoming posts, till then keep exploring and learning.


Azure, Corfu Navision 2016, How To, Information, Instalation & Configuration, Office 365, Office Integration, Tip & Tricks

Configuring Single Sign-On using Office 365 on Navision 2016

Today we will see how we can enable Single Sign-On using Office 365 for Navision 2016.

Before we start we should have Virtual Machine ready on Azure with Navision 2016 installed, Certificates and Nav User is configured. Endpoints are open so that web client can be used from outside Virtual Machine on internet.

It should be hosted on Public IP, then only we will be able to configure it.

For details regarding Azure Subscription you can see my earlier post here.

For details regarding Creating Virtual Machines you can see my earlier post here.

You also need Office 365 Subscription ready for use and you can use the AD of same to configure your Single Sign-On.

Let us start with Admin console of office 365. Click on Azure AD this will create Management Console to work with AD.

SingleSignOn-1

Enter your details and click on Next.

SingleSignOn-2

Enter your details and click on Next, Finally Sign Up.

SingleSignOn-3

It will take few minutes to configure and make it available for you.

SingleSignOn-4

Once your Subscription is ready click on Start Managing my Service.

SingleSignOn-5

From Management Console click on Virtual Machine, if you dont have already to create one for you.

SingleSignOn-6

Select the Virtual Machine in Search for Microsoft Dynamics Nav 2016.

SingleSignOn-7

Select the approprite Virtual Machine from the List.

SingleSignOn-8

Enter your details and Create. For more details see the link provided on top of the post.

SingleSignOn-9

Let us return to our AD, Click on Applications. This will List all you Apps currently available with your AD or office 365.

SingleSignOn-10

Click on Add to configure your Application.

Give a Name and Select Web Application/or Web API, as we are configuring for Web Client today. Click on Next.

SingleSignOn-11

Enter your Web Client URL and Office portal AD URL.  Click on OK.

SingleSignOn-12

Your New application gets registered with your AD.

Select the created Application and Click on View Endpoints.

SingleSignOn-13

Copy the Federation MetaData URL and keep it handy at safe place we will require this in our next step. Close the window we are not performing any changes here.

SingleSignOn-14

Open your Navision User Card.In Office 365 Authentication enter your Office portal user email id which you will be using for Single Sign-On.

SingleSignOn-15

Open your Navision Service Instance configuration and enter Federal MetaData URL which we copied in our previous step.

SingleSignOn-16

Restart you NAV Service.

SingleSignOn-17

Open the Web Client Folder under your IIS. Edit your Web.config file using prefered Editor.

SingleSignOn-18

Enter you Client Service Credentials as AccessControlService.

SingleSignOn-19

Change value of ACS URI as below. You have full explaination of same in the file itself.

SingleSignOn-20

Thats all, Now you open your web client and you will be redirected to Office 365 Login Page, enter your valid office 365 e-mail user id and password you will be authenticated and Web Client is opened.

Thats all for today, I will come up with moredetails in my upcoming posts.

Till then keep exploring and learning.