Development Tips, Office Integration, Report

Using Automation to Write a Letter in Microsoft Office Word

Automation lets you use the capabilities and features of Microsoft Office products, such as Microsoft Word or Microsoft Excel, in your Microsoft Dynamics NAV application.

Today we will implement Word Automation from a customer card in the Microsoft Dynamics NAV Windows client.

Note: The Microsoft Dynamics NAV Web client does not support automation.

Most information that we need to transfer to Word for this example is in the Customer table. The Customer table contains a FlowField called Sales (LCY) that contains the aggregated sales for the customer.

In this example we are learning about Automation, so we will use the existing value. In a real customer installation, we would need to set up an appropriate date filter to get the sales for the past year only.

We also need to retrieve the information about our own company that we will use in the letterhead and in the greeting of the letter. This information is contained in the Company Information and User tables.

  • The Automation server must be installed on the computer that compiles an object that uses Automation. If you must recompile and modify an object on a computer that does not have the Automation server installed, then you must modify the code to compile it again. We recommend that you isolate code that uses Automation in separate codeunits.
  • Performance can be an issue if extra work is needed to create an Automation server with the CREATE system call. If the Automation server is to be used repeatedly, then you will gain better performance by designing your code so that the server is created only once instead of making multiple CREATE and CLEAR calls).

Performance can be improved by putting the code on the customer card because you do not have to open and close Word for each letter that is created in the session.

You can work around this problem. If Word is already open when it is called from the code, then the running instance is reused. You can manually open Word or do not close Word after creating the first letter.

We will extract and transfer data one customer at a time. We will also initiate this processing and the subsequent processing in Word from the customer card.

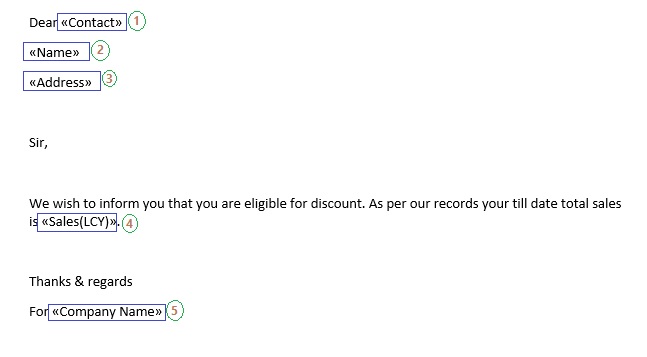
We will insert fields into the Word template and give these fields convenient mnemonic names that correspond to the names of the record fields that we are using.

To make this work, C/AL code must make two extra calls to Microsoft Office Word. You must call the ActiveDocument.Fields.Update method before using the fields. After you have transferred all the information, you must call the ActiveDocument.Fields.Unlink method. This ensures that you can successfully use the Word fields as placeholders.

In addition, while you can name the Customer or Address fields, you must reference them by indexing into the Fields collection of the document. This can make the C/AL code harder to understand.

Creating the Word Template for Use by Automation

First, task is to create a Word template that we will use to create letters to customers that qualify for a discount. To create the template, we will add mail merge fields for displaying data that is extracted from Microsoft Dynamics NAV that you want included in the customer letter, such as the customer’s name, contact, and total sales.

You will create and save the template on the computer running the Microsoft Dynamics NAV Windows client, because you will configure the automation object to run on the client.

  • On the computer running Microsoft Dynamics NAV Windows client, open Word and create a new document.

WordAutomation-1

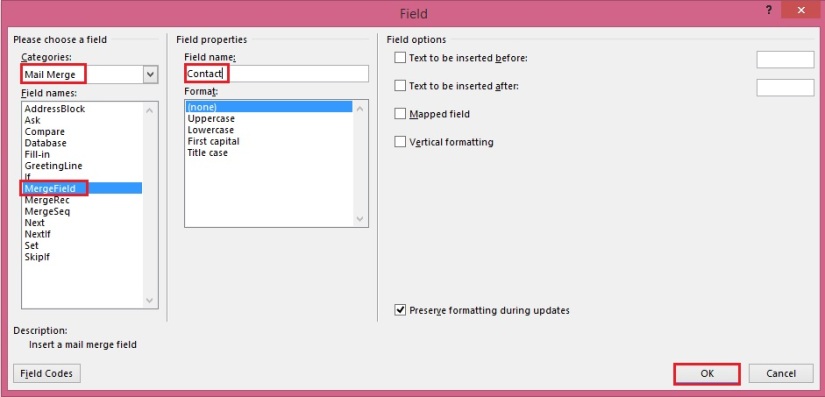
  • Choose where you want to insert the fields. Then, on the Insert tab, in the Text group, choose Quick Parts, and then choose Field.

WordAutomation-2

  • In the Categories list, select Mail Merge.
  • In the Field names list, select MergeField.
  • In the Field Name box under Field Properties, type Contact. This field will display the name of your contact person at the customer site as taken from the Customer table.
  • Choose OK to add the field.

WordAutomation-3

  • Repeat steps as above to add the remaining fields as follows:
Field name Description Underlying table
Name The name of the customer. Customer
Address The address of the customer. Customer
Sales (LCY) The total amount that the customer has purchased from you. Customer
Company Name The name of your company. Company Information
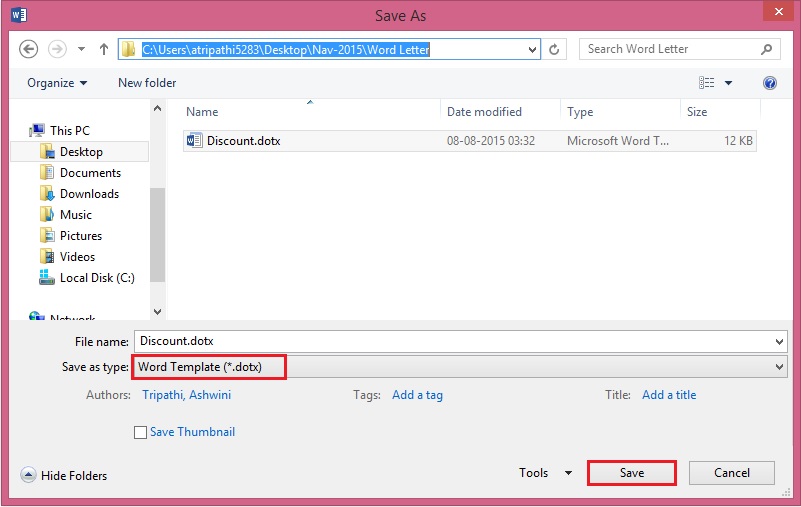
  • Save the Word document as a template with the name Discount.dotx in folder of your choice.

WordAutomation-4

Creating the Codeunit and Declaring the Variables

The next step is to create the codeunit that calls Word and creates the letter.

To create the codeunit

  • In Object Designer, choose Codeunit, and then choose the New button to create a new codeunit.
  • On the View menu, choose Properties to open the Properties window of the codeunit.
  • In the TableNo field, choose the AssistEdit button to open the Table List window.
  • In the Table List window, select the Customer table, and then choose OK.

WordAutomation-5

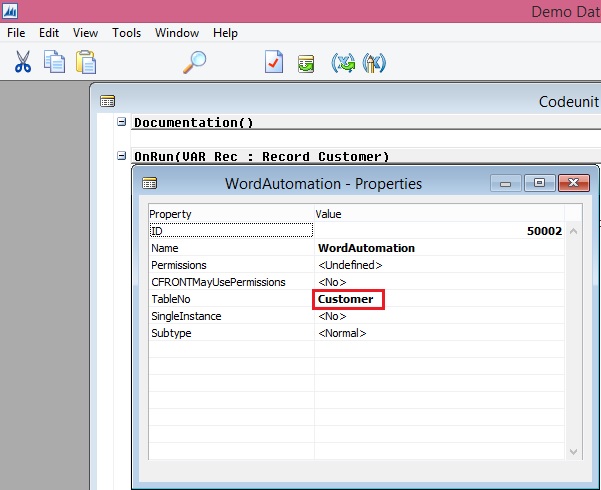
  • Close the Properties window.

To declare the variables

  • Choose the OnRun Trigger and on the View menu, choose C/AL Locals, and then choose the Variables tab.
  • On a blank line, type wdApp in the Name field and set the Data Type field to Automation.

Note

When you create an Automation variable, some hidden events are also created for it. If you want to delete the variable, be aware that the events are also not deleted. This can cause issues if you then create a variable with the same name.

  • In the Subtype field, choose the AssistEdit button. The Automation Object List window is displayed.
  • In the Automation Server field, choose the AssistEdit button.
  • In the Automation Server List, select Microsoft Word 15.0 Object Library if you are running Word 2013, or select Microsoft Word 14.0 Object Library if you are running Word 2010, and then choose OK.
  • From the list of classes in the Automation Object List, select the Application class, and then choose OK.

WordAutomation-6

  • Repeat steps above to add the following two Automation variables:
Name Data type Subtype Class
wdDoc Automation Microsoft Word 14.0/15.0 Object Library Document
wdRange Automation Microsoft Word 14.0/15.0 Object Library Range
  • Add the following variables.
Name Data type Subtype Length
CompanyInfo Record Company Information
TemplateName Text 250
  • Close the C/AL Locals window.

Writing the C/AL Code

Before you start writing the C/AL code that uses Automation, you must do some initial processing. You start by calculating the Sales (LCY) FlowField. Then, you check whether the customer qualifies for a discount. Finally, you retrieve the information from the Company Information and User tables that you use to fill in some of the fields in the letter.

To write the C/AL code

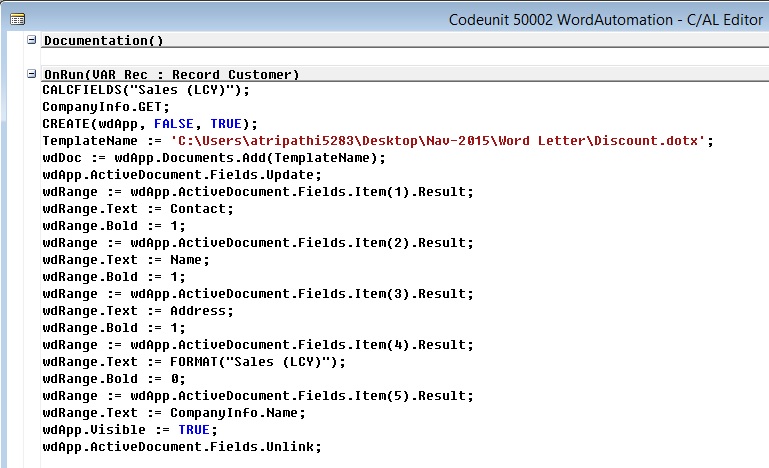
  • In the C/AL Editor, add the following lines of code to the OnRun section.
  CALCFIELDS(“Sales (LCY)”);CompanyInfo.GET;
  • To create an instance of Word before using it, enter the following line of code.
 CREATE(wdApp, FALSE, TRUE);
  • This statement creates the Automation object with the wdApp variable.
    1. The first Boolean parameter in the statement (FALSE) tells the CREATE function to try to reuse an already running instance of the Automation server that is referenced by Automation before creating a new instance. If you change this to TRUE, then the CREATE function always creates a new instance of the Automation server.
    2. The second Boolean parameter in the statement creates the Automation object on the client. This is necessary to use this codeunit on a page in the Microsoft Dynamics NAV Windows client.
  • Enter the following lines of code to add a new document to Word that uses the template that you designed earlier. If required, replace C:\Users\atripathi5283\Desktop\Nav-2015\Word Letter with the correct folder path to the template that you defined in the procedure.
 TemplateName := C:\Users\atripathi5283\Desktop\Nav-2015\Word Letter\Discount.dotx’;wdDoc := wdApp.Documents.Add(TemplateName);wdApp.ActiveDocument.Fields.Update;
  • Because the Add method of the Documents collection requires that you pass the path to the template by reference, you must set up the TemplateName variable to hold this information. You will get a compilation error if you put the path into the call as a literal string.
  • The Documents property returns a Documents collection that represents all open documents. You can also see that the Documents collection object has an Add method, and that the Add method has the following syntax.
  • expression.Add(Template, NewTemplate, Document Type, Visible)
  • expression is a required argument, and it must be an expression that returns a Documents object. All the arguments are optional. You will use Template to open a new document that is based on your template.
  • For the syntax in the C/AL Symbol Menu, note that the Documents property returns an object of type DOCUMENTS, which is a user-defined type. The property returns a Documents class or IDispatch interface. This information helps the compiler perform a better type check during compilation. The following statement can also pass both the compile-time and the run-time type checks.
  • wdDoc := wdApp.Documents.Add(TemplateName);
  • Finally, the Add method returns a Document class. While you did not need to declare a C/AL variable for the interim Documents class, you have declared a variable for the wdDoc return value,.
  • The third line contains a call that must be made to ensure that the template works as intended.
  • wdApp.ActiveDocument.Fields.Update;

Transferring Data to Word

Now you can transfer the actual data from the Customer record to the placeholder fields in the Word document.

You have set up the first three fields in the template so that they can contain the contact, name, and address of the customer and you can transfer the data.

To transfer data to Word

  • Transfer the data by adding the following lines of code.
 wdRange := wdAPP.ActiveDocument.Fields.Item(1).Result; wdRange.Text := Contact; wdRange.Bold := 1; wdRange := wdAPP.ActiveDocument.Fields.Item(2).Result; wdRange.Text := Name; wdRange.Bold := 1; wdRange := wdAPP.ActiveDocument.Fields.Item(3).Result; wdRange.Text := Address; wdRange.Bold := 1;
  • You cannot use the fields directly as variables and make an assignment such as Fields.Item(3) := Address. Instead, you use the Result property of the field. This property returns the result of the field as a range. You place this range in the wdRange Automation variable that you declared.
  • You then set the Text property of the range to the desired values, which is the name of your contact person and the name and address of the customer. Finally, you add bold formatting.
  • The data you are transferring must be in text format. If it is not in text format, then you get a compilation error. wdRange.Text expects arguments to be of type BSTR, which maps to either Text or Code. This means that any data that is not Text or Code must be converted before it is passed to Word. To convert a field to Text, you use the FORMAT function. All the fields that are transferred in this step are in text format, so no conversion is needed and the FORMAT function is not used. However, in this example, you also need to transfer the Sales (LCY) field, which is a Decimal field. To see how to convert the Sales (LCY) field, go to the next step.
  • To transfer and format the data from the Sales (LCY) field, add the following code.
 wdRange := wdAPP.ActiveDocument.Fields.Item(4).Result;wdRange.Text := FORMAT(“Sales (LCY)”);wdRange.Bold := 0;
  • To transfer the information from the Company Information table, add the following code.
 wdRange := wdApp.ActiveDocument.Fields.Item(5).Result;wdRange.Text := CompanyInfo.Name;
  • To complete the processing in Word, add the following code.
 wdApp.Visible := TRUE;wdApp.ActiveDocument.Fields.Unlink;
  • The first statement opens Word and shows you the letter that was created. The second statement makes the fields work as placeholders.

WordAutomation-7

  • Save and compile the codeunit

To-Do List

Although this code will work, you must add a few things to make it complete:

  • We recommend that you do not use a hardcoded template name. You should keep the template name in a table, and the user should select it from a page. You can then have different templates for different types of letters that you want to send to your customers.
  • You should add some error-handling code. For example, the CREATE call fails if the user does not have Word installed or if the installation has been corrupted. You should check the return value of CREATE and give an appropriate message if it fails.
  • The user should get a message if the customer does not qualify for the discount. In the example, the codeunit closes without any message.

Calling the Codeunit from the Customer Card

The final task is to ensure that you can call the codeunit from the Customer Card page in the Microsoft Dynamics NAV Windows client.

To call the codeunit from the Customer card page in the Microsoft Dynamics NAV Windows client

  • Open Object Designer, and then choose Page.
  • Select the Customer Card page and then choose Design.
  • On the View menu, choose Page Actions.
  • To add a new action, locate the action container with the subtype set to ActionItems.
  • Right-click the next line after the ActionItems container, and then choose New.
  • In the Caption field of the new line, type Word Letter.
  • Set the Type field to Action.
  • With the new action selected, on the View menu, choose Properties.
  • In the RunObject field, type codeunit Discount Letter.

Note

If you saved the codeunit that you created in the previous procedure under a different name, then substitute Discount Letter with the name that you used.

  • Use the arrow buttons to make sure that the new action is indented only once from the ActionItems container above it

WordAutomation-8

  • Save and compile the Customer Card page.

To run the Customer Card and view the Word letter

  1. In Object Designer, choose the Page
  2. Select the Customer Card page, and then choose Run.
  3. In the ribbon, on the Actions tab, choose the Word Letter

The letter document opens in Word.

WordAutomation-9

Next Steps

The letter that you have just created only contains five fields and sample body text. Before you can use this letter in an actual situation, you will need to add some more fields, such as the name and address of your own company, the date, and the currency code, and the main text of the letter. It will also need some formatting to make it look more attractive. If you alter the order in which the fields appear in the template, you must change the numbering of the fields in the codeunit to ensure that the correct data is inserted into the appropriate fields.


Development Tips

How to create and install a test certificate for the Microsoft Dynamics NAV Server computer

To start with this exercise you need to first create certificate and certificate revocation list, if not yet created refer to previous post.

Previous Step Link- How to create a root CA and a private key file by using the makecert.exe utility

Previous Step Link- How to create certificate revocation list for the root certification authority

Let’s start with this exercise:

  • At the command prompt, type the following command:

makecert -sk NavServiceCert -iv RootNavServiceCA.pvk -n “CN=NavServiceCert” -ic RootNavServiceCA.cer -sr localmachine -ss my -sky exchange -pe NavServiceCert.cer

Note

This command specifies the subject’s certificate name as NavServiceCert. You need this certificate name when you configure the Microsoft Dynamics NAV Windows client or Microsoft Dynamics NAV Web Server components.

Certificate-13

  • When you are prompted, enter the password that you used to create the root CA.
  • Select the Trusted Root Certificate Authorities node, and then refresh the snap-in.

You now have the NavServiceCert.cer certificate file in your temporary folder. The certificate is installed under the Personal node in the Certificates Snap-in.

Certificate-14
In next step we will now grant access to the certificate’s private key to the service account on computer running Microsoft Dynamics NAV Server.

Next Step Link- How to grant access to the certificate’s private key to the service account for the Microsoft Dynamics NAV Server computer

Development Tips

How to create a certificate revocation list for the root certification authority

To start with this exercise you need to first create certificate, if not yet created refer to previous post.

Previous Step Link- How to create a root CA and a private key file by using the makecert.exe utility

Let’s start with this exercise:

  • On the computer running Microsoft Dynamics NAV Server, create a temporary folder to use when you work with certificates.
  • Open the command prompt as follows:
    • If you have Visual Studio installed on your computer, choose Start, choose All Programs, choose Microsoft Visual Studio 2012, choose Visual Studio Tools, and then right-click Visual Studio Command Prompt and choose Run as Administrator.
    • If you have the Windows SDK installed on your computer, choose Start, choose All Programs, choose Microsoft Windows SDK, and then right-click Windows SDK Command Prompt (2010) (or CMD Shell) and choose Run as Administrator.
  • At the command prompt, locate the temporary directory.
  • At the command prompt, type the following command:

makecert -crl -n “CN=RootNavServiceCA” -r -sv RootNavServiceCA.pvk RootNavServiceCA.crl

  • When you are prompted, enter the password that you used to create the root CA.

Certificate-9
The RootNavServiceCA.crl certificate revocation file is saved in your temporary folder.
Certificate-10
Now we will install the certificate revocation list on the computer running Microsoft Dynamics NAV Server

  • In the Certificates snap-in, in the left pane of MMC, expand the Certificates (Local Computer) node.
  • Expand the Trusted Root Certification Authorities node, right-click the Certificates subfolder, select All Tasks, and then choose Import.
  • In the Certificate Import Wizard, on the Welcome page, choose Next.
  • On the File to Import page, choose Browse.
  • In the File Type field, select Certificate Revocation List (*.crl).
  • Browse to the location of the RootNavServiceCA.crl file, select the file, and then choose Open.
  • On the File to Import page, choose Next.
  • On the Certificate Store page, accept the default selection, and then choose Next.
  • On the Completing the Certificate Import Wizard page, choose Finish.

Certificate-11

  • Select the Trusted Root Certificate Authorities node, and then refresh the snap-in.

A Certificate Revocation List folder that contains the RootNavServiceCA.crl file has been created.
Certificate-12
In next step we will now create and install a test certificate on computer running Microsoft Dynamics NAV Server.

Next Step Link- How to create and install a test certificate for the Microsoft Dynamics NAV Server computer

Development Tips

How to create a root CA and a private key file by using the makecert.exe utility

We will follow below step to create a certificate for Microsoft Dynamics Server. Then we will implement the same for login from WAN to access Navision using Windows and Web Clients.

  • On the computer running Microsoft Dynamics NAV Server, create a temporary folder to use when you work with certificates.
  • Open the command prompt as follows:
    • If you have Visual Studio installed on your computer, choose Start, choose All Programs, choose Microsoft Visual Studio 2012, choose Visual Studio Tools, and then right-click Visual Studio Command Prompt and choose Run as Administrator.
    • If you have the Windows SDK installed on your computer, choose Start, choose All Programs, choose Microsoft Windows SDK, and then right-click Windows SDK Command Prompt (2010) (or CMD Shell) and choose Run as Administrator.
  • At the command prompt, locate the temporary directory.
  • Type the following command.

makecert -n “CN=RootNavServiceCA” -r -sv RootNavServiceCA.pvk RootNavServiceCA.cer

Certificate-4

  • When you are prompted, enter a password.
    • You need this password to create the service certificate.
  • The RootNavServiceCA.cer certificate file and the RootNavServiceCA.pvk private key are saved in your temporary folder.

Certificate-5

Now we will use the Certificates snap-in to install the root CA on the computer running Microsoft Dynamics NAV Server

  • Start the Certificates snap-in for MMC on the computer running Microsoft Dynamics NAV Server, and then add the Certificates snap-in.
  • In the Certificates snap-in dialog box, choose Computer account, and then choose Next.
  • In the Select Computer pane, choose Local computer: (the computer this console is running on), and then choose Finish.
  • Choose OK to close the Add or Remove Snap-ins dialog box.
  • In the left pane of MMC, expand the Certificates (Local Computer) node.

Certificate-2

Certificate-3

  • Expand the Trusted Root Certification Authorities node, right-click the Certificates subfolder, select All Tasks, and then choose Import.

Certificate-6

  • In the Certificate Import Wizard, on the Welcome page, choose Next.
  • On the File to Import page, choose Browse.
  • Browse to the location of the RootNavServiceCA.cer certificate file, select the file, and then choose Open.
  • On the File to Import page, choose Next.
  • On the Certificate Store page, accept the default selection, and then choose Next.
  • On the Completing the Certificate Import Wizard page, choose Finish.

Certificate-7

The RootNavServiceCA certificate is now visible in the list of trusted root CAs.

Certificate-8

In next step we will now create a certificate revocation list for the root certification authority and then install the certificate revocation list on the computer running Microsoft Dynamics NAV Server.

A certificate revocation list is required because WCF applications check the revocation list when validating certificates.

Next Step Link- How to create a certificate revocation list for the root certification authority

Development Tips

Learning .NET Framework interoperability by Example

Today we will discuss an example which uses .NET Framework interoperability to display headlines from the RSS feed of my site https://msdynamicsnavashwinitripathi.wordpress.com/

This example accesses classes in the System.XML assembly that is found in Global Assembly Cache.

Today’s example uses .NET Framework interoperability to display headlines from an RSS feed from my blog site, which has the following URL:

https://msdynamicsnavashwinitripathi.wordpress.com/feed/

We will use members of the System.XML assembly, which is part of the Microsoft .NET Framework class library and is installed in the global assembly cache.

Let’s start with creating a table to store the value of feeds as below:

DotNetInteroperability-1
Save your Table.

Next we will be creating a codeunit that has the following local variables:

DotNetInteroperability-2

Variable name DataType SubType
xml DotNet ‘System.Xml, Version=2.0.0.0, Culture=neutral, PublicKeyToken=b77a5c561934e089’.System.Xml.XmlDocument
items DotNet ‘System.Xml, Version=2.0.0.0, Culture=neutral, PublicKeyToken=b77a5c561934e089’.System.Xml.XmlNodeList
I Integer
title DotNet ‘System.Xml, Version=2.0.0.0, Culture=neutral, PublicKeyToken=b77a5c561934e089’.System.Xml.XmlNode
FeedTable Record DotNetInteroperability

After you create the codeunit, add a function LoadFeed and add below code to it:

 DotNetInteroperability-3
xml := xml.XmlDocument();

xml.Load(‘https://msdynamicsnavashwinitripathi.wordpress.com/feed/?format=xml’);

items := xml.SelectNodes(‘/rss/channel/item’);

FOR i := 0 TO items.Count – 1 DOBEGIN

title := items.Item(i).SelectSingleNode(‘title/text()’);

FeedTable.INIT;    FeedTable.”Topic ID” := i + 1;

FeedTable.”Topic Description” := title.Value;

IF NOT FeedTable.INSERT THEN

FeedTable.MODIFY;

END;

MESSAGE(‘Loading of Feeds Done.’);

Save your codeunit.

To see the example in the Microsoft Dynamics NAV Windows client, you will now create an action on a page that opens the codeunit.

Create a Page as below:

DotNetInteroperability-4
Create below Variable of codeunit created above:

DotNetInteroperability-5
Create below Page Actions:

DotNetInteroperability-6
Write a code for Load Feed Action as:

DotNetInteroperability.LoadFeed;

Save your Page.

Now Run this Page:

DotNetInteroperability-7
Click the Action Load Feed created above.

DotNetInteroperability-8
Respond OK to see the feeds loaded. Make sure your internet connection is operational as it directly fetch the Live feed from Internet.

DotNetInteroperability-9
In this case it will Load 50 Posts headings as this feed provides 50 as output, different feeds may return different numbers mostly 10-20 posts.

Using above logic you can create any such functionality and add value to your customers.

Thanks for going through this post, hopefully you may have earned some fruitful Tips.

You can follow the blog or subscribe to the RSS feed to remain updated and keep getting such posts in future.

Your response to my posts will keep motivating me for helping the community.

Development Tips

How to: Specify the Start ID Offset of Elements on Objects – In Navision 2015

You can specify a start ID for new objects so that elements on these new objects have IDs that are offset by the number that you specified.

For example

You can specify a start ID of 50000 and then create a new page. The first element that you create on the page, for example, a Container control, has ID 50000. The next element that you create on the page, for example, a Group control, has ID 50001. The ID of each element on the page is incremented by 1, starting with the offset that you specified.

If you create variables or text constants on the page, then the first variable or text constant has ID 50000. The ID of each variable or text constant that you create is incremented by 1, starting with the offset that you specified.

If you create functions on the page, then they start with ID 50000. Parameters, return value, local variables, and local text constants of a function start with ID 50000.

Note

In earlier versions of Microsoft Dynamics NAV, you specified the start ID offset by using the GetUidOffset function in codeunit 1.

You can use the start ID to identify a set of elements in your application, for example, to identify the elements in a country/region-specific version.

When you merge changes from different country/region-specific versions, having different start IDs lets you easily identify the country/region-specific version for each element.

If you do not specify a start ID, then the IDs are determined by your license.


To specify the start ID

  • In the development environment, on the File menu, choose Database, and then choose Alter.
  • In the Alter Database window, select the Advanced tab.
  • On the Advanced tab, under Designer, in the Start ID (UidOffset) text box, enter an integer, and then choose the OK button.

Start-Id
Important

Microsoft recommends that you specify a start ID that is greater than or equal to 1000. If you specify a start ID that is less than 1000, then variables and text constants on the object have a starting offset of 1000, not the value that you specified. Other elements on the object have the starting offset that you specified.

  • Create a new table, page, report, codeunit, query, or XMLport. The IDs of the elements on that object are offset by the number that you specified.

Note

To view the ID of an element, select the element in the designer, and then on the View menu, choose Properties.


Development Tips

Object Specifications and Limitations – in Navision 2015

Today I would like to discuss few important information. It always good to know out limitations, so do the limitation of the tools we are using. It helps in planning the design what all are possible and where are the limitations.

This could be also helpful for person taking interviews or appearing for interviews.

Below are the specifications and limitations for the database and application objects.

Specifications for the database

Feature Characteristic
Maximum number of physical disk files 16
Database file size 256 GB
Maximum number of objects in a database 1,000,000,000
Maximum number of characters in application object names 30
Maximum number of characters in a Database Authentication password 80

Specifications for Tables

Feature Characteristic
Range for table object ID numbers 1 – 999,999,999
Maximum number of characters in a table name 30
Maximum table size Depends on available storage
Maximum number of records in a table Depends on available storage
Maximum record size 8000 bytes
Maximum number of fields in a record 500
Range for field numbers 1 – 999,999,999
Maximum number of keys for a table 40
Maximum size of a Microsoft Dynamics NAV key 900 bytes
Maximum number of distinct fields per key 16
Maximum size of an index 900 bytes
Maximum number of SumIndexFields per key 20
Maximum number of characters in a text or code field 250
Maximum size of a BLOB field 2 GB
Maximum number of characters in a field name 30

 Specifications for Pages and Reports

Feature Characteristic
Range for page or report object ID numbers 1 – 999,999,999
Maximum number of characters in a caption 1024
Maximum bitmap size in bitmap property 32500 bytes

Specifications for Codeunits

Feature Characteristic
Range for codeunit object ID numbers 1 – 999,999,999
Maximum number of characters in variable names 30
Maximum number of dimensions in array variables 10
Maximum number of elements in an array variable 1,000,000
Maximum physical size of a codeunit 2 GB
Lower bound of index in an array 1

All application objects are identified by an ID number. There are restrictions, however, on the numbers you can use when you create your own application objects. Check with your Partner License Agreement for more information.

Development Tips

AccessByPermission Property – in Navision 2015

Sets a value for a table field or UI element that determines the permission mask for an object that a user must have to see and access the related page fields or UI element in the client. The UI element will be removed at runtime if the user does not have permissions to a certain object as specified in the Access by Permission window.

AccessByPermission-1
AccessByPermission-2
AccessByPermission-3

Depending on the setting in the UI Elements Removal field in the Microsoft Dynamics NAV Server Administration tool, only user interface (UI) elements on objects in the license or on objects that the user has permissions to will appear in the user interface.

AccessByPermission-4

To make full use of the LicenseFileAndUserPermissions option in the UI Elements Removal field, it is recommended that you assign the special permission set, FOUNDATION, along with the relevant permission sets that define which application objects the user will access.

AccessByPermission-5

The majority of the permission sets that are provided with the CRONUS demonstration database cannot be combined with the FOUNDATION permission set to fully use the UI Elements Removal feature. You must first create or edit the relevant permission sets to avoid that the user is blocked from performing the involved tasks. You must first create or edit the relevant permission sets to avoid that the user is blocked from performing the involved tasks.

If you only use the LicenseFile option in the UI Elements Removal field, then you do not have to edit any permission sets as they will not affect which UI elements are removed.

To specify when UI elements are removed
  1. Open the Microsoft Dynamics NAV Server Administration
  2. In the UI Elements Removal field, choose the relevant option as described in the following table.
Option Description
None All UI elements are displayed, even if the license file does not include the related object and the user does not have permissions to the related object.
LicenseFile A UI element is removed if the related object is not included in the license file.
LicenseFileAndUserPermissions A UI element is removed if the related object is not included in the license file and the user does not have permissions to the object as defined in the AccessByPermission property for the related UI element.

By default, this option is selected.

AccessByPermission-6

When you configure user interfaces in Microsoft Dynamics NAV, you should make sure that the UI Elements Removal field is set to its default, LicenseFileAndUserPermissions, so that you only see the relevant UI elements in the Customize window.

When you develop in Microsoft Dynamics NAV, you should make sure that the UI Elements Removal field is set to its default, None, to make sure that all UI elements are visible when you review your development in the UI.

All types of UI elements will be removed if they relate to objects that are not included in the license or the user does not have the required permission to the objects:

  • Fields
  • Actions
  • Page parts

UI elements that are directly related to an object through the TableRelation or the CalcFormula property can be removed automatically according to the license file and/or user permissions.

For UI elements that are not directly related to an object, you can use the AccessByPermission property to remove the element according to the user’s permission to a related object

All types of UI elements will be removed if they relate to an object to which the user does not have the required permissions:

Fields on pages, including FactBoxes

Actions on pages, including toolbars and navigation panes

Page parts, such as Lines FastTabs

Note

To use this property, the UI Elements Removal field in the Microsoft Dynamics NAV Server Administration tool must be set to LicenseFile or LicenseFileAndUserPermissions.

This Property Applies To

Fields in tables (affecting all related fields on pages)

Fields on pages

Actions on pages

MenuSuite items

Page parts, such as a Lines FastTab

Property Value

When you choose the AssistEdit button, the Access By Permission window opens. Fill the fields as described in the following table.

Field Description
Object Type Specify the type of object to which permission is required to display the UI element.
Object ID Specify the object to which permission is required to display the UI element.
Read Specify if Read permission is required to display the UI element.
or Insert Specify if Insert permission is required to display the UI element.
or Modify Specify if Modify permission is required to display the UI element.
or Delete Specify if Delete permission is required to display the UI element.
or Execute Specify if Execute permission is required to display the UI element.

AccessByPermission-7

Note

If multiple permissions are selected, then one or the other applies.

Example: Remove the Unit Price field if the user does not have permission to the Sales Price table

Open table 27, Item Card, with the Table Designer.

View the properties of field 18, Unit Price.

For the AccessByPermission property, choose the AssistEdit button in the Value field.

In the Access By Permission window, fill the fields as described in the following table.

Field Description
Object Type TableData
Object ID Sales Price
Read Select
Insert Select
Modify Leave blank
Delete Leave blank
Execute Leave blank

Close the Access By Permission window and save the changes on table 27.

All instances of the Unit Price field on pages are now removed if the user does have Read or Insert permission to the Sales Price table.

AccessByPermission-8

Important

If you defined the property for a table field, then all instances of the field on pages are removed. To override the property on an individual page field, delete the permission value after the = sign in the Value field. Do NOT delete the whole string as that will be replicated on the property of the table field.

Note

To use the LicenseFileAndUserPermissions option in the UI Elements Removal field, you must assign the special FOUNDATION permission set to the user along with the relevant application permission sets that define which application objects the user will access. Unlike the BASIC permission set, the FOUNDATION permission set only grants access to application setup and system tables and requires that other assigned permission sets define which specific application objects can be accessed.

Not all of the 167 default permission sets that are provided with Microsoft Dynamics NAV are ready to support the FOUNDATION permission set to remove UI elements according to user permissions. You must therefore edit the relevant permission sets as explained in the following procedures.

To experience how UI elements are removed for a user performing the task to create and edit a new customer, you can create a sample user interface based on default permission sets provided with Microsoft Dynamics NAV.

Special Permission Sets

The following permission sets have special definitions that you should be aware of as you implement permissions and security for Microsoft Dynamics NAV users.

Permission set Definition
SUPER Can read, use, update, and delete all data and all application objects in the scope of your license. Microsoft Dynamics NAV requires that at least one user be assigned this permission set in each database.

You cannot modify permissions for the SUPER permission set.

SUPER (DATA) Can read, use, update, and delete all data. You typically assign this permission set to an accounting manager who needs to work with all data but does not need to change Microsoft Dynamics NAV.

This permission set does not give access to the Object Designer.

SECURITY Can create new users and assign them the same permission sets. Must be able to access the User, User Property, Permission Set, and Access Control tables.

For example, you can create a SECURITY permission set that includes the four required tables and any additional permissions that you want to include. You can then assign this permission set to a user who is a department administrator. This user can then administer permissions for other users in their department.

Only a user who has the SUPER permission set can create and modify a SECURITY permission set. Users who have this permission set can assign the same permissions to other users, but they cannot assign themselves the SUPER permission set.

BASIC Grants Read access to almost all application tables and all system tables.

The main purpose of this permission set is to enable the client to open and show all pages.

When you create a new database, you must import the BASIC permission set from an XML file.

FOUNDATION A prerequisite for all other permission sets. The FOUNDATION permission set grants access to system tables and application setup tables that are required for most application features to work.

Note

This permission set is recommended when using the UI Elements Removal feature to automatically remove UI elements according to user permissions.