Azure, Corfu Navision 2016, Development Tips, How To, Information, Instalation & Configuration, Machine, Server, Tip & Tricks, Virtual

Creating Virtual Machine on Azure

Continuing from my previous post.

In previous post we saw how to register for Free Azure Portal Account, if you missed you can find the link here.

Today we will see how to create Virtual Machine for Dynamics Navision 2016 pre Loaded.

Lets start creating one for our future posts practice.

Open the page : https://azure.microsoft.com/en-us/free/ and follow onscreen Instruction to login to your account.

Login using the account credentials you used for registering on Azure Portal.

Azure-5

Upon signing you will be landed to your dashboard on Portal.

You can see we don’t have any resource on Portal yet.

Azure-6

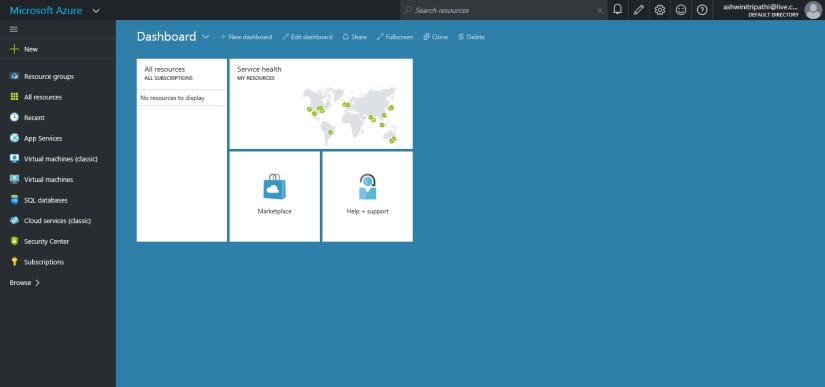
Lets start creating one.

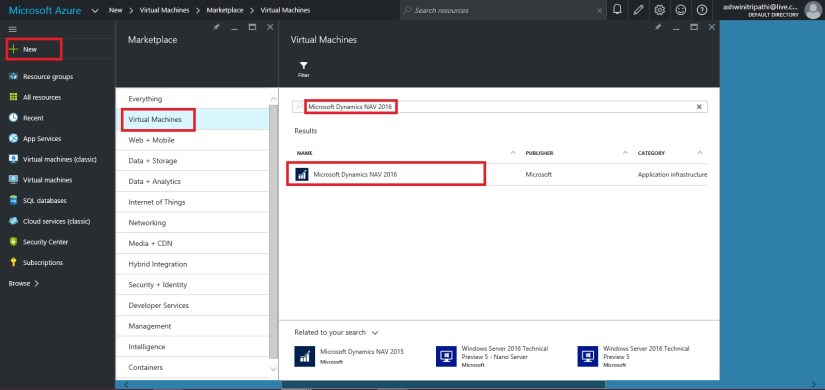
Click on New from Top right corner.

Choose Virtual Machine.

Enter “Microsoft Dynamics NAV 2016” in the search box, it will list available Virtual Machine images.

Select the one available Virtual Machine for commissioning.

I have choose this because we will get preinstalled NAV 2016 which will save our time.

Azure-7

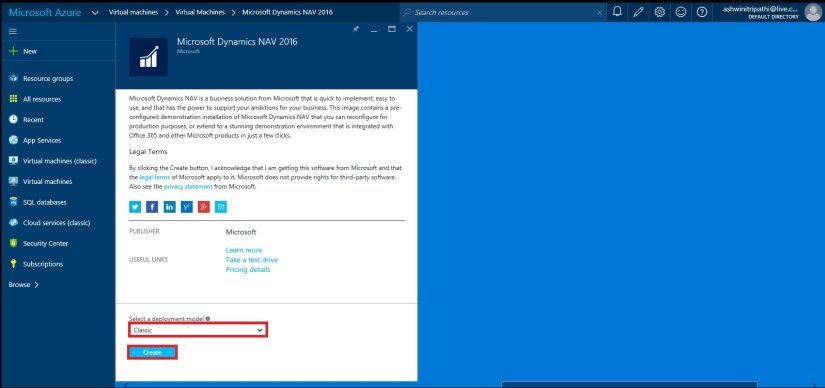
Select Deployment Model, I have choose Classic and click on Create.

Azure-8

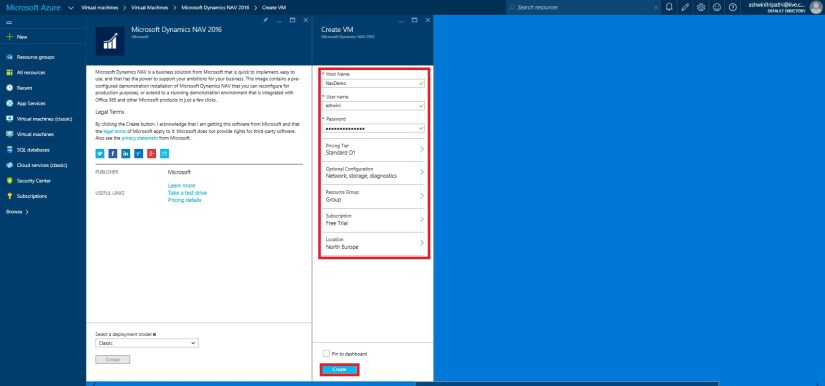
Next we will enter  Host Name, User Name, Password, other things you adjust as per your need. Click on Create.

Note your User Name & Password you will require this to login to the Server.

Azure-9

Give some time to get created and up your Server.

In the mean time you can explore other things till your Server is up and running for you.

Once it is made available, you can start login and explore your newly created Server.

Where to find my Server?

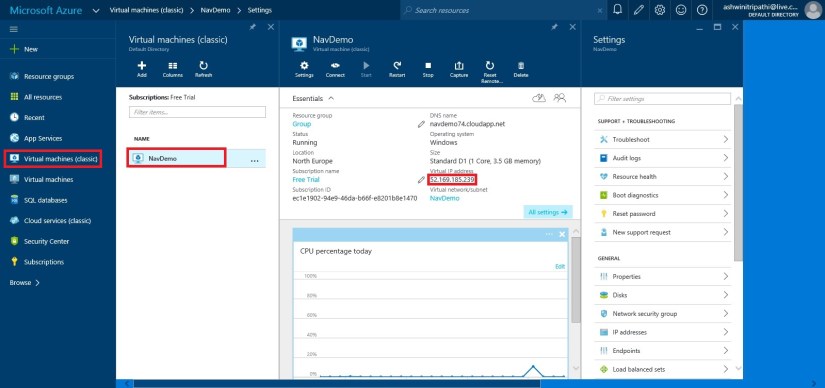
From the Navigation Bar choose Virtual Machine (classic).

It will list you all Virtual Machines created by you.

Select your Virtual Machine in my case it is NavDemo.

You can find the Server Name and IP of your Virtual Machine.

Azure-10

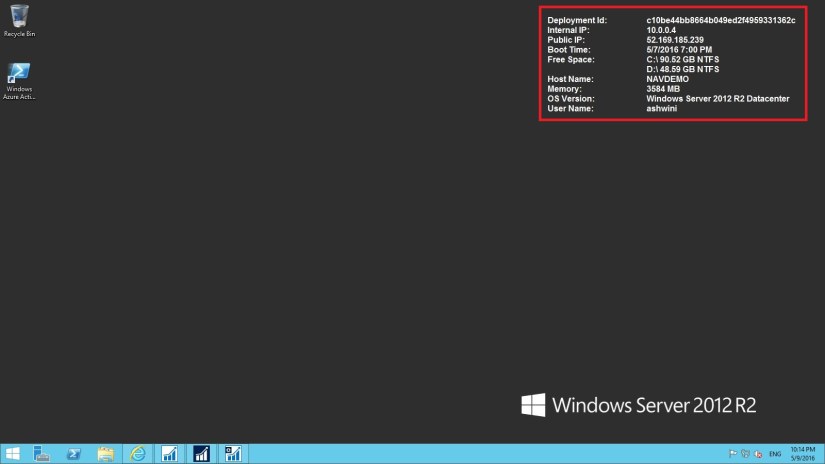
I am using my IP to login to my Server.

Open your Remote Desktop Connection and enter your IP.

The User Name & Password as we created in previous step.

Azure-11

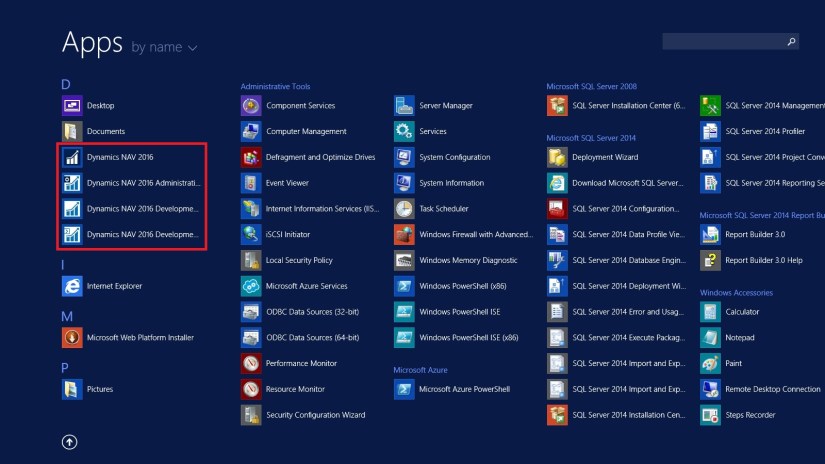
Here I am Login to my Server.

Azure-12

You can see that Dynamics NAV 2016 is already available with my Server.

Azure-13

That’s all for today, we will see more in my upcoming posts.

Till then keep exploring & Learning.


How To, Information, Instalation & Configuration, Maderia, Tip & Tricks

Using Payment Services – in Madeira

It’s obvious you know we can include link in PDF documents, if you don’t know no issues everything is not known to every one until he uses it or someone inform them. Today we will be learning this feature for making payments using links in your PDF invoices generated from Madeira.

If you had setup the preview this feature is already available in CRONIUS US demo company.

How do we Setup:

Login to Madeira Project using your Credentials.

Click on Search Page from right top corner.

Search for Payment Services page.

PayPalPayment-1


PayPalPayment-2

Open the Page.

Click on Setup and enter your details as shown in above screen.

Click on Maximize button and Show more to see more details.

PayPalPayment-3

Payment Service Link:

In the CRONUS US demonstration company, the payment link inserted into invoices will link to the PayPal test site.

For your actual Company, we will set so that the payment link will point to the real PayPal site, where payments can be made.

It is advisable that not to do this up for the Actual Company until Project “Madeira” is generally available for purchase. And authorized documentation on this feature is released from Madeira.

If you have setup Always Include on Document then you need not to perform any additional step, but in case you want to add the Payments Service Link to individual invoices that too can be done.

Manually Selecting Payment Services:

Open your Invoice on which you want to include this option.

PayPalPayment-4

As you can see in above Invoice no Payment Service is included.

Click on the Lookup on right side of the field.

PayPalPayment-5

Select the Payment Service from the list of available Services, and click on OK.

PayPalPayment-6

When you send the invoice to your customer the Payment Service Link will be included in the Invoice PDF.

PayPalPayment-7


PayPalPayment-8


PayPalPayment-9


PayPalPayment-10

How it will look in Invoice:

The PDF will contain the link to your selected Payment Service using which your customer can do the payment.

PayPalPayment-11

Stay tuned for more Information in upcoming posts.

Till then keep exploring and learning.


Development Tips, How To, Information, Tip & Tricks, Web Services

Exposing & Consuming the Web service from & inside Navision – Part-4

Continuing from my previous post. Find the link to access the same in case you missed it.

Exposing & Consuming the Web service from & inside Navision – Part-1

Exposing & Consuming the Web service from & inside Navision – Part-2

Exposing & Consuming the Web service from & inside Navision – Part-3


Step 5: Create a Codeunit to test Retrieve the data using above DLL and Send data in XML Format using another Web Service exposed in Dot Net.

How to create WCF Service Application using C#, Publishing it and creating DLL Class Library is out of scope of this document. You may require to take help from guy who are comfortable in .Net technology.

Let’s start with new codeunit, select the available ID in your database and suitable name to save this codeunit.

We will define a Global variable to hold the data we receive from Navision Web Service and pass to Web Service exposed outside Navision.

WebServiceUsage-16

Create a Function to Read/Export the data using Navision Web Service.

Variables defined to the function is also shown in below screen.

We will add the code similar to below. Description provided along with the code in below screenshot.

WebServiceUsage-17

Create a Function to Send Exported data from above function to the Web Service created outside the Navision. Web Service created in DotNet.

Here too we are using DLL file of the Outside Exposed Web Service.

Variables defined to the function is also shown in below screen.

We will add the code similar to below. Description provided along with the code in below screenshot.

WebServiceUsage-18

Now we have our both function ready.

One which Export data consuming the Navision Published Web Service and then read the data in BigText Variable and finally converted to Text variable.

Second one will send data consuming the Web Service Exposed outside Navision created in DotNet. 

Let us test our process if it works as desired.

We will call above both function.

When we call First Web Service as a result we get the XML format file data in my Global defined Text Variable.

We will review the data which we are going to send to Second Web Service on Screen for which we are simply calling the Message.

Finally we will send the data to the Second Web Service, the content of XML file stored in our Global Variable.

Code we use is as below shown screenshot.

WebServiceUsage-19

Save the codeunit and execute, as we have written our test code in Run trigger so we can directly run this codeunit.

The output will be as shown in below screenshots.

Until this step our Data is Exported and data is loaded in Global defined Text variable.

WebServiceUsage-20

Here the content of Text variable is shown in Message window, which we can verify the data which we are going to send to the external Web Service.

WebServiceUsage-21

As a final step we are sending this content to the External Web Service Exposed using DotNet.

WebServiceUsage-22

Verify the data received at the DotNet side. You can program the Second Web Service as save the content on disk as file or perform any processing like inserting those data in some other table or displayed on screen. 

That’s it for this series.

I will be posting couple of more posts on Web Services soon.

Since this was in response of request from one of my reader so I stick to the requirement.

In my other post I will show some different flavour of using the same.

Till then keep exploring and learning.

Will be back with other posts soon.

Development Tips, How To, Tip & Tricks, Web Services

Exposing & Consuming the Web service from & inside Navision – Part-3


Continuing from my previous post. Find the link to access the same in case you missed it.

Exposing & Consuming the Web service from & inside Navision – Part-1

Exposing & Consuming the Web service from & inside Navision – Part-2


Step 4: Create a DLL to use as Add-in to consume the Web Service itself in Navision.

We will start with Class Library Project in Visual Studio.

It’s very simple with few steps to follow, and we will be done with our requirement.

Enter Name and select the path for your project solution folder. In my case I am saving my project to the default location of Visual Studio. And I am naming my project as XMLData.

WebServiceUsage-8

Right click on the project folder and Add Service reference to the project.

WebServiceUsage-9

Enter your Web Service URL and click on GO.

Once your Service is listed, enter the Reference Namespace. And click on OK to add the Service Reference to the project.

WebServiceUsage-10

Click on app.config in Solution browser to open.

Verify your code similar to below.

WebServiceUsage-11

Build your Project to obtain the .dll file.

WebServiceUsage-12

Below screen shows we have no errors and the .dll file is created successfully.

WebServiceUsage-13

Locate the .dll file in your Project folder similar to path shown below. Copy your dll file.

WebServiceUsage-14

Create a folder and paste your .dll file to Service & RTC folder, as shown in below screen.

WebServiceUsage-15


We are ready with the Add-in, which we will use in our next post to consume our service with the help of this dll, and call the method to obtain our file for further processing.

That’s all for this post, I will be back with next post in series soon.

Till then keep practicing.


To be Continued….


Development Tips, How To, Information, Power Bi Content Pack, PowerBI.com, Tip & Tricks

Microsoft Power BI – My Organization Content Pack Library

Continuing from my previous post. Today we will discuss about Content Pack Library (My Organization) in Power BI.

In case you have missed my previous posts here I present the link to all previous posts below:

Microsoft Power BI – Part – I

Introduction to Power BI and Creating Report from Excel Data, Local Files.

Microsoft Power BI – Part – II

Introduction to few Features of Power BI

Microsoft Power BI – Part – III

Power BI Desktop, Creating Dataset & Reports from In Premise Database installation

Microsoft Power BI – Part – IV

Power BI Gateway usage

Microsoft Power BI – Part – V

Scheduling Refresh of Dataset & Report created using In Premise Database

Microsoft Power BI – Part – VI

Power BI Content Pack

Microsoft Power BI – Part – VII

Power BI Mobile App

Microsoft Power BI – Part – VIII

Power BI Content Pack

Microsoft Power BI – Part – IX

Power BI Publisher for Excel

Microsoft Power BI – Part – X

Analyse in Excel (preview)

PowerBI-47

Login to Power BI using your credentials.

OrgPowerContent-1

Select Get Data.

OrgPowerContent-2

From Content Pack Library section select Get Data under My Organization.

OrgPowerContent-3

Select Create content pack.

OrgPowerContent-4

This is the part where majority of work to be performed.

In First Section – Choose who will have access to this content pack

You have 2 option

  1. You can share with specific users or Groups, since your AD is in sync with your in premise AD you can select them.
  2. You can share with your entire Organization.

Select the Group or Users if you go with first option.

In Second Section – Provide Title for you Content Pack

In Third Section – Provide detailed Description for your content pack.

OrgPowerContent-5

In Fourth Section – You can select Image for your content pack.

Finally in Fifth Section you will define what all content you want to share for the user using this content pack.

Here all available contents are divided under 3 sections (Dashboards, Reports & Datasets).

When you select Dashboard all included Reports and Dataset will be shared by default.

When you select Reports all included Datasets will be shared by default.

When you select Dataset only that will be shared.

You can select combination as you desire.

I will provide write up why we will select selective contents to share with case study, in my future post some time other.

Once you are done with all above step you are good to Publish the Content Pack.

OrgPowerContent-6

If we revisit the Get Data option again for My Organization, we can view our Published Content Pack which we shared with others.

User can customize as per his need and Share with others in form of New Content Pack or as-it-is depends.

Good Example will be we have one Content Pack for My Organization which include all modules Dashboard, Reports and Datasets.

My IT will create Module wise Content Pack (Finance, Sales, Purchase, Warehouse, Manufacturing etc…) and share these content packs with concern department Heads. Further each Heads will create sub-content pack and share with their team with information which is related to them and so on.


That’s all for today, will come up with more information in my future posts.

Till then keep exploring and learning.


Cumulative Updates, Tip & Tricks

Cumulative Update 6 for Microsoft Dynamics NAV 2016 released in April

Cumulative Update 6 includes all application and platform hotfixes and regulatory features that have been released for Microsoft Dynamics NAV 2016.

Where to find Cumulative Update 6

You can download the cumulative update from KB 3151017 – Cumulative Update 6 for Microsoft Dynamics NAV 2016 (Build 45480).

Warning

Before you install a cumulative update in a production environment, take the following precautions:

  1. Test the cumulative update in a non-production environment.
  2. Make a backup of the system or computer where the cumulative update is to be installed.

Additional Information

For information about how to install the cumulative update, see How to Install a Microsoft Dynamics NAV 2016 Cumulative Update.

For a list of all cumulative updates for this version, see Released Cumulative Updates for Microsoft Dynamics NAV 2016.

Cumulative Updates, Tip & Tricks

Cumulative Update 18 for Microsoft Dynamics NAV 2015 released in April

Cumulative Update 18 includes all application and platform hotfixes and regulatory features that have been released for Microsoft Dynamics NAV 2015.

Where to find Cumulative Update 18

You can download the cumulative update from KB 3151020 – Cumulative Update 18 for Microsoft Dynamics NAV 2015 (Build 45483).

Warning

Before you install a cumulative update in a production environment, take the following precautions:

  1. Test the cumulative update in a non-production environment.
  2. Make a backup of the system or computer where the cumulative update is to be installed.

Additional Information

For information about how to install the cumulative update, see How to Install a Microsoft Dynamics NAV 2015 Cumulative Update.

For information about how to work around a recent process change, see How to Get Back the ‘Hotfix Directories’ from NAV 2015 Cumulative Update 1.

For a list of all cumulative updates for this version, see Released Cumulative Updates for Microsoft Dynamics NAV 2015.

Cumulative Updates, Tip & Tricks

Cumulative Update 30 for Microsoft Dynamics NAV 2013 R2 released in April

Cumulative Update 30 includes all application and platform hotfixes and regulatory features that have been released for Microsoft Dynamics NAV 2013 R2.

Where to find Cumulative Update 30

You can download the cumulative update from KB 3151021 – Cumulative Update 30 for Microsoft Dynamics NAV 2013 R2 (Build 45478).

Warning

Before you install a cumulative update in a production environment, take the following precautions:

  1. Test the cumulative update in a non-production environment.
  2. Make a backup of the system or computer where the cumulative update is to be installed.

Additional Information

For more information about cumulative updates for this version, see Announcement of update rollups for Microsoft Dynamics NAV 2013 R2.

For a list of all cumulative updates for this version, see Released Cumulative Updates for Microsoft Dynamics NAV 2013 R2.

For a list of all hotfixes included in cumulative updates for this version, see the following CustomerSource and PartnerSource pages:

CustomerSource:

PartnerSource

Cumulative Updates, Tip & Tricks

Cumulative Update 37 for Microsoft Dynamics NAV 2013 released in April

Cumulative Update 37 includes all application and platform hotfixes and regulatory features that have been released for Microsoft Dynamics NAV 2013.

https://blogs.msdn.microsoft.com/nav/2016/04/04/cumulative-update-37-for-microsoft-dynamics-nav-2013-has-been-released/


Where to find Cumulative Update 37

You can download the cumulative update from KB 3151023 – Cumulative Update 37 for Microsoft Dynamics NAV 2013 (Build 45477).

Warning

Before you install a cumulative update in a production environment, take the following precautions:

  1. Test the cumulative update in a non-production environment.
  2. Make a backup of the system or computer where the cumulative update is to be installed.

Additional Information

For a list of all cumulative updates for this version, see Released Cumulative Updates for Microsoft Dynamics NAV 2013.

For a list of all hotfixes included in cumulative updates for this version, see the following CustomerSource and PartnerSource pages:

CustomerSource:

PartnerSource:

PowerBI.com, Tip & Tricks

Microsoft Power BI – Part VIII

Continuing from my previous post. Today we will see usage of Power Content Pack to Refresh in Premise Navision Installation using Personnel Gateway.

Please see my previous post it will help you in continuing with this Walkthrough.

In case you have missed here I present the link to all previous posts here below.

Microsoft Power BI – Part – I

Introduction to Power BI and Creating Report from Excel Data, Local Files.

Microsoft Power BI – Part – II

Introduction to few Features of Power BI

Microsoft Power BI – Part – III

Power BI Desktop, Creating Dataset & Reports from In Premise Database installation

Microsoft Power BI – Part – IV

Power BI Gateway usage

Microsoft Power BI – Part – V

Scheduling Refresh of Dataset & Report created using In Premise Database

Microsoft Power BI – Part – VI

Power BI Content Pack

Microsoft Power BI – Part – VII

Power BI Mobile App

Step -1

Check your Service is up & running, here we are not going to use SLL in fact Personnel Gateway.

PowerBI-86

Step -2

Make sure you Imported your Query Objects required for Power BI Dynamics Nav Content Pack. If you are not using NAV-2016, in my case I am using NAV-2015 for this Walkthrough.

PowerBI-87

Step -3

Make sure your Web Services are published.

PowerBI-88

Step -4

You have installed the Power BI Gateway – Personal and Login to it using your Credentials.

PowerBI-89

Step – 5

Login to PowerBI using your Credentials and choose Get Data from Bottom Left Corner in your Navigation Bar.

PowerBI-90

Step – 6

Connect Your Service using MS Dynamics Content Pack.

PowerBI-91

PowerBI-92

Notice here I am not using https:// also remove any ‘/’ and Service name from the URL.

PowerBI-93

Set your Authentication Mode and Sign In.

PowerBI-94

It will take some moment and your Dataset, Report & Dashboard will be available to you.

Graphical representation and data may vary depending upon data in your database.

We are done.

For further detail on any step you can refer previous posts for any clarifications, Links provided above.

Will come up with more details in my upcoming posts.

Till then keep trying and practicing.