Office Integration

Integrating with Microsoft OneNote With Navision 2015

You can set up Microsoft Dynamics NAV to work with Microsoft OneNote.

For example, you can use OneNote integration to synchronize notes from a mobile OneNote installation with Microsoft Dynamics NAV. You can also use OneNote to share pictures, recordings, and other instructions across a company.

When you set up OneNote integration, you can enable adding notes to a particular record or to a complete page

Note: You cannot set up Microsoft Dynamics NAV to work with OneNote in multitenant deployments.

With Microsoft OneNote integration you can attach notes to customers, items, or invoices.

OneNote notes can be created for a specific record, but also for a whole page depending on the setup.

You can attach notes, reminders, or pictures to a specific record such as a customer. You can also create a note attached to a whole page, so there are separate instructions about how to deal with customers, items, or journals.

Pages notes can only be used on pages that are based on a source table. This means that, for example, the Role Center page cannot use page notes.

Note: OneNote integration lets users share their OneNote repository, which means that information in a shared OneNote repository can be read by all persons having access to that repository.

Let’s start with creating background which we will use in Setting up our solution, I am using   Local folders to configure my OneNote.

OneNote-1

Here I have created two Folders

  1. PageNotes
  2. RecordNotes

How to access PageNote & RecordNote.

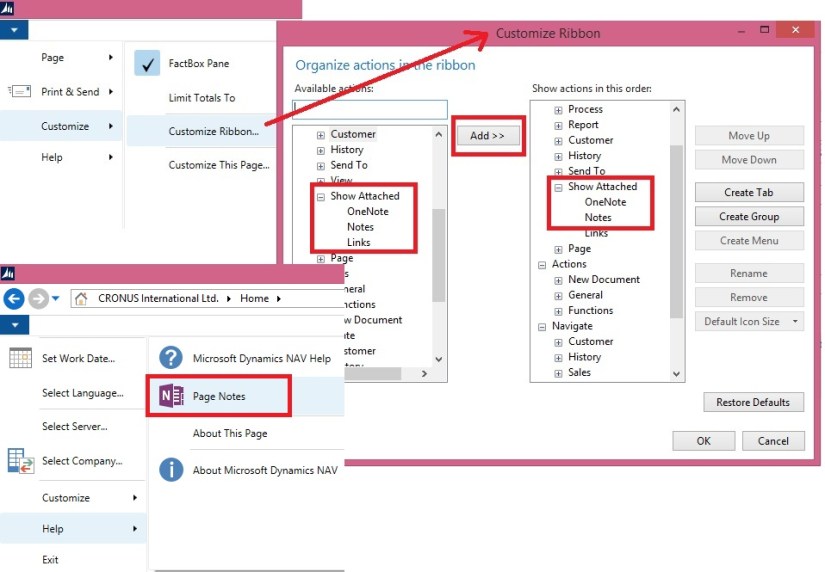
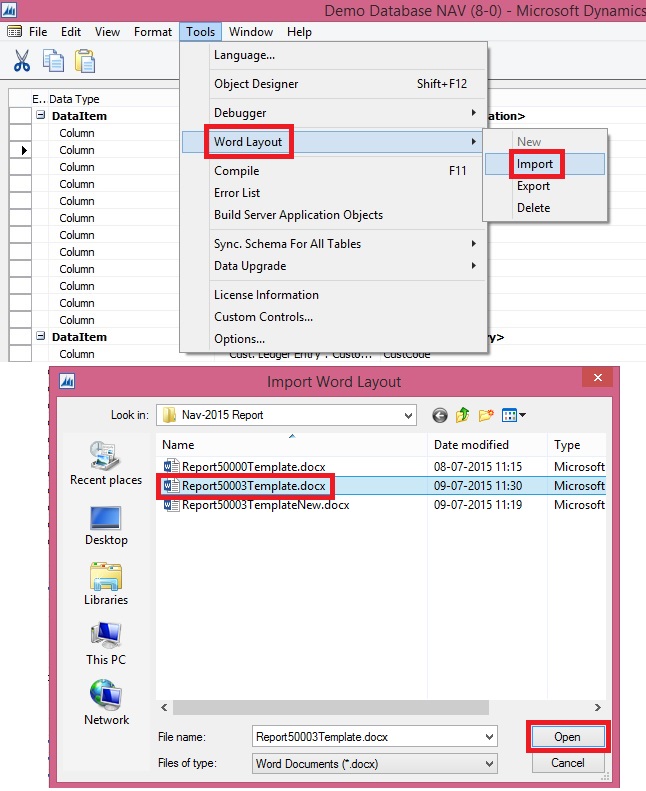
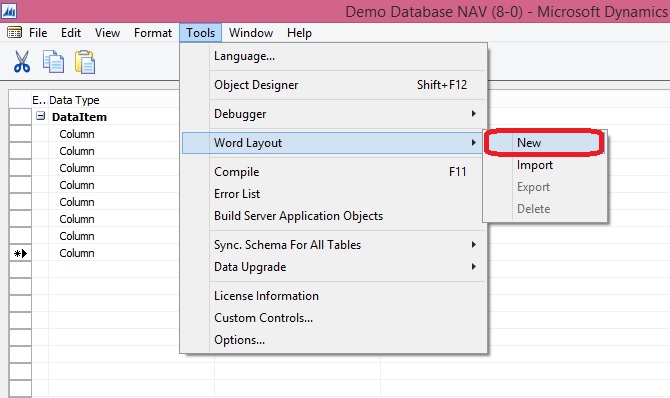
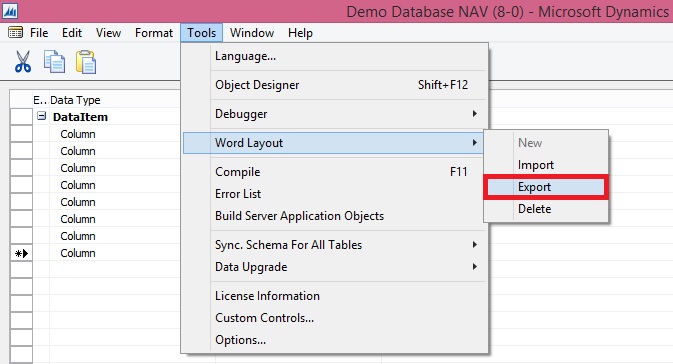
If OneNote not visible on Pages you can add the same as below:

OneNote-3

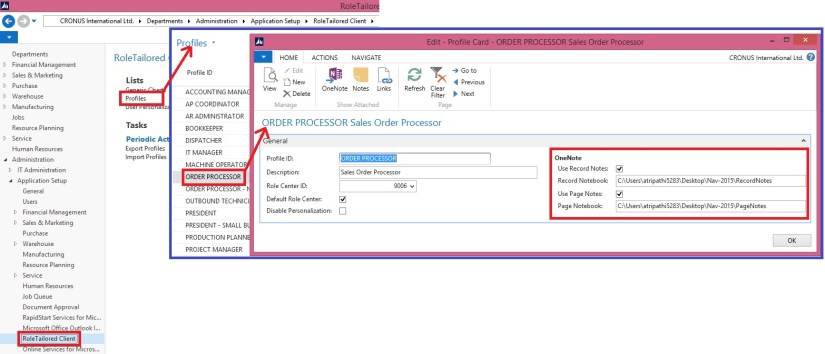
To set up OneNote integration for a group of users

  1. In the Search box, enter Profiles, and then choose the related link.
  2. Select the profile to make the OneNote adjustments for.
  3. On the Home tab, choose Edit.
  4. Select the Use Record Notes check box.
  5. In the Record Notebook field, enter the path where Microsoft Dynamics NAV should access the notebook.

OneNote-2

Note: You can find this information in Microsoft OneNote using the File tab. Select the OneNote book that you want to use, this can be shared among the books listed in Notebook Information or you can create a new one. Copy the location path for the notebook.

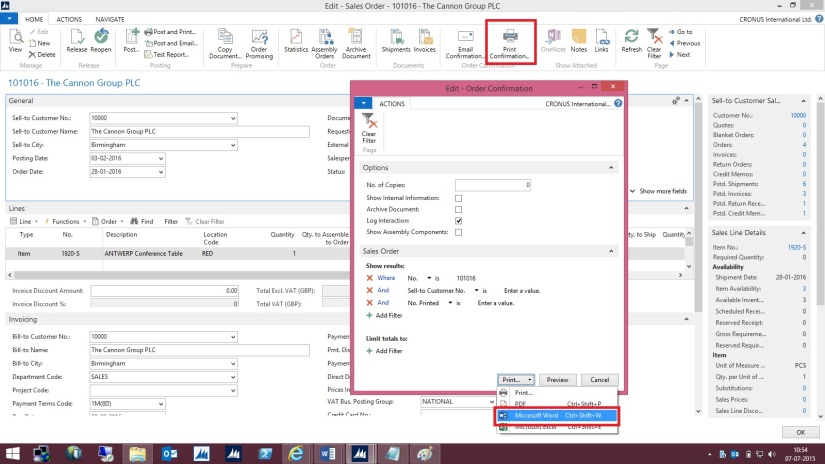
You may want to use customization to promote the OneNote action to the ribbon for easy accessibility.

If want to us Page Note too follow below steps:

  1. Select the Use Pages Notes check box.
  2. In the Page Notebook field, enter the path where Microsoft Dynamics NAV should access the notebook.
  3. Choose the OK

Note: The RoleTailored client must be restarted for the changes to have effect.

Using Record Notes

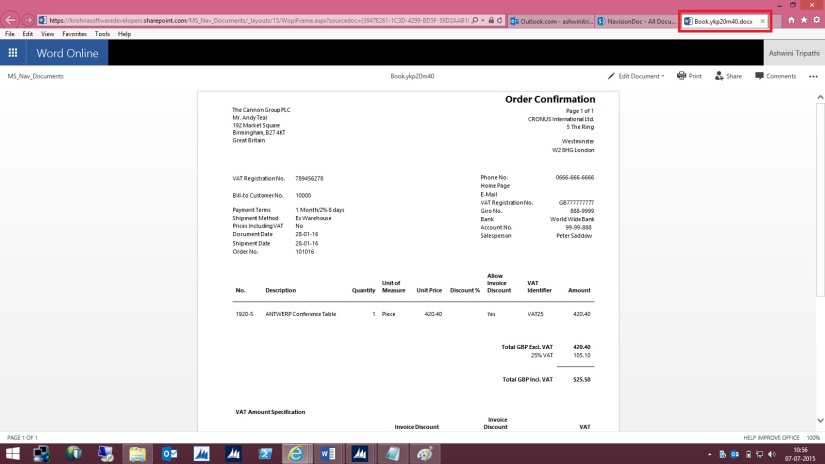
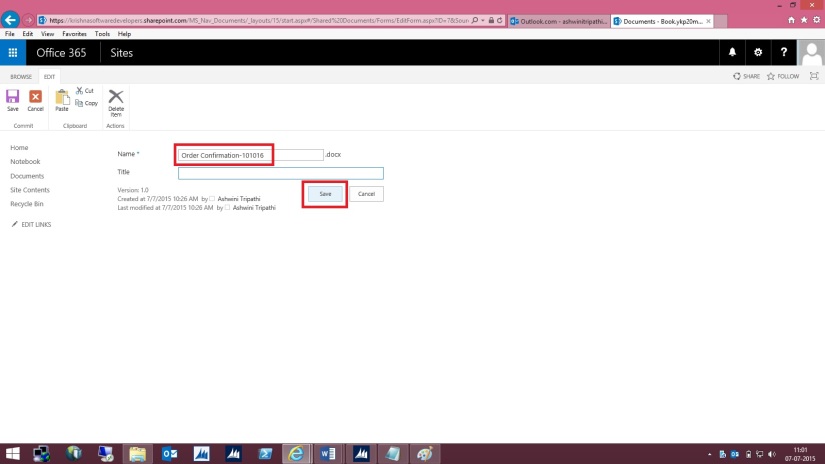
  1. From any Page Select OneNote, Note For selected record will be available to record.

OneNote-4

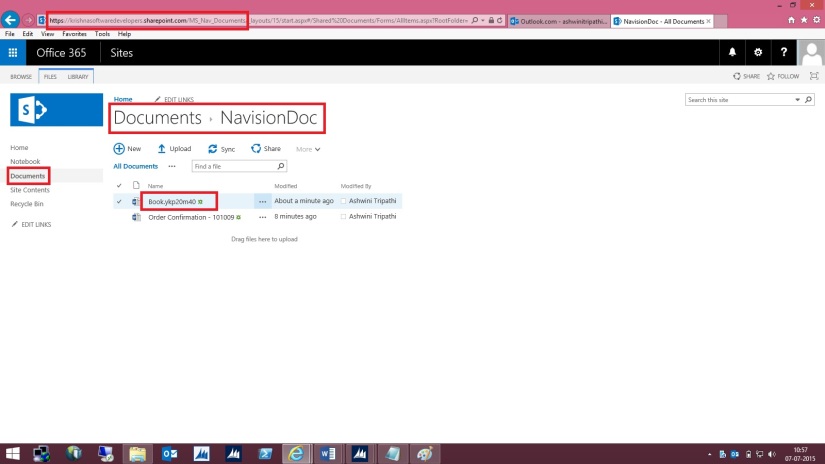
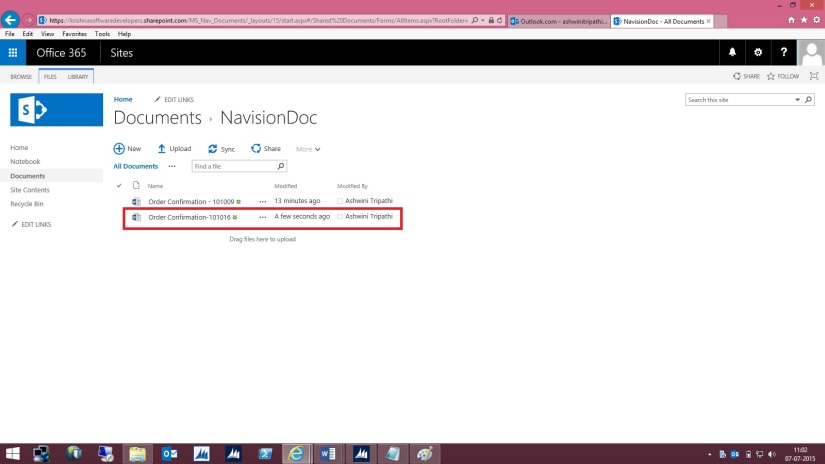
Your One Note File is created in the specified Folder:

OneNote-5

Accessing the Record Notes:

OneNote-6

Using Page Notes

  1. From any Page Select PageNote, Note For active Page will be available to page.

OneNote-7

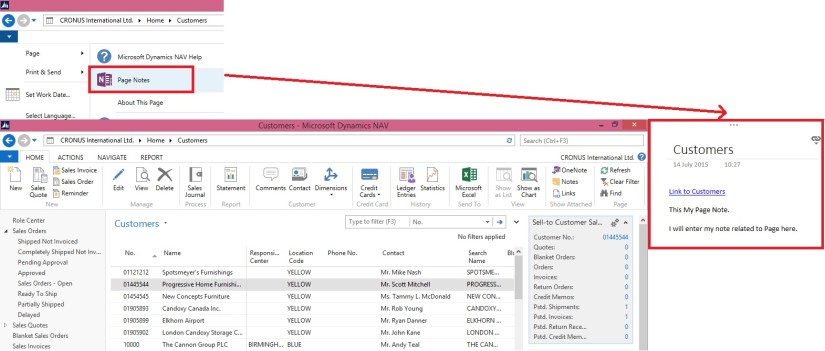
Your Page Note File is created in Specified folder

OneNote-8

Accessing the Page Note

OneNote-9

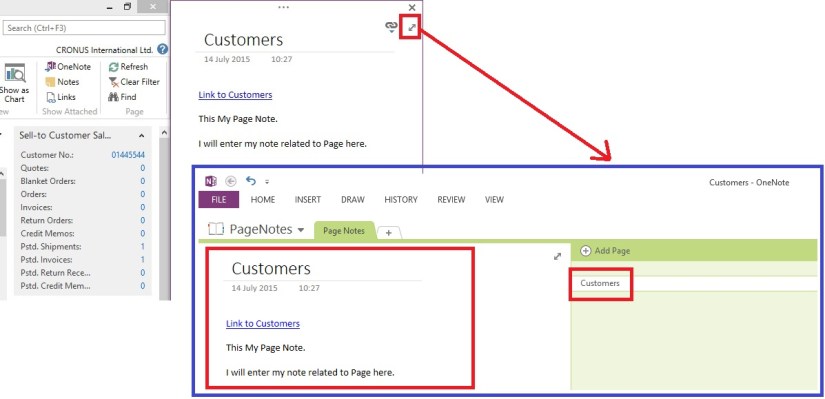
Try using it, it’s Simple and Very useful.

Corfu Navision 2016

Navision 2016 – ‘Corfu’

Microsoft have published official name of new NAV. Now, it is Microsoft Dynamics NAV 2016.

New NAV will be released in few months with really lot of news. Some of them are:

Phone Client

Better In/On

Works natively with Power BI and CRM Online

e-Everything

Posting Preview

OCR

Workflow

And many more…

You can expect more details very soon.

Report

The New Report Scheduling feature for end users running reports in Microsoft Dynamics Navision 2015


The new Report Scheduling feature for end users running reports:

  • End user can schedule reports for later execution.
  • User can get to his next task quicker.
  • User has an inbox part for viewing the scheduled reports.

 A. Setting up the job queue to run a report

My Customer needs to run a number of long running reports and does not want to wait for them to complete.

The scenario is simplified because a typical customer setup would involve setting up a NAS instance to process the reports.

* Open the Job Queues page.

ReportSchedule-1

* On the Home tab, in the New group, choose New to set up a new job queue

ReportSchedule-2

* In the Code field, type Reports.

* Fill in the Description field My Report Schedule.

* Leave the Job Queue Category Filter field blank.

* On the Home tab, in the Process group, choose Start Job Queue.

* Close the Job Queue Card

ReportSchedule-3

A job queue with no filter runs the reports.

In many customer installations, the reports will be picked up by the DEFAULT job queue


B. Adding the Report Inbox to the Role Center

My Customer wants easy access to the reports that he has scheduled, so he adds the Report Inbox part to the Role Center page.

* To open the Role Center page that you want to customize, in the navigation pane, choose the Home button, then choose the Role Center menu item.

* On the Application menu , choose Customize, and then Customize This Page.

* In the Available Parts pane, select Report Inbox, and then choose the Add button.

* To move the Report Inbox part to top of the second column in the Role Center layout pane, select it and then use the Move buttons.

* (Optional) To add the My Job Queue to the Role Center, in the Available Parts pane, select My Job Queue, and then choose the Add button.

* (Optional) To move the My Job Queue part below the Report Inbox in the Role Center layout pane, select it and then use the Move buttons.

ReportSchedule-4

ReportSchedule-5

* Verify that the Report Inbox appears in the Role Center.

ReportSchedule-6


C.Scheduling a report and viewing the result

* On the Role Center, on the Report tab, choose Customer Order – Summary.

* On the report request window, choose the Print button, and then choose Schedule

ReportSchedule-7

* In the Schedule a Report window that appears, in the Description field type a different text.

* In the Report Output Type field, select the down arrow, and choose PDF.

* Choose the OK button.

ReportSchedule-8

* Go to the Report Inbox on the Role Center and show that the report appears when it is finished running.

* To view the report, select it in the Report Inbox, and then choose Show.

ReportSchedule-9


D. When a scheduled report fails

* Open the Role Center.

* On the Application menu , choose Customize, and then Customize This Page.

* In the Available Parts pane, select My Job Queue, and then choose the Add button.

* To move the My Job Queue part below the Report Inbox in the Role Center layout pane, select it and then use the Move buttons

* In the Role Center, go to the My Job Queue part.

We have already done above step in above steps. Let’s continue with next step. If not already done follow the steps as defined above.

* On the Role Center, on the Reports tab, choose Price List.

* In the Sales Type field select Customer.

* To schedule the report to run later, choose the Print button, then select Schedule.

* In the Schedule a Report window, leave the default values in fields and choose the OK button.

ReportSchedule-10

* When the error shows up in the My Job Queue part, select the error, and then choose Show Error.

* Read the error message, and then choose the OK button to close it.

ReportSchedule-11

* Open the Job Queue Log Entries page.

* Filter the list to display entries whose Status is Error.

* To view the error message, point to the Error message field for the entry, or, select the entry, and then on the Home tab, choose Show Error Message.

* Return to the Role Center, and then run the Price List report again.

* On the report request window, set the Sales Type field to All Customers, choose Print, and then choose Schedule.

* In the Schedule a Report window, leave the default values in fields and choose the OK button.

* In the Report Inbox on the Role Center, view the completed report.

ReportSchedule-12


Cumulative Updates

List of Cumulative Updates for Microsoft Dynamics NAV 2015 as of July 2015

Knowledge Base ID Title Release date Build no. Local versions included
3075726  (https://support.microsoft.com/kb/3075726/ ) Cumulative Update 9 for Microsoft Dynamics NAV 2015 July, 2015 41779 AT, AU, BE, CH, CZ, DE, DK, ES, FI, FR, IS, IT, NA, NL, NO, NZ, RU, SE, UK
3069272  (https://support.microsoft.com/kb/3069272/ ) Cumulative Update 8 for Microsoft Dynamics NAV 2015 June, 2015 41370 AT, AU, BE, CH, CZ, DE, DK, ES, FI, FR, IS, IT, NA, NL, NO, NZ, RU, SE, UK
3058000  (https://support.microsoft.com/kb/3058000/ ) Cumulative Update 7 for Microsoft Dynamics NAV 2015 May, 2015 40938 AT, AU, BE, CH, CZ, DE, DK, ES, FI, FR, IS, IT, NA, NL, NO, NZ, RU, SE, UK
3052226  (https://support.microsoft.com/kb/3052226/ ) Cumulative Update 6 for Microsoft Dynamics NAV 2015 April, 2015 40459 AT, AU, BE, CH, CZ, DE, DK, ES, FI, FR, IS, IT, NA, NL, NO, NZ, RU, SE, UK
3039824  (https://support.microsoft.com/kb/3039824/ ) Cumulative Update 5 for Microsoft Dynamics NAV 2015 March, 2015 40262 AT, AU, BE, CH, CZ, DE, DK, ES, FI, FR, IS, IT, NA, NL, NO, NZ, RU, SE, UK
3035986  (https://support.microsoft.com/kb/3035986/ ) Cumulative Update 4 for Microsoft Dynamics NAV 2015 February, 2015 39663 AT, AU, BE, CH, CZ, DE, DK, ES, FI, FR, IS, IT, NA, NL, NO, NZ, RU, SE, UK
3024901  (https://support.microsoft.com/kb/3024901/ ) Cumulative Update 3 for Microsoft Dynamics NAV 2015 January, 2015 39368 AT, AU, BE, CH, CZ, DE, DK, ES, FI, FR, IS, IT, NA, NL, NO, NZ, RU, SE, UK
3020885  (https://support.microsoft.com/kb/3020885/ ) Cumulative Update 2 for Microsoft Dynamics NAV 2015 December, 2014 38798 AT, AU, BE, CH, DE, DK, ES, FI, FR, IS, IT, NA, NL, NO, NZ, RU, SE, UK
3013215  (https://support.microsoft.com/kb/3013215/ ) Cumulative Update 1 for Microsoft Dynamics NAV 2015 November, 2014 38457 AT, AU, BE, CH, DE, DK, ES, FI, FR, IS, IT, NA, NL, NO, NZ, RU, SE, UK
Report

Creating Word Mail Merge Report in Microsoft Dynamics Navision 2015

Today we will see Mail Merge feature in Word Report.

I would suggest to please go through my earlier post for creating simple List Report for better understanding as some parts I will be skipping in this post assuming you have already learned from my previous post.

Here is the Quick Link : [ Creating My First List Report in Navision 2015 ]

Lets assume ever month we require to send a Reminder Letter to our Customers for Due Payments.

Now we can design such report at customer ease.

Lets Start with creating a new Report.

Add the Data Items and desired columns as one shown below.

Add appropriate filters on Data Items, I have added [ Open = Yes, Document Type = Invoice, Remaining Amount > 0, Due Date <> ‘ ‘] you select your own as desired.

Set the Report Properties as shown in below screen.

Define Global Variables as shown in below screen.

We have Included WordMergeDataItem as Cust. Ledger Entry. This will set the table to loop for records.

Each records will be considered as New Page for the Report.

Word Mail Merge -1

In this report we are using Include Caption which will include caption for each required columns from one defined in respective table.

Add this property for each required column.

Add the code to the Data Item Trigger to fetch Customer Information for each record.

Word Mail Merge -2

Insert New Blank Word Layout to the Report.

Word Mail Merge -3

Export the Layout Template and Save.

Word Mail Merge -4

Open saved Layout Template in Word.

In below screen each component is shown, refer to earlier post Creating List Word Report, Link provided above for better understanding.

In this report Label is included as we have set property for each column to include caption.

Word Mail Merge -5

Design the sample Letter as one shown below.

I have highlighted all the Dataset Columns/Fields in yellow.

How to add fields please refer to earlier post Creating Word List Report, Link provided above.

Word Mail Merge -6

Now Save the Template and Import into the Report.

Word Mail Merge -7

Here is the out put from the report as below.

Each page will contain data as per in Customer Ledger Entry Due Payment Records.

Word Mail Merge -8

We are done !!!

You can use formatting feature of Word to add more better look to your Report as desired.

Stay tuned for more in upcoming posts.

Don’t forget to follow the Blog Site for future posts.

Report

Creating my first Word List Report in Navision 2015

Today we will learn creating Word List Report in Navision 2015.

Prepare the Dataset for Report as below, to keep it simple I am creating List report for Item Inventory.

I am adding one additional field for Company Logo from Company information.

Make sure you add calcfields code for Picture from Company information.

—————————————————

I have added below piece of code in [ Item – OnPreDataItem() ]

CompInf.GET;
CompInf.CALCFIELDS(Picture);

—————————————————

Word Report Design 1

Place the cursor on Blank Line and open Report Properties and add DefaultLayout Property.

Word Report Design 2

Next we will Add a Blank Word Layout to the Report, Step as below.

Word Report Design 3

Confirm the action by responding OK to the Dialog Box.

Word Report Design 4

Now Export this Blank Template

Word Report Design 5

and save as docx file (MS Word File)

Word Report Design 6

Open the Exported Template in Word.

Click on DEVELOPER Menu.

From Ribbon click on XML Mapping Pane.

Word Report Design 7

You will now be able to see XML Mapping Pan which contains your Dataset for the Report.

Click to the Dropdown List and select entry containing your Report Name & ID.

Word Report Design 8

Now you will be able to access your Dataset with Table & Fields details. As shown in below screen.

Word Report Design 9

Place the cursor on top (or wherever desired) of the document to add Logo to the Report.

Select the Picture Filed from the Dataset -> Right Click -> Insert Content Control -> Picture.

See below screen for details:

Word Report Design 10

You will see the Place holder for the Picture.

Now add Table with 2 Rows ( 1 for Header & 1 for Data) and 6 columns.

We have six columns in our dataset excluding Logo.

Word Report Design 11

Add your Header for the table, We are using fixed Text Heading as of now but you can add captions from your dataset.

In current report I have not included we can check same in some other report posts.

Word Report Design 12

Select Entire 2nd Row and Add Repeating Content Control for Item (Table).

As this will show records from the table Item we included in our Dataset.

Word Report Design 13

Now in each column add your columns from Dataset as shown below.

Place your cursor in each column and choose Insert Content Control -> Plain Text.

Word Report Design 14

Now our Report is almost ready.

May be the Report have data which may continue on several pages, in this case our Heading Row must Repeat on every new Page. To do this we will Select the entire 1st Row -> Right Click -> Table Properties.

Go to Row Tab of Property window and put a checkmark on option “Repeat as header row at the top of each page

Word Report Design 15

Save your Word Template an Import back in your report as shown below.

Word Report Design 17

Now Save the Report and Execute it.

Here is the Output below of the Report.

Word Report Design 16

We are done !!!

You can use formatting feature of Word to add more better look to your Report as desired.

Stay tuned for more in upcoming posts.

Don’t forget to follow the Blog Site for future posts.

Office Integration

OFFICE 365 INTEGRATION IN NAV 2015 – Word/Excel/SharePoint

If you have signed up for Office 365, Microsoft Dynamics NAV can use this service to open and save documents. For example, when you export a report to Excel and save it on Office 365, Microsoft Dynamics NAV can use Excel Online that your Office 365 account uses to open the document.

Before you can use Office 365 and SharePoint Online with Microsoft Dynamics NAV, you must configure the service in Microsoft Dynamics NAV.

If you want to use the same folder to store temporary files for all users, you must specify a shared user account. Otherwise, each user’s temporary files are stored in their personal document repository on the SharePoint site.

Let us first understand the details before we start with Setup for SharePoint Shared Folder.

Your IT can help you configuring and assigning suitable rights to access. Although you can explore and help yourself. Since we are concentrating on Navision so we will not go in details for Share point.

Just to make understand I will be only covering top level information.

In this example I assume you already have up and running site for Document Sharing in SharePoint 2013 – 365 Online.

Here I am logging in to Office 365 – Online registered by me for demo purpose. You can register for free trial to explore the same in more details.

SharePoint-1

My Opening screen looks as one below.

SharePoint-2

I select SharePoint Site to continue. Below is my SharePoint Opening screen. I will select my site which I have created for this demo and file sharing with other users in my organization.

SharePoint-3

Let us understand different parts which will help configuring our Online Document Storage Configuration in Navision 2015.

SharePoint-4

Here I am in my Folder at Lower level where all my files will be stored and shared with my other colleges.

SharePoint-5

Open “Online Document Storage Configuration” from path shown in below screen.

SharePoint-6


Specify the Service Name of your choice or use Default provided by the System.


Fill the Location to your SharePoint site: Specifies the unified resource indicator (URI) for your site on SharePoint Online, such as [https://krishnasoftwaredevelopers.sharepoint.com/MS_Nav_Documents] in my case I will use this.


Fill the Folder field which specifies the folder in the document repository for this document service that you want documents to be stored in.


This field is required. If you have not already created a subfolder in your document repository, you must create one now, and then specify it in the Folder field.


The Document Repository field includes the top-level folder in the document repository that your document service provides. The Folder field specifies a subfolder so that you can keep business documents and drafts separate from pictures and other shared documents.


For example, if the Document Repository field is set to [Documents], the Folder field can be set to [NavisionDoc] as per my example discussed above.


When a user exports data to Excel, for example, Microsoft Dynamics NAV saves the temporary file at the location that is specified in the Document Repository and Folder fields, such as

[https://krishnasoftwaredevelopers.sharepoint.com/MS_Nav_Documents/Documents/NavisionDoc]


Fill Document Repository field: Specifies the name of the document library, such as [Document]


Fill User Name field: Specifies the account that Microsoft Dynamics NAV Server must use to log on to the document service.


I would recommend that you specify a different user name than the administrative account. This helps reduce the risk of users accessing administrative settings, for example. For example, if your user name as an administrator is Administrator@KrishnaSoftwareDevelopers.onmicrosoft.com,

then the user name for Microsoft Dynamics NAV Server can be Nav@KrishnaSoftwareDevelopers.onmicrosoft.com or any of the regular user names that you have created.

SharePoint-7


On the Actions tab, in the General group, choose Set Password.


In the window that appears, specify and confirm the password for the account    that you specified in the User Name field. Choose the OK button.


When you have set up the service, you can test whether that configuration is valid.

SharePoint-8


On the Actions tab, in the General group, choose Test Connection.


A message displays the result of the test.

SharePoint-9


The above message confirms we can now save documents on our SharePoint.


Let us check a sample as below:
Open the Document and Execute the report available.
While Running the Report I specify I want to Print with Microsoft Word.

SharePoint-10


Document will be generated and opened in Word – Office – 365. Temp file name is given to the file. Close the File as it is auto Saved by Office 365 Word Application.

SharePoint-11


Browse to your SharePoint Folder configured above, you will see the Word file is now available in this Folder.

SharePoint-12


Right Click on Name of the File and Rename with some meaning full Name as shown below.

SharePoint-13


Give the Name to the File and press Save Button.

SharePoint-14


Here is the File after Rename.

SharePoint-15


This way when ever you Print your document from Navision in Word or Excel it will get saved in this Folder.

By setting appropriate access rights you can share the files between you colleges in your Organization.

 Please check SharePoint stuffs with you admin or appropriate authority in your organization.

Office Integration

SMTP Setup errors while setting Office 365

Normally we see below Errors while configuring our SMTP in Navision.

Error-1

Check that your User Setup is having valid e-mail id.

Error-2

If you are using Domain make sure you are accessible to your domain. If you are outside you office make sure you are connected using your VPN.

Error-3

Office Integration

OFFICE 365 INTEGRATION IN NAV 2015 – Exchange Online

NEW SMTP EMAIL FLOW IN NAV.

Open SMTP Mail Setup Page, Refer below screen for path.

Office Integration-1

Click on action Apply Office 365 Server Settings.

The fields SMTP Server, SMTP Server Port and Authentication fields will be filled up automatically

Fill the User ID and Password fields based on the existing account in Office 365. You can contact your Network Admin for details.

Office Integration-2

Click “Test Email Setup” action

Office Integration-3

Office Integration-4

If everything is configured properly in Office 365 and NAV 2015 then you will get below successful message.

Office Integration-5

And below mail will be sent to Office 365 account.

Office Integration-6

After this step if we try to run action Email Confirmation from Sales Order

Office Integration-7

Then a dialog box will be opened showing from address as office 365 account.

Office Integration-8

Press OK button to send an email to required address. Edit required information.

If Edit in Outlook is checked it will open in Outlook App. You can change further mail content and recipient details before sending the mail.

Office Integration-9

Click Send to send mail from your Outbox.

Below screen shot shows that mail is sent from Office 365 account

Office Integration-10

Report

How many types of Layout is supported in NAV 2015?

In new Microsoft Dynamics NAV 2015, we are introduced in new reporting feature – Word Layout. It means, that now we can use both of layouts, RDLC and Word. Microsoft Dynamics NAV 2015 includes 4 built-in report layouts that are used on reports by default. These are only “mini” sales reports: Sales – Quote (1304), Sales – Confirmation (1305), Sales – Invoice (1306) and Sales – Credit Memo (1307).

By default, all of these reports are configured as ‘RDLC (built-in)’, but we can change it on Report Layout Selection.
ReportLayoutSelection-1
We can also customize these reports using ‘Custom Layouts’ command. But, what if we need more documents report in Word Layout, for example some of purchase documents. The biggest benefit of this feature is that you can give your customers to prepare own documents and don’t spend your time (and their money) on this job. Because of that, we need to be able to create Word Layout for new documents.
ReportLayoutSelection-2