Corfu Navision 2016, Development Tips, How To, Information, upgrade

Upgrade in Microsoft Dynamics NAV 2016

Upgrade Considerations Preparing for Upgrade in Microsoft Dynamics NAV 2016

If your solution includes variables where the name is now used by a standard C/AL function or statement such as REGISTERTABLECONNECTION or FOREACH, you must change the variables before you upgrade to Microsoft Dynamics NAV 2016. Alternatively, you can enclose the variable names in quotation marks.

If you are upgrading a solution that depends on functionality that is deprecated or changed in the default version of Microsoft Dynamics NAV 2016, you must verify that the upgrade codeunits migrate data correctly. From 2013-R2 not yet reported any under this category.

When you introduce changes to the database schema in Microsoft Dynamics NAV 2016, Microsoft Dynamics NAV will check if these changes are destructive or not. If the database check indicates that the change may lead to data deletion, such as if you are dropping a table column so that the contents of that column will be deleted, this is considered a destructive change. You will be prompted to handle the situation using upgrade codeunits. You can check out my earlier post on this topic here. Data Upgrade – in Navision 2015 it still valid for 2016, I will come up with any specific differences in my upcoming post later.

If a company name includes a special character, an error may display during the upgrade. In this context, special characters include the: [ ~ @ # $ % & * ( ) . ! % – + / = ? ]. If you are going to upgrade a database where one or more company name includes a special character, it is recommend that you rename the company before you start the upgrade process. After the upgrade is successfully finished, you can rename the company again.

Versions later than Microsoft Dynamics NAV 2013 R2 require that all columns in all system tables are in English. As a result, if you try to open a database with non-English system tables in Microsoft Dynamics NAV 2013 R2 or later, an error displays, saying that one or more columns do not exist. Make sure that all objects where compiled in a development environment with the right .ETX and .STX files. You can verify that you are running in the correct environment with English (US) as the base language by opening the ndo$dbproperty table in SQL Server Management Studio. In the Identifiers column, the word Object must be written exactly as shown here.

Converting a Database in Microsoft Dynamics NAV 2016

Before you start, make sure that you have applied the changes that are described in KB 2804640

Code corrections for some Microsoft Dynamics NAV 2013 reports to prevent compilation errors with Report Viewer 2012 when upgrading to later versions of Microsoft Dynamics NAV. Your will require to use partner login to access the hotfix. Click here for the Link.

You can choose to convert the old database and not upgrade your application. However, it is recommend that you upgrade the application objects as well so that your solution includes important application fixes and new functionality that is introduced in Microsoft Dynamics NAV 2016.

Upgrading the application will also reduce the amount of merging required to upgrade to the next major version of Microsoft Dynamics NAV, bringing you to the latest version of the product faster.

Preparing the Old Database for Conversion

  • Make a copy of the old database or create full database backup.

I have copied the database (Navision 2013/R2) and attached to the SQL for this operation:
Upgrade2016-1

  • Clear all Microsoft Dynamics NAV Server instance records from the dbo.Server Instance table in the database on SQL Server.

Upgrade2016-2

You can do this by using SQL Server Management Studio to open and clear the table.

  • Open the development environment that matches the Microsoft Dynamics NAV version of the old database, and then connect to the old database.
  • In Object Designer, make sure that no objects are locked.

If any objects are locked, the conversion process will not update the database version number. As a result, the conversion will not complete.

  • On the Tools menu, choose Build Server Application Objects, and then choose the Yes button.
  • If any errors occur, they are shown in the Error List window. Make sure that you address all compilation errors before you continue.
  • Upload the Microsoft Dynamics NAV 2016 Partner license to the database

The license that you upload must be a developer license. During the conversion, the development environment will convert the report objects that are stored in the old database to the RDL 2012 format.

  • If you are converting a Microsoft Dynamics NAV 2013 R2 or Microsoft Dynamics NAV 2015 database, then run the Sync-NavTenant cmdlet from the Microsoft Dynamics NAV 2013 R2 or Microsoft Dynamics NAV 2015 Administration Shell to synchronize the database schema changes.

Converting the Old Database

Next, we will convert the old database so that it can be used in Microsoft Dynamics NAV 2016.

Before you start the following procedure, you can choose to uninstall Microsoft Dynamics NAV 2013, Microsoft Dynamics NAV 2013 R2, or Microsoft Dynamics NAV 2015. When you uninstall Microsoft Dynamics NAV 2013, Microsoft Dynamics NAV 2013 R2, or Microsoft Dynamics NAV 2015, the database is still attached to the instance of SQL Server, which you can verify using SQL Server Management Studio.

To convert the database

  • Install Microsoft Dynamics NAV 2016.
  • Open the Microsoft Dynamics NAV 2016 development environment, and then connect to the database that you prepared in the previous task.
  • In the dialog box that appears, read the instructions carefully because this action cannot be reversed. When you are ready, choose the OK button, and then choose the OK button to confirm that you want to convert the database.

Upgrade2016-3

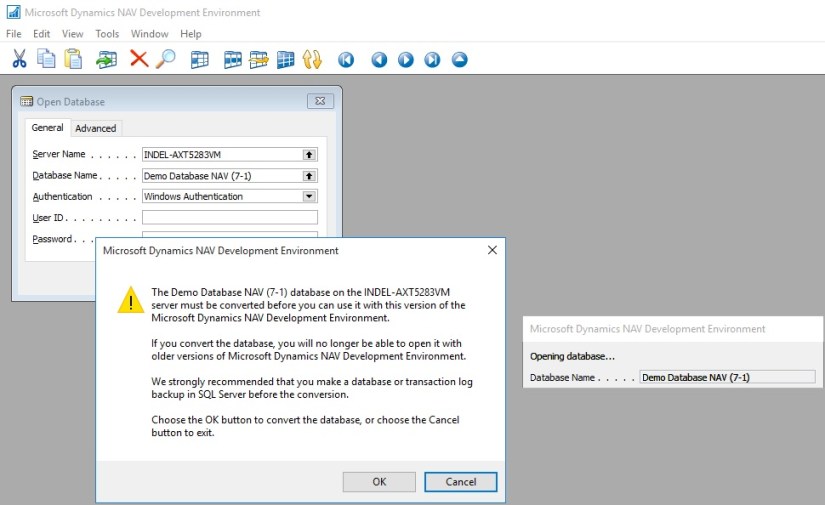
Microsoft Dynamics NAV will now convert the database. This includes an upgrade of system tables, and an upgrade of all reports to support Report Viewer 2012.

  • When you are notified that the conversion was successful, choose the OK button.

Upgrade2016-4

Upgrade2016-5

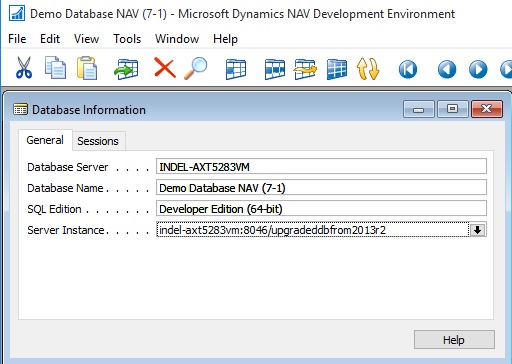
  • Connect a Microsoft Dynamics NAV 2016 Server instance to the converted database.

You use the Microsoft Dynamics NAV Server Administration tool to connect a Microsoft Dynamics NAV Server instance to the converted database.
Upgrade2016-6

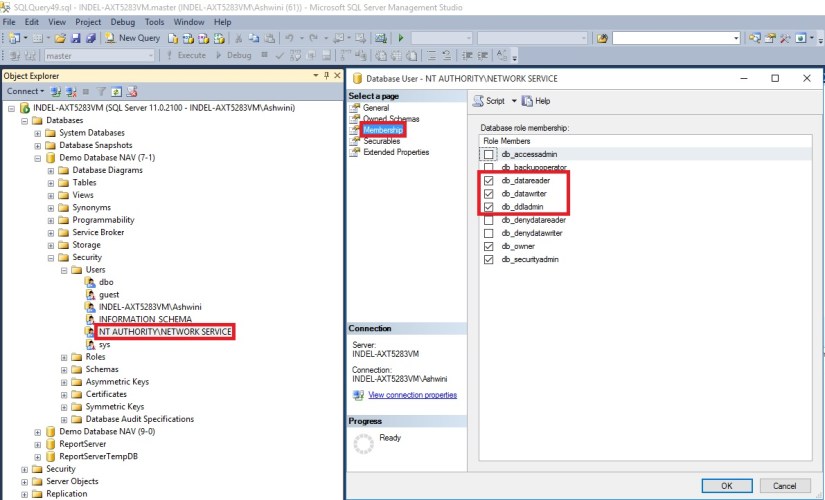
In addition, you must add the service account that is used by the Microsoft Dynamics NAV Server instance as a member of the db_owner role in the Microsoft Dynamics NAV database on SQL Server.

It is also possible to script these steps in SQL Server Management Studio:

USE [master]

GO

CREATE LOGIN [domain\accountname] FROM WINDOWS

CREATE USER [domain\accountname] FOR LOGIN [domain\accountname]

GRANT SELECT ON [master].[dbo].[$ndo$srvproperty] TO [domain\accountname]

GO

USE [Microsoft Dynamics NAV Database]

GO

CREATE USER [domain\accountname] FOR LOGIN [domain\accountname]

ALTER ROLE [db_owner] ADD MEMBER [domain\accountname]

GRANT VIEW DATABASE STATE TO [domain\accountname]

You can check more details from my earlier post Provisioning the Microsoft Dynamics NAV Server Account.

  • Run the development environment as an administrator, and then set the development environment to use the Microsoft Dynamics NAV Server instance that connects to the database.

Upgrade2016-7

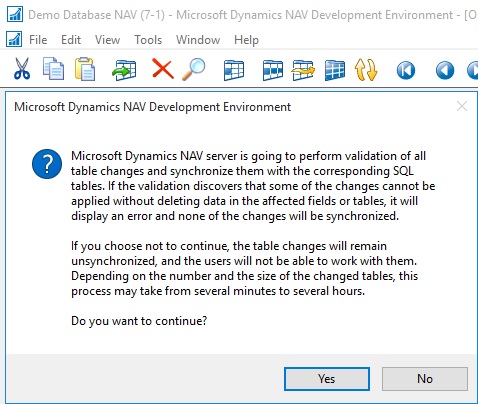
  • Run the schema synchronization to complete the database conversion.

You can run the schema synchronization from the Microsoft Dynamics NAV Development Environment or Microsoft Dynamics NAV 2016 Administration Shell.
Upgrade2016-8

From the development environment:

Open development environment as an administrator. On the Tools menu, choose Sync. Schema For All Tables, and then choose With Validation and follow the schema synchronization instructions.
Upgrade2016-9

Upgrade2016-10

From the Microsoft Dynamics NAV 2016 Administration Shell:

Open the Microsoft Dynamics NAV 2016 Administration Shell as an administrator, and then run Sync-NavTenant cmdlet as follows:

Sync-NavTenant –ServerInstance <ServerInstanceName>

Replace <ServerInstanceName> with the name of the Microsoft Dynamics NAV Server instance that is connected to the database

  • If the database references any assemblies (such as client control add-ins) that are not included on the Microsoft Dynamics NAV 2016 installation media (DVD), then add the assemblies to the Add-ins folder on Microsoft Dynamics NAV Server or Microsoft Dynamics NAV Windows client computers.

For the Microsoft Dynamics NAV Windows client, the default path is C:\Program Files (x86)\Microsoft Dynamics NAV\90\RoleTailored Client\Add-ins folder.

For Microsoft Dynamics NAV Server, the default path is the C:\Program Files\Microsoft Dynamics NAV\90\Service\Add-ins folder

In the development environment, on the Tools menu, choose Build Server Application Objects, and then, in the dialog box, choose the Yes button.
Upgrade2016-14

  • Fix compilation errors.

You can find all objects which did not compile in the Object Designer window, by setting a field filter on the Compiled field.

  • Upload the customer license to the converted database.

You have now completed the conversion of the Microsoft Dynamics NAV 2013, Microsoft Dynamics NAV 2013 R2, or Microsoft Dynamics NAV 2015 database to be accessed from Microsoft Dynamics NAV 2016. To test the converted database, you can connect it to the Microsoft Dynamics NAV 2016 Server instance that by Microsoft Dynamics NAV clients, and then open a client.

You may encounter some login issues to resolve it here are the few tips:

Delete the user login details as we do in earlier versions when RTC was introduced to access any database using SQL Query as below :

USE [Demo Database NAV (7-1)]  (use your database name)
GO

delete from [dbo].[User]

delete from [dbo].[Access Control]

delete from [dbo].[User Property]

delete from [dbo].[Page Data Personalization]

delete from [dbo].[User Default Style Sheet]

delete from [dbo].[User Metadata]

delete from [dbo].[User Personalization]

After this if you get error stating you don’t have permission to codeunit ApplicationManagement give permission in SQL to the Login running the service as below:

Upgrade2016-12

Upgrade2016-13

Next, upgrade the application code to Microsoft Dynamics NAV 2016.

I will come up with more details in my upcoming posts.

Corfu Navision 2016, Development Tips, How To, TryFunction

Using Try Functions in Navision 2016

You may have seen in different programing language concept of try… catch…

The try-catch statement consists of a try block followed by one or more catch clauses, which specify handlers for different exceptions.

When an exception is thrown, the language looks for the catch statement that handles this exception. If the currently executing method does not contain such a catch block, the language looks at the method that called the current method, and so on up the call stack. If no catch block is found, then the language displays an unhandled exception message to the user and stops execution of the program.

The try block contains the guarded code that may cause the exception. The block is executed until an exception is thrown or it is completed successfully.

Although the catch clause can be used without arguments to catch any type of exception, this usage is not recommended. In general, you should only catch those exceptions that you know how to recover from.

A throw statement can be used in a catch block to re-throw the exception that is caught by the catch statement.

You can also re-throw an exception when a specified condition is true.

Now Dynamics Navision 2016 introduces this concept in C/AL in terms of function.

Try functions in C/AL enable you to handle errors that occur in the application during code execution.

For example, with try functions, you can provide more user-friendly error messages to the end user than those thrown by the system.

You can use try functions to catch errors/exceptions that are thrown by Microsoft Dynamics NAV or exceptions that are thrown during .NET Framework interoperability operations.

Try functions catch errors similar to a conditional Codeunit.Run function call, except with the following differences:

Try function calls do not require that write transactions are committed to the database.
Changes to the database that are made with a try function are not rolled back.

Creating a Try Function

To create a try function, add a function in C/AL code of an object (such as a codeunit) as usual, and then set the TryFunction Property property to Yes. A try function has the following restrictions:

In test and upgrade codeunits, you can only use a try function on a normal function type, as defined by the FunctionType Property (Test Codeunits) or FunctionType Property (Upgrade Codeunits).
The try function cannot have a user-defined return value.
Understanding Try Function Behavior and Usage

A function that is designated as a try function has a Boolean return value (true or false). A try function has the construction OK:= MyTryFunction.

If a try function call does not use the return value, the try function operates like an ordinary function and errors are exposed as usual.

If a try function call uses the return value in an OK:= statement or a conditional statement such as IF-THEN, errors are caught.

You can use the GETLASTERRORTEXT Function to obtain errors that are generated by Microsoft Dynamics NAV.

To get details of exceptions that are generated by .NET Framework objects, you can use the GETLASTERROROBJECT Function to inspect the Expection.InnerException property. You can see codeunit 1291 – DotNet Exception Handler.

If you call the GETLASTERRORTEXT function immediately after you call the CLEARLASTERROR function, then an empty string is returned.

The result of the GETLASTERRORCODE Function is not translated into the local language. The result of the GETLASTERRORTEXT function is translated into the local language.

TryFunction usage concept you can find throughout the system especially for Posting Preview, Applying Entries, and Printing Reports etc. in several codeunits.

However to give simple sight on usage of same I am using my below defined example.

I have created a codeunit with TryFunction to add an Item to Item Table.
TryFunction-1

I created another codeunit with function which calls the above codeunits AddItem function passing parameter to function. Testing it if it is successful or any error occurred while performing the action. 
TryFunction-2
When I execute the second codeunit in first run it says successful as Item dosen’t exists in the table. When I execute for second time it gives error as the item was already added to the table in its first run.
TryFunction-3

Above example also demonstrates the usage of ClearLastError, GetLastErrorCode and GetLastErrorText functions.

Spend some time in scanning other codeunits for better understanding about TryFunctions.

You can see the example provided by Microsoft MSDN also to understand usage of TryFunction.

The following example illustrates the use of a try function together with codeunit 1291 DotNet Exception Handler to handle .NET Framework Interoperability exceptions. The code is in text file format and has been simplified for illustration. The CallTryPostingDotNet function runs the try function TryPostSomething in a conditional statement to catch .NET Framework Interoperability exceptions. Errors other than IndexOutOfRangeException type are re-thrown.

[TryFunction]

PROCEDURE TryPosting@1);

BEGIN

CODEUNIT.RUN(CODEUNIT::”Purch.-Post”);

END;

PROCEDURE CallTryPostingDotNet @2();

VAR

MyPostingCodeunit@1 : Codeunit 90;

MyDotNetExceptionHandler@2 : Codeunit 1291;

IndexOutOfRangeException@3 : DotNet ‘mscorlib, Version=4.0.0.0, Culture=neutral, PublicKeyToken=b77a5c561934e089′.System.IndexOutOfRangeException’

BEGIN

IF TryPostSomething THEN

MESSAGE(‘Posting succeeded.’)

ELSE BEGIN

MyDotNetExceptionHandler.Collect;

IF MyDotNetExceptionHandler.TryCastToType(IndexOutOfRangeException) THEN

MESSAGE(‘The index used to find the value was not valid.’)

ELSE

MyDotNetExceptionHandler.Rethrow;

END;

END;

I will come up with more details in my upcoming posts.

Corfu Navision 2016, Development Tips, Dynamics Content Package, How To, PowerBI.com

PowerBI.com content package for Microsoft Dynamics NAV 2016

Microsoft Dynamics NAV 2016 includes an entirely new integration with Microsoft Power BI.

In Microsoft Dynamics NAV 2016, using the new Power BI Content Pack, Microsoft Dynamics NAV end users can connect a correctly configured Microsoft Dynamics NAV instance to PowerBI.com and immediately be able to see full business performance insights in a dashboard.

The PowerBI.com content package for Microsoft Dynamics NAV 2016 empowers you to share and present data across an organization. Data can be defined centrally but be consumed, modified and presented to the local needs of users, while everybody still sees data from the same overall picture.

Benefits:

  • Business performance dashboard  Data from Microsoft Dynamics NAV is presented in an easy-to-use dashboard, providing a complete overview and important insights
  • Finance and sales insights  Users can drill into more details in the sales and finance reports, facilitating decision making
  • Personalizing the insights  Users can create a personalized dashboard from the existing KPIs and charts in reports
  • Modify and extend With this package, users can start using and exploring their own data using Power BI in just a few minutes. The dashboard gives users KPIs and charts on their sales and finance data. The setup consists of three easy steps:

Users can create their own KPIs and charts, select data from queries, set filters, select visualizations and more to create their own dashboards

  • Sign in to PowerBI.com.
  • Select the content package for Microsoft Dynamics NAV.
  • Connect a Microsoft Dynamics NAV instance to the content package. Today I will discuss about below:

It takes less than five minutes to get going! Depends upon net speed and volume of data.

Preparation:
PowerBI-1

Make sure OData Service is enabled and Port for same is defined in your Server Instance of Navision. Also you use valid thumbprint and SSL is enabled.
PowerBI-2

Check that the Page 197 Service powerbifinance is published in Web Services window. Copy the OData URL we will be requiring it while connecting to content pack for Dynamics 2016 in BI.


Go to PowerBI.com and sign in or go through the easy account setup process.
PowerBI-3

Sign in to Power BI using your credentials.

You first get to a page to select your data source.

The data sources are OData feeds, such as OData web services from any Microsoft Dynamics NAV solution.

  • To import your Microsoft Dynamics NAV data into Power BI, you need to have permissions to the tables where data is retrieved from, in this case sales and finance data. You sign in your account credentials.
  • The Power BI Microsoft Dynamics NAV content pack uses Microsoft Dynamics NAV’s web services to retrieve your data. If you have a lot of data in your Microsoft Dynamics NAV instance, a suggestion to minimize the impact on your web service usage is to change the refresh frequency from the current default which is once a day to only refresh on weekdays or every other day depending on your needs. Another suggestion is to have one admin create the content pack and share it with the rest of the team instead of having every admin in your organization create their own

In this case select Services to get to content packages. Refer below how to connect.
PowerBI-4

Select the content package for Microsoft Dynamics NAV.
PowerBI-5

You will be prompted to add the URL to your Dynamics NAV instance. 

An easy way to obtain this URL is in Dynamics NAV to go to Web Services, find the powerbifinance web service and copy the Odata URL, but leaving out the “/powerbifinance” from the URL string. 

When you paste in the copied URL, you must remove the last part of the web service-specific URL: “/powerbifiance” – you only need the company-specific part of it

After entering the URL You will be prompted to select an authentication method. 

Select the appropriate method and provide the relevant user credentials.
PowerBI-6

Here you provide the OData URL we saved above. Enter your Authentication Mode and provide your User ID and password to get connected to the data.

When you select Log on, it will take a few minutes for the content package to connect to your Dynamics NAV instance, get the data and create the dashboard and reports.

Troubleshooting


“Parameter validation failed, please make sure all parameters are valid”

If you see this error after typing your Microsoft Dynamics NAV URL. Make sure the following requirements are satisfied:

– The URL follows exactly this pattern https//instance.navserver.com:7048/DynamicsNAV90_Instance1/OData/Company(‘CRONUS%20International%20Ltd.’) replacing ” instance.navserver.com” with your NAV Server name, “DynamicsNAV90_Instance1” with your NAV Server Instance name and “Company(‘CRONUS%20International%20Ltd.’)” with your NAV Company name.

– Make sure all the letters are lower case.

– Make sure the URL is in ‘https’.

– Make sure there are no trailing forward slash at the end of the URL.


“Login failed”

If you get a “login failed” error after using your Microsoft Dynamics NAV credentials to login, then the account you are using doesn’t have permissions to retrieve the Microsoft Dynamics NAV data from your account. Verify it is an admin account and try again.

Let’s see what data exactly this page provides:
PowerBI-7

Depending on whether you use your own database or the demo database, the charts in the dashboard might have different content or none at all.

 New Post with details available, please check out : https://msdynamicsnavashwinitripathi.wordpress.com/2016/03/23/microsoft-power-bi-part-vi/


We will see rest details in my upcoming post.

Cumulative Updates, Information

Released Cumulative Updates for Microsoft Dynamics NAV 2015

For a list of all cumulative updates for this version, see Released Cumulative Updates for Microsoft Dynamics NAV 2015.

Cumulative Updates for Microsoft Dynamics NAV 2015

Knowledge

Base ID

Title Release date Build no. Local versions included
3097767 Cumulative Update 12 for Microsoft Dynamics NAV 2015 October, 2015 42951 AT, AU, BE, CH, CZ, DE, DK, ES, FI, FR, IS, IT, NA, NL, NO, NZ, RU, SE, UK
3091812 Cumulative Update 11 for Microsoft Dynamics NAV 2015 September, 2015 42603 AT, AU, BE, CH, CZ, DE, DK, ES, FI, FR, IS, IT, NA, NL, NO, NZ, RU, SE, UK
3086434    Cumulative Update 10 for Microsoft Dynamics NAV 2015 August, 2015 42222 AT, AU, BE, CH, CZ, DE, DK, ES, FI, FR, IS, IT, NA, NL, NO, NZ, RU, SE, UK
3075726 Cumulative Update 9 for Microsoft Dynamics NAV 2015 July, 2015 41779 AT, AU, BE, CH, CZ, DE, DK, ES, FI, FR, IS, IT, NA, NL, NO, NZ, RU, SE, UK
3069272    Cumulative Update 8 for Microsoft Dynamics NAV 2015 June, 2015 41370 AT, AU, BE, CH, CZ, DE, DK, ES, FI, FR, IS, IT, NA, NL, NO, NZ, RU, SE, UK
3058000    Cumulative Update 7 for Microsoft Dynamics NAV 2015 May, 2015 40938 AT, AU, BE, CH, CZ, DE, DK, ES, FI, FR, IS, IT, NA, NL, NO, NZ, RU, SE, UK
3052226    Cumulative Update 6 for Microsoft Dynamics NAV 2015 April, 2015 40459 AT, AU, BE, CH, CZ, DE, DK, ES, FI, FR, IS, IT, NA, NL, NO, NZ, RU, SE, UK
3039824    Cumulative Update 5 for Microsoft Dynamics NAV 2015 March, 2015 40262 AT, AU, BE, CH, CZ, DE, DK, ES, FI, FR, IS, IT, NA, NL, NO, NZ, RU, SE, UK
3035986 Cumulative Update 4 for Microsoft Dynamics NAV 2015 February, 2015 39663 AT, AU, BE, CH, CZ, DE, DK, ES, FI, FR, IS, IT, NA, NL, NO, NZ, RU, SE, UK
3024901 Cumulative Update 3 for Microsoft Dynamics NAV 2015 January, 2015 39368 AT, AU, BE, CH, CZ, DE, DK, ES, FI, FR, IS, IT, NA, NL, NO, NZ, RU, SE, UK
3020885 Cumulative Update 2 for Microsoft Dynamics NAV 2015 December, 2014 38798 AT, AU, BE, CH, DE, DK, ES, FI, FR, IS, IT, NA, NL, NO, NZ, RU, SE, UK
3013215    Cumulative Update 1 for Microsoft Dynamics NAV 2015 November, 2014 38457 AT, AU, BE, CH, DE, DK, ES, FI, FR, IS, IT, NA, NL, NO, NZ, RU, SE, UK
Cumulative Updates, Information

Released Cumulative Updates for Microsoft Dynamics NAV 2013

For a list of all cumulative updates for this version, see Released Cumulative Updates for Microsoft Dynamics NAV 2013.

Cumulative Updates for Microsoft Dynamics NAV 2013

Knowledge

Base ID

Title Release date Build no. Local versions included
3097765 Cumulative Update 31 for Microsoft Dynamics NAV 2013 October, 2015 42948 AT, AU, BE, CH, DE, DK, ES, FI, FR, IS, IT, NA, NL, NO, NZ, SE, UK
3091810 Cumulative Update 30 for Microsoft Dynamics NAV 2013 September, 2015 42591 AT, AU, BE, CH, DE, DK, ES, FI, FR, IS, IT, NA, NL, NO, NZ, SE, UK
3086433 Cumulative Update 29 for Microsoft Dynamics NAV 2013 August, 2015 42219 AT, AU, BE, CH, DE, DK, ES, FI, FR, IS, IT, NA, NL, NO, NZ, SE, UK
3075723 Cumulative Update 28 for Microsoft Dynamics NAV 2013 July, 2015 41767 AT, AU, BE, CH, DE, DK, ES, FI, FR, IS, IT, NA, NL, NO, NZ, SE, UK
3069230 Cumulative Update 27 for Microsoft Dynamics NAV 2013 June, 2015 41354 AT, AU, BE, CH, DE, DK, ES, FI, FR, IS, IT, NA, NL, NO, NZ, SE, UK
3058009 Cumulative Update 26 for Microsoft Dynamics NAV 2013 May, 2015 40940 AT, AU, BE, CH, DE, DK, ES, FI, FR, IS, IT, NA, NL, NO, NZ, SE, UK
3051268 Cumulative Update 25 for Microsoft Dynamics NAV 2013 April, 2015 40468 AT, AU, BE, CH, DE, DK, ES, FI, FR, IS, IT, NA, NL, NO, NZ, SE, UK
3039828 Cumulative Update 24 for Microsoft Dynamics NAV 2013 March, 2015 40118 AT, AU, BE, CH, DE, DK, ES, FI, FR, IS, IT, NA, NL, NO, NZ, SE, UK
3035980 Cumulative Update 23 for Microsoft Dynamics NAV 2013 February, 2015 39671 AT, AU, BE, CH, DE, DK, ES, FI, FR, IS, IT, NA, NL, NO, NZ, SE, UK
3024895 Cumulative Update 22 for Microsoft Dynamics NAV 2013 January, 2015 39369 AT, AU, BE, CH, DE, DK, ES, FI, FR, IS, IT, NA, NL, NO, NZ, SE, UK
3020883 Cumulative Update 21 for Microsoft Dynamics NAV 2013 December, 2014 38800 AT, AU, BE, CH, DE, DK, ES, FI, FR, IS, IT, NA, NL, NO, NZ, SE, UK
3013213 Cumulative Update 20 for Microsoft Dynamics NAV 2013 November, 2014 38454 AT, AU, BE, CH, DE, DK, ES, FI, FR, IS, IT, NA, NL, NO, NZ, SE, UK
3000200 Cumulative Update 19 for Microsoft Dynamics NAV 2013 October, 2014 38052 AT, AU, BE, CH, DE, DK, ES, FI, FR, IS, IT, NA, NL, NO, NZ, SE, UK
2992503 Cumulative Update 18 for Microsoft Dynamics NAV 2013 September, 2014 37798 AT, AU, BE, CH, DE, DK, ES, FI, FR, IS, IT, NA, NL, NO, NZ, SE, UK
2984829 Cumulative Update 17 for Microsoft Dynamics NAV 2013 August, 2014 37532 AT, AU, BE, CH, DE, DK, ES, FI, FR, IS, IT, NA, NL, NO, NZ, SE, UK
2977472 Cumulative Update 16 for Microsoft Dynamics NAV 2013 July, 2014 37201 AT, AU, BE, CH, DE, DK, ES, FI, FR, IS, IT, NA, NL, NO, NZ, SE, UK
2971745 Cumulative Update 15 for Microsoft Dynamics NAV 2013 June, 2014 36919 AT, AU, BE, CH, DE, DK, ES, FI, FR, IS, IT, NA, NL, NO, NZ, SE, UK
2964546 Cumulative Update 14 for Microsoft Dynamics NAV 2013 May, 2014 36605 AT, AU, BE, CH, DE, DK, ES, FI, FR, IS, IT, NA, NL, NO, NZ, SE, UK
2955943 Cumulative Update 13 for Microsoft Dynamics NAV 2013 April, 2014 36347 AT, AU, BE, CH, DE, DK, ES, FI, FR, IS, IT, NA, NL, NO, NZ, SE, UK
2937998 Cumulative Update 12 for Microsoft Dynamics NAV 2013 March, 2014 36207 AT, AU, BE, CH, DE, DK, ES, FI, FR, IS, IT, NA, NL, NO, NZ, SE, UK
2930616 Cumulative Update 11 for Microsoft Dynamics NAV 2013 February, 2014 36076 AU, DE, DK, FR, IT, NA, NL, NZ, SE, UK
2918536 Cumulative Update 10 for Microsoft Dynamics NAV 2013 January, 2014 36005 AU, DE, DK, FR, IT, NA, NL, NZ, SE, UK
2913980 Cumulative Update 9 for Microsoft Dynamics NAV 2013 December, 2013 35782 AU, DE, DK, FR, IT, NA, NL, NZ, SE, UK
2901572 Cumulative Update 8 for Microsoft Dynamics NAV 2013 November, 2013 35670 AU, DE, DK, FR, IT, NA, NL, NZ, SE, UK
2892427 Cumulative Update 7 for Microsoft Dynamics NAV 2013 October, 2013 35488 AU, DE, DK, FR, IT, NA, NL, NZ, UK
2881294 Cumulative Update 6 for Microsoft Dynamics NAV 2013 September, 2013 35345 AU, DE, DK, FR, IT, NA, NL, NZ, UK
2872273 Cumulative Update 5 for Microsoft Dynamics NAV 2013 August, 2013 35201 AU, DE, DK, FR, IT, NA, NL, NZ, UK
2860301 Cumulative Update 4 for Microsoft Dynamics NAV 2013 July, 2013 35026 DE, DK, FR, IT, NA, NL, UK
2852685 Cumulative Update 3 for Microsoft Dynamics NAV 2013 June, 2013 34902 DE, DK, FR, IT, NA, NL, UK
2843305 Cumulative Update 2 for Microsoft Dynamics NAV 2013 May, 2013 34688 DE, DK, NA, NL, UK
2829782 Cumulative Update 1 for Microsoft Dynamics NAV 2013 April, 2013 34587 DE

For a list of all hotfixes included in Cumulative Updates for Microsoft Dynamics NAV 2013, view the following CustomerSource and PartnerSource pages:

CustomerSource

PartnerSource

Cumulative Updates, Information

Released Cumulative Updates for Microsoft Dynamics NAV 2013 R2

For a list of all cumulative updates for this version, see Released Cumulative Updates for Microsoft Dynamics NAV 2013 R2.

Knowledge

Base ID

Title Release date Build no. Local versions included
3097766 Cumulative Update 24 for Microsoft Dynamics NAV 2013 R2 October, 2015 42950 AT, AU, BE, CH, CZ, DE, DK, ES, FI, FR, IS, IT, NA, NL, NO, NZ, RU, SE, UK
3091811 Cumulative Update 23 for Microsoft Dynamics NAV 2013 R2 September, 2015 42610 AT, AU, BE, CH, CZ, DE, DK, ES, FI, FR, IS, IT, NA, NL, NO, NZ, RU, SE, UK
3084775 Cumulative Update 22 for Microsoft Dynamics NAV 2013 R2 August, 2015 42221 AT, AU, BE, CH, CZ, DE, DK, ES, FI, FR, IS, IT, NA, NL, NO, NZ, RU, SE, UK
3075724 Cumulative Update 21 for Microsoft Dynamics NAV 2013 R2 July, 2015 41768 AT, AU, BE, CH, CZ, DE, DK, ES, FI, FR, IS, IT, NA, NL, NO, NZ, RU, SE, UK
3069271 Cumulative Update 20 for Microsoft Dynamics NAV 2013 R2 June, 2015 41371 AT, AU, BE, CH, CZ, DE, DK, ES, FI, FR, IS, IT, NA, NL, NO, NZ, RU, SE, UK
3058010 Cumulative Update 19 for Microsoft Dynamics NAV 2013 R2 May, 2015 40941 AT, AU, BE, CH, CZ, DE, DK, ES, FI, FR, IS, IT, NA, NL, NO, NZ, RU, SE, UK
3052269 Cumulative Update 18 for Microsoft Dynamics NAV 2013 R2 April, 2015 40452 AT, AU, BE, CH, CZ, DE, DK, ES, FI, FR, IS, IT, NA, NL, NO, NZ, RU, SE, UK
3039826 Cumulative Update 17 for Microsoft Dynamics NAV 2013 R2 March, 2015 40076 AT, AU, BE, CH, CZ, DE, DK, ES, FI, FR, IS, IT, NA, NL, NO, NZ, RU, SE, UK
3035983 Cumulative Update 16 for Microsoft Dynamics NAV 2013 R2 February, 2015 39665 AT, AU, BE, CH, CZ, DE, DK, ES, FI, FR, IS, IT, NA, NL, NO, NZ, RU, SE, UK
3024898 Cumulative Update 15 for Microsoft Dynamics NAV 2013 R2 January, 2015 39354 AT, AU, BE, CH, CZ, DE, DK, ES, FI, FR, IS, IT, NA, NL, NO, NZ, RU, SE, UK
3020884 Cumulative Update 14 for Microsoft Dynamics NAV 2013 R2 December, 2014 38801 AT, AU, BE, CH, CZ, DE, DK, ES, FI, FR, IS, IT, NA, NL, NO, NZ, RU, SE, UK
3013214 Cumulative Update 13 for Microsoft Dynamics NAV 2013 R2 November, 2014 38455 AT, AU, BE, CH, CZ, DE, DK, ES, FI, FR, IS, IT, NA, NL, NO, NZ, RU, SE, UK
3000199 Cumulative Update 12 for Microsoft Dynamics NAV 2013 R2 October, 2014 38053 AT, AU, BE, CH, CZ, DE, DK, ES, FI, FR, IS, IT, NA, NL, NO, NZ, RU, SE, UK
2992495 Cumulative Update 11 for Microsoft Dynamics NAV 2013 R2 September, 2014 37799 AT, AU, BE, CH, CZ, DE, DK, ES, FI, FR, IS, IT, NA, NL, NO, NZ, RU, SE, UK
2984452 Cumulative Update 10 for Microsoft Dynamics NAV 2013 R2 August, 2014 37563 AT, AU, BE, CH, CZ, DE, DK, ES, FI, FR, IS, IT, NA, NL, NO, NZ, RU, SE, UK
2977473 Cumulative Update 9 for Microsoft Dynamics NAV 2013 R2 July, 2014 37221 AT, AU, BE, CH, CZ, DE, DK, ES, FI, FR, IS, IT, NA, NL, NO, NZ, RU, SE, UK
2971746 Cumulative Update 8 for Microsoft Dynamics NAV 2013 R2 June, 2014 36897 AT, AU, BE, CH, DE, DK, ES, FI, FR, IS, IT, NA, NL, NO, NZ, RU, SE, UK
2964528 Cumulative Update 7 for Microsoft Dynamics NAV 2013 R2 May, 2014 36703 AT, AU, BE, CH, DE, DK, ES, FI, FR, IS, IT, NA, NL, NO, NZ, RU, SE, UK
2955941  Cumulative Update 6 for Microsoft Dynamics NAV 2013 R2 March, 2014 36366 AT, AU, BE, CH, DE, DK, ES, FI, FR, IS, IT, NA, NL, NO, NZ, RU, SE, UK
2937999 Cumulative Update 5 for Microsoft Dynamics NAV 2013 R2 March, 2014 36281 AT, AU, BE, CH, DE, DK, ES, FI, FR, IS, IT, NA, NL, NO, NZ, SE, UK
2930617 Cumulative Update 4 for Microsoft Dynamics NAV 2013 R2 February, 2014 36078 AU, DE, DK, FR, IT, NA, NL, NZ, SE, UK
2918538 Cumulative Update 3 for Microsoft Dynamics NAV 2013 R2 January, 2014 36035 AU, DE, DK, FR, IT, NA, NL, NZ, SE, UK
2913982 Cumulative Update 2 for Microsoft Dynamics NAV 2013 R2 December, 2013 35800 AU, DE, DK, FR, IT, NA, NL, NZ, SE, UK
2901573 Cumulative Update 1 for Microsoft Dynamics NAV 2013 R2 November, 2013 35701 AU, DE, DK, FR, IT, NA, NL, NZ, SE, UK

For a list of all hotfixes included in Cumulative Updates for Microsoft Dynamics NAV 2013 R2, view the following CustomerSource and PartnerSource pages:

CustomerSource

PartnerSource

Cumulative Updates, Information

Cumulative Update 12 for Microsoft Dynamics NAV 2015 has been released

Cumulative Update 12 includes all application and platform hotfixes and regulatory features that have been released for Microsoft Dynamics NAV 2015.

For more details checkout link : Cumulative Update 12 for Microsoft Dynamics NAV 2015 has been released

Corfu Navision 2016, Development Tips, Information

Introducing Extensions in Microsoft Dynamics NAV 2016

Extensions enable you to modify your Microsoft Dynamics NAV system without directly altering the source resources, making it easier to deploy, manage, and upgrade customizations or extensions.

While you will still use the existing Microsoft Dynamics NAV Development system to customize or extend Microsoft Dynamics NAV, a new set of Windows PowerShell cmdlets have been introduced that mean you can add your changes into a proprietary package format, called a .navx package file.

These packages can be installed, and more importantly uninstalled, from a Microsoft Dynamics NAV system with ease.

Packages can be automatically upgraded through the installation process, so up taking newer versions is made easier.

For the time being for more details see : Introducing Extensions in Microsoft Dynamics NAV 2016

Will come up with more details in my upcoming posts.

Corfu Navision 2016, Development Tips, Functional Tips, How To, Layouts, Office Integration, Report, Selection, Word

Modify, Assign and Process Email for Word Forms in Navision 2016

Microsoft Dynamics NAV 2016 offers new functionality with Microsoft Word forms and emailing documents for Customers and Vendors. You can now modify the customer statement report and the vendor remittance report using Microsoft Word. You can also select a specific report format by customer to ease the statement process.

To make this functionality work for you, you need to make sure you have setup the SMTP Mail Setup. You can see my earlier post OFFICE 365 INTEGRATION IN NAV 2015 – Exchange Online this is still valid for Navision 2016.

Recall from my earlier posts, how to work with Word Layouts which I have written for 2015 but those are still valid for 2016 links as below.

Word Document Reports and Custom Layouts

Using Report Selector to run Report

Managing Report Layouts

In Microsoft Dynamics NAV 2016, Microsoft have extended the functionality for Word forms and Email beyond the Sales documents. We now have default Microsoft Word forms for Customer Statements and the Vendor Remittance report.

You can now modify the Word form to meet your needs, assign a custom Word layout to a specified customer or vendor and print or email based on those customer specific selections.

In the Report Layout selection, there is a new report object for the Customer Statement with a default Word report created.

The Mini Statement report (1316) is based on the existing RDLC customer statement but includes a Word report with the same information. You can use Managing Report Layouts to know more details regarding customizing the Layouts.

In Report Selection – Sales, you can set the Customer Statement to use the new report, Mini-Statement – 1316.
Report2016-1

Now your system is setup to use the specified layout for all customers and the statement itself is going to use the new report.

Now that Microsoft Dynamics NAV is setup to use the new report, you can assign a specific report by customer. This will enable you to have multiple formats processed at the same time.

We assigned a custom layout to the customer in the customer card.

Here you set your selection by document type, for example, the sales quote or the customer statement.

You can also enter an email address for the document. So, if the statement goes to your customer’s accounts receivable clerk and the sales quote is sent to the sales manager, you define this information in the Document Layouts page.

The system uses the custom layout when you print the documents instead of emailing them.

Enter multiple email addresses with a semi-colon to separate them.
Report2016-2

You can do this for all customers.

When statements are processed, the report layout used is the one assigned to the customer. If the customer has no custom layouts assigned, the custom layout assigned in the Report Layout Selection is used.

If you go to Customer Statements, you can see that that Output Options are available. This will let you select how you wish to use the document layout settings.
Report2016-3
A checkbox will appear allowing you to print remaining statements. If you mark this checkbox, any statements with an email address in Customer Document Layouts is emailed, and any statements with a custom report layout but no email address will print with that report layout and any customers without any document layout settings will use the company default report from Report Layout Selections.

I will come up with more details in my upcoming posts.

Corfu Navision 2016, Development Tips, How To, XMLports

Multiple namespace support in XML Ports – Microsoft Dynamics NAV 2016

Microsoft Dynamics NAV 2016 now enables developers to create XMLPorts which contain more than one namespace. Namespaces are used to distinguish fields and provide uniqueness.

The inclusion of namespaces enables parties to tag elements and resolve any ambiguity.

What is default Namespace?

This property specifies the default namespace for both import and export. The default value is unique for different XMLports.

For example, the following string specifies a namespace: urn:microsoft-dynamics-nav/xmlports/x100, where 100 is the ID of the XMLport.

What is Namespace?

You can use this property to declare one or more namespaces on the XMLport.

To add a namespace, you can choose the AssistEdit button or enter the namespaces directly in the field.

A namespace declaration consists of prefix and the namespace name, which has the format prefix=namespace. Separate multiple namespaces with a comma.

In the XML documents exported or imported by the XMLport, the namespaces declarations are only supported in the <root> element.

For example, if an XMLport has the namespace mynavprefix=mynavnamepace and the default namespace urn:nav:schema:all, then the root element will be as follows:

<Root xmlns:mynavprefix=”mynavnamespace” xmlns=”urn:nav:schema:all”>

To specify a default namespace, leave the Prefix field blank.

You can also specify the default namespace by specifying the namespace in the DefaultNamespace Property and setting the UseDefaultNamespace Property to Yes.

However, there can only be one default namespace. So if you want to specify a default namespace in the Namespace property, you must set the UseDefaultNamespace Property to No.

How to Define Namespace:
Namespace-1

Using Namespace:
Namespace-2

The final XMLport will be as below:
Namespace-3

Now save your XMLport and execute it.
Namespace-4

The output will be similar to below:
Namespace-5

Conclusion:

  • Multiple namespaces are defined in the root element of the XMLport and have their own property editor for defining them.
  • Developers can easily select the namespace via lookups on the element record.
  • XMLports are accessible both for developers and super users. Including the namespace prefix in the core editor lets you see key data while developing.

I will come up with more information in my upcoming posts.