Office Integration

OFFICE 365 INTEGRATION IN NAV 2015 – Exchange Online

NEW SMTP EMAIL FLOW IN NAV.

Open SMTP Mail Setup Page, Refer below screen for path.

Office Integration-1

Click on action Apply Office 365 Server Settings.

The fields SMTP Server, SMTP Server Port and Authentication fields will be filled up automatically

Fill the User ID and Password fields based on the existing account in Office 365. You can contact your Network Admin for details.

Office Integration-2

Click “Test Email Setup” action

Office Integration-3

Office Integration-4

If everything is configured properly in Office 365 and NAV 2015 then you will get below successful message.

Office Integration-5

And below mail will be sent to Office 365 account.

Office Integration-6

After this step if we try to run action Email Confirmation from Sales Order

Office Integration-7

Then a dialog box will be opened showing from address as office 365 account.

Office Integration-8

Press OK button to send an email to required address. Edit required information.

If Edit in Outlook is checked it will open in Outlook App. You can change further mail content and recipient details before sending the mail.

Office Integration-9

Click Send to send mail from your Outbox.

Below screen shot shows that mail is sent from Office 365 account

Office Integration-10

Report

How many types of Layout is supported in NAV 2015?

In new Microsoft Dynamics NAV 2015, we are introduced in new reporting feature – Word Layout. It means, that now we can use both of layouts, RDLC and Word. Microsoft Dynamics NAV 2015 includes 4 built-in report layouts that are used on reports by default. These are only “mini” sales reports: Sales – Quote (1304), Sales – Confirmation (1305), Sales – Invoice (1306) and Sales – Credit Memo (1307).

By default, all of these reports are configured as ‘RDLC (built-in)’, but we can change it on Report Layout Selection.
ReportLayoutSelection-1
We can also customize these reports using ‘Custom Layouts’ command. But, what if we need more documents report in Word Layout, for example some of purchase documents. The biggest benefit of this feature is that you can give your customers to prepare own documents and don’t spend your time (and their money) on this job. Because of that, we need to be able to create Word Layout for new documents.
ReportLayoutSelection-2

Report

Designing Report Layouts from the Microsoft Dynamics NAV Development Environment

After you have created a dataset for a report, you design the report layout. The report layout determines how the report looks when it is viewed, printed, and saved from the Microsoft Dynamics NAV client. The report layout specifies which fields of the dataset are included in the report and how they are arranged, the format of text that appears on the report (such as font type and color), margins, background images, and more.

You generally display most data in the body of a report, and you use the header to display information before any dataset fields are displayed. For example, you can display a report title, company, and user information in the header of a report.

Report Layout Types

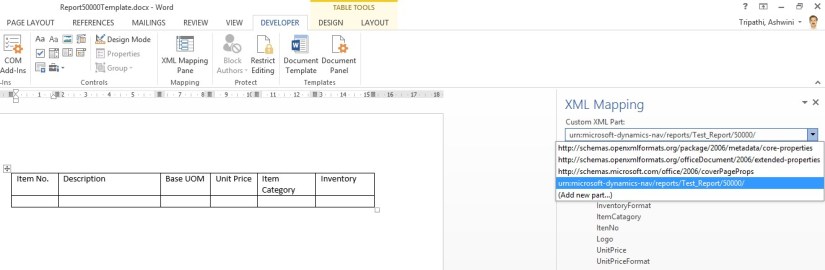
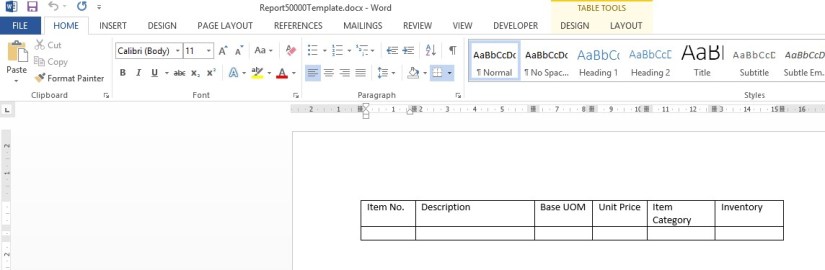
There are two types of report layouts: Word and Client Report Language Definition (RDLC). Word report layouts are based on a Word document (.docx file type) and are created and modified by using Word 2013. RDLC report layouts are .rdlc or .rdl file types that are created and modified by using Visual Studio 2013 or SQL Server Report Builder 3.0.

Built-in and Custom Report Layouts

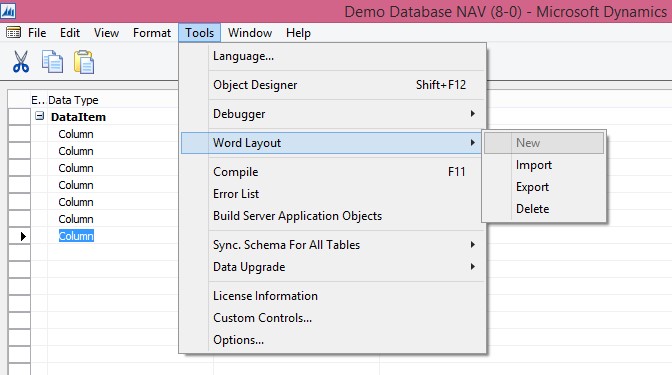
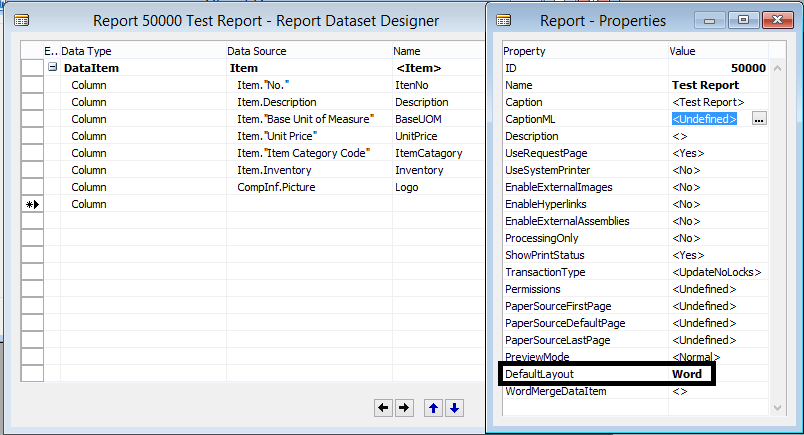
In the Microsoft Dynamics NAV Development Environment, you can create both an RDLC report layout and Word report layout on a report. These layouts are referred to as built-in layouts because they are part of the report object in the database. This means, for example, if you export the report object as a .fob or .txt file, the RDLC report layout and Word report layout are included. A report can only have one built-in RDLC report layout and one built-in Word report layout. By default, the built-in RDLC report layout is used when the report is run in the Microsoft Dynamics NAV client unless there is only a built-in Word report layout, in which case, the built-in Word report layout is used.

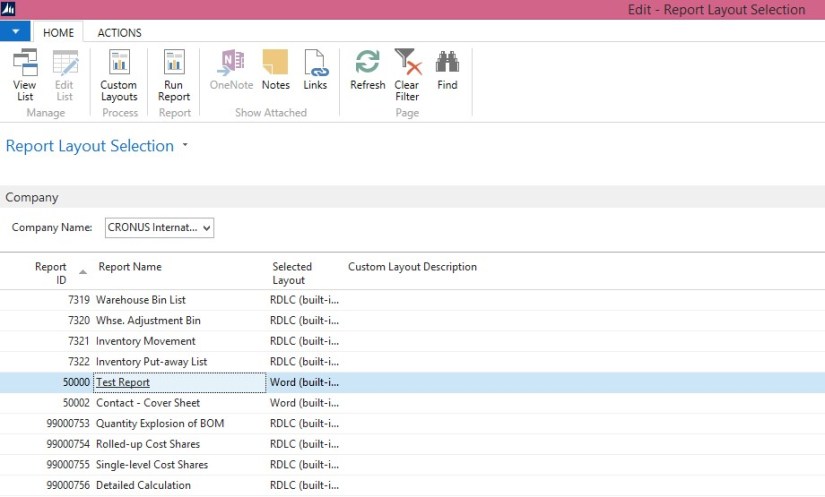
Microsoft Dynamics NAV users can specify whether to use the built-in RDLC or Word report layout on a report from the Microsoft Dynamics NAV Windows client and Microsoft Dynamics NAV Web client. From the client, users can also create custom report layouts that are based on the built-in report layouts. This enables users to have several different layouts for the same report which they can switch among. Custom report layouts are managed from page 9650 Report Layouts in the Microsoft Dynamics NAV client. Unlike built-in report layouts, which are part of the report object, custom report layouts are stored in table 9650 Report Layouts of the database.

Report Layouts in a Multitenant Deployment

In a multitenant Microsoft Dynamics NAV deployment, the built-in report layouts are stored in the application database because they are part of the report objects. Therefore, built-in report layouts are available to all tenants. Custom report layouts are stored in the business data database; therefore they are specific to the tenant. This enables you to create separate report layouts for each tenant.

Report

Removing Label and Data Fields

Label and data fields of a report are contained in content controls in Word. The following figure illustrates a content control when it is selected in the Word document.

Label

The name of the label or data field name displays in the content control. In the example, the field name is CompanyAddr1.

To remove a label or data field

  1. Right-click the field that you want to delete, and then choose Remove Content Control.
  2. RemoveContentControl
  3. The content control is removed, but the field name remains as text.
    Delete the remaining text as needed.
Report

Import and Export a Word Report Layout

From the Microsoft Dynamics NAV Development Environment, you can import and export built-in Word report layouts of report objects as Word document files (.docx file type). This enables you to modify a built-in Word report layout on a report. For example, you can export a built-in Word report layout to a file on your computer or network. Then, you open the file in Word and modify the report layout. Finally, you import the file back to the report object. The existing built-in Word report layout on the report is overwritten by the content in the imported file.

To export a Word report layout from a report to a file

  1. In the development environment, open the report in Report Dataset Designer as follows.
    1. On the Tools menu, choose Object Designer.
    2. In Object Designer, choose Report, select the report, and then choose the Design button.
  1. On the Tools menu, choose Word Layout, and then choose Export.

Export

  1. Browse to the location where you want to save the exported file, and then choose the Save button.

To import a Word report layout from a file into report

  1. In the development environment, open the report in Report Dataset Designer as follows.
    1. On the Tools menu, choose Object Designer.
    2. In Object Designer, choose Report, select the report, and then choose the Design button.
  1. On the Tools menu, choose Word Layout, and then choose Import.

Import

  1. Locate the file that you want to import, and then choose the Open
Report

Add Fields from a Report Dataset to a Word Report Layout

A report dataset can consist of fields that display labels, data, and images. This topic describes procedure for adding fields of a report dataset to an existing Word layout of a report. You add fields by using the Word custom XML part for the report and adding content controls that map to the fields of the report dataset.

To display the Custom XML part for the Report in Word

  1. Open the Word report layout document in Word for editing.
  2. Show the Developer tab in the ribbon of Word.

By default, the Developer tab is not shown in the ribbon.

  1. On the Developer tab, choose XML Mapping Pane.
  2. In the XML Mapping pane, in the Custom XML Part list, choose the XML part for Microsoft Dynamics NAV report. The name of the XML part has the following format:

urn:microsoft-dynamics-nav/reports/report_name/ID

report_name is the name that is assigned to the report as specified by the report’s Name Property.

ID is the identification number of the report.
XMLDataSet
After you select the XML part, the XML Mapping pane displays the labels and field controls that are available for the report.

To add a label or data field

  1. Place your pointer in the document where you want to add the control.
  2. In the XML Mapping pane, right-click the control that you want to add, choose Insert Content Control, and then choose Plain Text.

AddDataField

Note

You cannot add a field by manually typing the dataset field name in the content control. You must use the XML Mapping pane to map the fields.

To add repeating rows of data fields to create a list

  1. If not already existing, add a table row that includes a column for each field that you want repeated.

This row will act as a placeholder for the repeating fields.

  1. Select the whole row.
  2. In the XML Mapping pane, right-click the control that corresponds to the report data item that contains the fields that you want repeated, choose Insert Content Control, and then choose Repeating.

AddRepeatingField

  1. Add the repeating fields to the row as follows:
    1. Place your pointer in a column.
    2. In the XML Mapping pane, right-click the control that you want to add, choose Insert Content Control, and then choose Plain Text.

InsertContentField

  1. For each field, repeat steps a and b.
Report

Adding Image Fields

A report dataset can include a field that contains an image, such as a company logo or a picture of an item. To add an image from the report dataset, you insert a Picture content control.

Images align in the top-left corner of the content control and resize automatically in proportion to fit the boundary of the content control.

Important
You can only add images that have a format (such as .bmp, .jpeg, and .png file types), which that is supported by Word. If you add an image that has a format that is not supported by Word, you will get an error when you run the report from the Microsoft Dynamics NAV client.

To add an image

  1. Place your pointer in the document where you want to add the control.
  2. In the XML Mapping pane, right-click the control that you want to add, choose Insert Content Control, and then choose Picture.
  3. To increase or decrease the image size, drag a sizing handle away from or towards the center of the content control.

AddImage

Report

To modify the Word report layout

1. In the development environment, export the Word report layout as a Word document file to your computer or network.

Export Word Template

2. Open the Word document file in Word 2013 and make changes.


To make basic layout changes, such as adding or removing tables and cells, formatting text, or changing margins, use the editing features of Word.

Open Word Template


To add fields from the report dataset to the layout, use the custom XML part for the report to add content controls that map to the fields.

AddFields


3. Save your changes, and then close the Word report layout document.
4. Import the Word document into the report.


Import Word Template

Report

To create a Word report layout for a report

In the development environment, open the report in Report Dataset Designer as follows.

  1. On the Tools menu, choose Object Designer.
  2. In Object Designer, choose Report, select the report, and then choose the Design button.
  3. On the Tools menu, choose Word Layout, and then choose New, and then choose the OK button.
  4. Save the report object.

Create Layout

A blank Word report layout is created on the report object. The report layout includes a custom XML part for the current report dataset. You can now design the layout in Word.

A Word report layout determines the content and format of a report when it is viewed and printed from the Microsoft Dynamics NAV client. When you modify a Word report layout, you specify the fields of the report dataset to include on report and how the fields are arranged. You also define the general format of the report, such as text font and size, margins, and background images. You will typically arrange the content of the report by adding tables to the layout.

You insert dataset fields in the layout by using a custom XML part that is automatically generated for the report when you create the Word report layout.

Report

How to. Specify the Default Built-in Report Layout

You can specify whether a report uses a built-in RDLC or Word report layout as the default layout.

To specify the default report layout

    1. In the development environment, on the Tools menu, choose Object Designer.
    2. In Object Designer, choose Report, select the report that you want to modify, and then choose Design.
    3. In Report Dataset Designer, select a blank row, and then on the View menu, choose Properties.
    4. In the Report – Properties window, set the DefaultLayout property to RDLC or Word.
    5. DefaultLayout
    6. Save and compile the report..