
In today’s post we will see some Power Shell Commands which will be helpful while performing Upgrades using PowerShell. For below commands to exercise you will need to create/prepare Folder Structure as below else you will have to modify the path in below script as one which you will be using.
For your ease I have uploaded the below script in form of text file named ‘MyPowerShellScript.txt’ which you can get using this link http://1drv.ms/1OOf7If alternatively from Menu of my blog side use Shared Files to access the file.
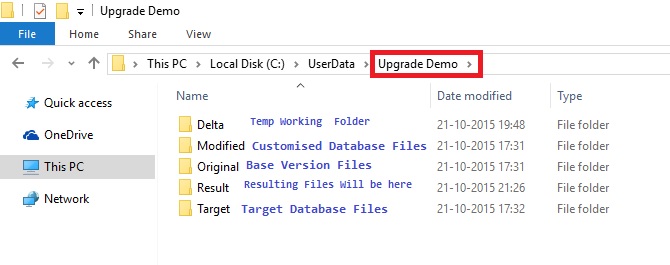
Extract you objects in Text format from Base, Customized and Target Database and place in respective folders. One text file per object will be better option for getting more clear insight on Results. You can find the command for Splitting the File per object in below Script.
After opening the PowerShell or ISE change your folder to Upgrade Demo as in my case it will be:
PS C:\userdata\upgrade demo>

Select the Script and Press Button in Toolbar Run Selection (F8) in Windows PowerShell ISE (Desktop App).
#1. Start Import NAV Module
Import-Module “${env:ProgramFiles(x86)}\Microsoft Dynamics NAV\90\RoleTailored Client\Microsoft.Dynamics.Nav.Model.Tools.psd1” -force -DisableNameChecking
Get-Help “NAV”
This is must in order to run all below commands.
#2. Merge Objects
# Compare ORIGINAL and MODIFIED and merge onto TARGET, then put the merged files in RESULT
Merge-NAVApplicationObject -OriginalPath .\ORIGINAL\*.txt -ModifiedPath .\MODIFIED\*.txt -TargetPath .\TARGET\*.txt -ResultPath .\RESULT -Force
# Standard PowerShell table formatting with sorting on Object Type, Id
Merge-NAVApplicationObject -OriginalPath .\ORIGINAL\*.txt -ModifiedPath .\MODIFIED\*.txt -TargetPath .\TARGET\*.txt -ResultPath .\RESULT -Force -PassThru |
Sort-Object ObjectType, Id |
Format-Table
# Use PowerShell VARIABLE, PIPING, FILTER, and LISTS – capture result in variable, then list file names of ORIGINAL and TARGET files in conflict
$myVariable = Merge-NAVApplicationObject -OriginalPath .\ORIGINAL\*.txt -TargetPath .\TARGET\*.txt `
-ModifiedPath .\MODIFIED\*.txt -ResultPath .\RESULT -Force
$myVariable.Summary
$myVariable |
Where-Object MergeResult –eq ‘Conflict’ |
Select Original, Target |
Format-List
# Open NOTEPAD for each CONFLICT file
Merge-NAVApplicationObject -OriginalPath .\ORIGINAL\*.txt -TargetPath .\TARGET\*.txt `
-ModifiedPath .\MODIFIED\*.txt -ResultPath .\RESULT -Force -PassThru |
Where-Object MergeResult -eq ‘Conflict’ |
foreach { NOTEPAD $_.Conflict }
# Handling Documentation triggers: Merged by default, but conflict can either be treated as real conflict (Strict) or both inserted (ModifiedFirst or TargetFirst)
Merge-NAVApplicationObject -OriginalPath .\ORIGINAL\pagXXXX.txt -ModifiedPath .\MODIFIED\pagXXXX.txt `
-TargetPath .\TARGET\pagXXXX.txt -ResultPath .\RESULT\pagXXXX.txt -Force -DocumentationConflict Strict
Merge-NAVApplicationObject -OriginalPath .\ORIGINAL\pagXXXX.txt -ModifiedPath .\MODIFIED\pagXXXX.txt `
-TargetPath .\TARGET\pagXXXX.txt -ResultPath .\RESULT\pagXXXX.txt -Force -DocumentationConflict ModifiedFirst
#3. Merge Format Output
# Compare ORIGINAL and MODIFIED and merge onto TARGET, then put the merged files in RESULT
Merge-NAVApplicationObject -OriginalPath .\ORIGINAL\*.txt -ModifiedPath .\MODIFIED\*.txt -TargetPath .\TARGET\*.txt -ResultPath .\RESULT -Force
# Same: Capture the rich output in a PowerShell variable for further processing
$result = Merge-NAVApplicationObject -OriginalPath .\ORIGINAL\*.txt -ModifiedPath .\MODIFIED\*.txt -TargetPath .\TARGET\*.txt -ResultPath .\RESULT -Force
# Using the variable: Use standard PowerShell outputting of variable
$result
# Using the variable: Use the Summary property of the result
$result.Summary
# Using the variable: Use standard PowerShell table formatting
$result | Format-Table
# Use standard PowerShell table formatting
Merge-NAVApplicationObject -OriginalPath .\ORIGINAL\*.txt -ModifiedPath .\MODIFIED\*.txt -TargetPath .\TARGET\*.txt -ResultPath .\RESULT -Force -PassThru |
Format-Table
# Use standard PowerShell table formatting with sorting on ObjectType, Id
Merge-NAVApplicationObject -OriginalPath .\ORIGINAL\*.txt -ModifiedPath .\MODIFIED\*.txt -TargetPath .\TARGET\*.txt -ResultPath .\RESULT -Force -PassThru |
Sort-Object ObjectType, Id |
Format-Table
# Use standard PowerShell graphical output (GridView)
Merge-NAVApplicationObject -OriginalPath .\ORIGINAL\*.txt -ModifiedPath .\MODIFIED\*.txt -TargetPath .\TARGET\*.txt -ResultPath .\RESULT -Force -PassThru |
Out-GridView
#4. Merge Filter Output
# Compare ORIGINAL and MODIFIED and merge onto TARGET, then put the merged files in RESULT
Merge-NAVApplicationObject -OriginalPath .\ORIGINAL\*.txt -ModifiedPath .\MODIFIED\*.txt -TargetPath .\TARGET\*.txt -ResultPath .\RESULT -Force
# Same: Plus use PIPING, PASSTHRU and FILTER – show objects with CONFLICT only
Merge-NAVApplicationObject -OriginalPath .\ORIGINAL\*.txt -TargetPath .\TARGET\*.txt `
-ModifiedPath .\MODIFIED\*.txt -ResultPath .\RESULT -PassThru -Force |
Where-Object MergeResult –eq ‘Conflict’
# Same: Plus use PIPING, PASSTHRU, FILTER, and COUNT – count MERGED objects
Merge-NAVApplicationObject -OriginalPath .\ORIGINAL\*.txt -TargetPath .\TARGET\*.txt `
-ModifiedPath .\MODIFIED\*.txt -ResultPath .\RESULT -PassThru -Force |
Where-Object MergeResult –eq ‘Merged’ |
Measure-Object
# Same: Plus use PIPING, PASSTHRU, FILTER, and LISTING FILES – list file names of ORIGINAL and TARGET files in conflict
Merge-NAVApplicationObject -OriginalPath .\ORIGINAL\*.txt -TargetPath .\TARGET\*.txt `
-ModifiedPath .\MODIFIED\*.txt -ResultPath .\RESULT -PassThru -Force |
Where-Object MergeResult –eq ‘Conflict’ |
Select Original, Target |
Format-List
#5. Merge and open Conflicts files using External Tools
# Compare ORIGINAL and MODIFIED and merge onto TARGET, then put the merged files in RESULT
$result = Merge-NAVApplicationObject -OriginalPath .\ORIGINAL\*.txt -ModifiedPath .\MODIFIED\*.txt -TargetPath .\TARGET\*.txt -ResultPath .\RESULT -Force
# Open NOTEPAD for each CONFLICT file
$result |
Where-Object MergeResult -eq ‘Conflict’ |
foreach { NOTEPAD $_.Conflict }
#6. Merge and Documentation Triggers
# Compare object DOCUMENTATION modifications: Body-text (can be merged) and version list additions (potential conflict).
Merge-NAVApplicationObject -OriginalPath .\ORIGINAL\pagXXXX.txt -ModifiedPath .\MODIFIED\pagXXXX.txt `
-TargetPath .\TARGET\pagXXXX.txt -ResultPath .\RESULT\pagXXXX.txt -Force -DocumentationConflict ModifiedFirst
# Same: But STRICT on conflicts.
Merge-NAVApplicationObject -OriginalPath .\ORIGINAL\pagXXXX.txt -ModifiedPath .\MODIFIED\pagXXXX.txt `
-TargetPath .\TARGET\pagXXXX.txt -ResultPath .\RESULT\pagXXXXa.txt -Force -DocumentationConflict Strict
#7. Merge and import in CSIDE
# Compare ORIGINAL and MODIFIED and merge onto TARGET, then put the merged files in RESULT
Merge-NAVApplicationObject -OriginalPath .\ORIGINAL\*.txt -ModifiedPath .\MODIFIED\*.txt -TargetPath .\TARGET\*.txt -ResultPath .\RESULT -Force
# Locate subset (code units) of partionally merged object files, combine them into a single file for performance, and import them into C/SIDE (parameter -Database for you to provide). All throught piping.
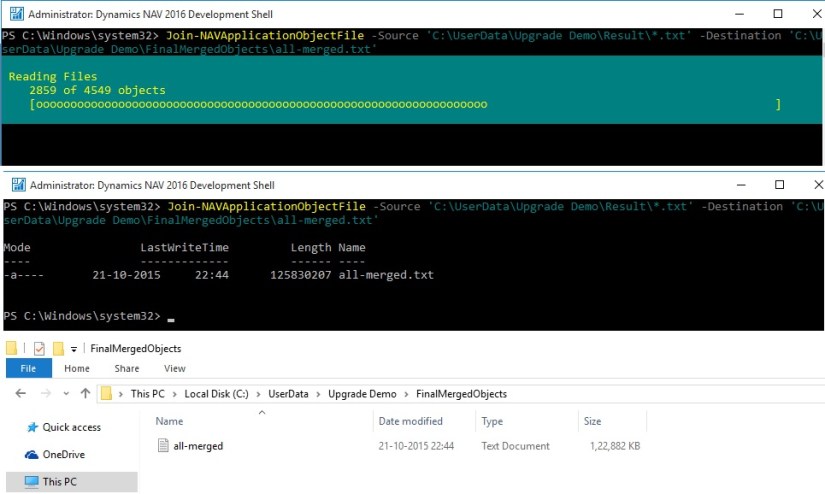
Get-ChildItem .\RESULT\COD*.txt |
Join-NAVApplicationObjectFile -Destination .\RESULT\partially-merged.txt |
Import-NAVApplicationObject
#8. Merge and Export Result to Excel Output
# Compare ORIGINAL and MODIFIED and merge onto TARGET, then put the merged files in RESULT
$result = Merge-NAVApplicationObject -OriginalPath .\ORIGINAL\*.txt -ModifiedPath .\MODIFIED\*.txt -TargetPath .\TARGET\*.txt -ResultPath .\RESULT -Force
$AutoMerged = ($result | Where-Object MergeResult -eq ‘Merged’).Count
$Conflict = ($result | Where-Object MergeResult -eq ‘Conflict’).Count
$Unchanged = ($result | Where-Object MergeResult -eq ‘Unchanged’).Count
$Inserted = ($result | Where-Object MergeResult -eq ‘Inserted’).Count
$Unknown = ($result | Where-Object MergeResult -eq ‘Unknown’).Count
$Deleted = ($result | Where-Object MergeResult -eq ‘Deleted’).Count
$Title = “MySample” # update Excel template file to allow blanks and special characters
$excelPath = “$(Get-ItemProperty ‘HKLM:\SOFTWARE\Microsoft\Windows\CurrentVersion\App Paths\excel.exe’ | select -exp Path)\Excel.exe”
& $excelPath “.\Merge Result Sample.xlsm” “/e/$Title/$AutoMerged/$Conflict/$Unchanged/$Inserted/$Unknown/$Deleted”
# Start-Process -FilePath “.\Merge Result Sample.xlsm” -ArgumentList “/e/BAS/$AutoMerged/$Conflict/$Unchanged/$Inserted/$Unknown/$Deleted”
#9. Compare
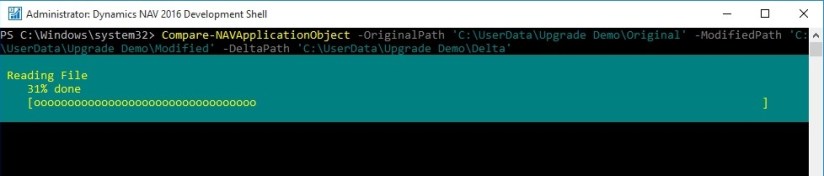
# Compare ORIGINAL and MODIFIED and output MULTIPLE separate DELTA files
Compare-NAVApplicationObject -OriginalPath .\ORIGINAL\*.txt -ModifiedPath .\MODIFIED\*.txt -DeltaPath .\DELTA -Force
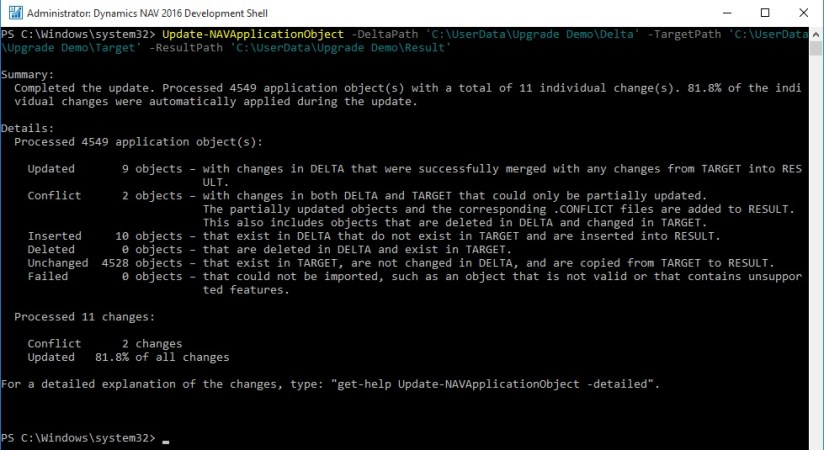
# Compare ORIGINAL and TARGET, pipe the result into the Update-cmdlet (in particular the DELTA parameter)
Compare-NAVApplicationObject -OriginalPath .\ORIGINAL\*.txt -ModifiedPath .\MODIFIED\*.txt -DeltaPath .\DELTA -Force -PassThru |
Update-NAVApplicationObject -TargetPath .\TARGET\*.txt -ResultPath .\RESULT -Force
#10. Compare Piped
# Compare ORIGINAL and TARGET and output ONE summary DELTA file
Compare-NAVApplicationObject -OriginalPath .\ORIGINAL\*.txt -ModifiedPath .\TARGET\*.txt -DeltaPath .\RESULT\sum-of-deltas.txt -Force
#11. Update Piped
# Compare ORIGINAL and MODIFIED and output MULTIPLE separate DELTA files, capture result in variable to apply multiple times
$myDifferences = Compare-NAVApplicationObject -OriginalPath .\ORIGINAL\*.txt -ModifiedPath .\MODIFIED\*.txt -DeltaPath .\DELTA -Force
# Apply a captured set of differences to TARGET objects using the Update-cmdlet
$myDifferences |
Update-NAVApplicationObject -TargetPath .\TARGET\*.txt -ResultPath .\RESULT -Force
#12. Join & Split Object Files
# Join all Codeunit-TXT-files into a single TXT-file
Join-NAVApplicationObjectFile -Source .\ORIGINAL\COD*.txt -Destination .\RESULT\all-codeunits.txt -Force
# Join list of Codeunit-TXT-files into a single TXT-file
Join-NAVApplicationObjectFile -Source .\ORIGINAL\COD1.txt, .\ORIGINAL\COD2.txt, .\ORIGINAL\COD3.txt -Destination .\RESULT\3-codeunits.txt -Force
# Split a single TXT-file with multiple application objects into separate files in the DESTINATION folder
Split-NAVApplicationObjectFile -Source .\RESULT\all-codeunits.txt -Destination .\SEPARATE -Force
Make sure you have created Separate Folder before executing this script.
#13. Get Application Properties
# Show values of application properties in CODXXXX.TXT
Get-NAVApplicationObjectProperty -Source .\RESULT\CODXXXX.txt
#14. Set Application Properties
# Set all object properties on named object COD1.TXT: VersionList to DemoV1, Modified as modified, and Date and Time to current date/time (show outcome)
Set-NAVApplicationObjectProperty -TargetPath .\RESULT\COD1.txt -VersionListProperty “DemoV1” -ModifiedProperty Yes -DateTimeProperty (Get-Date -Format g)
Get-NAVApplicationObjectProperty -Source .\RESULT\COD1.txt
# Set date/time to a fixed, machine-locale agnostic date (January 1st, 2015) on Merged objects
Merge-NAVApplicationObject -OriginalPath .\ORIGINAL\*.txt -ModifiedPath .\MODIFIED\*.txt -TargetPath .\TARGET\*.txt -ResultPath .\RESULT -Force -PassThru |
Where-Object MergeResult –eq ‘Merged’ |
foreach { Set-NAVApplicationObjectProperty -TargetPath $_.Result -DateTimeProperty (Get-Date -Year 2015 -Month 1 -Day 1 -Hour 0 -Minute 0 -Format g) }
# Capture merge-result in variable, set VersionList property as an concatenation of Modified and Target values with trailing ‘!’
$result = Merge-NAVApplicationObject -OriginalPath .\ORIGINAL\*.txt -ModifiedPath .\MODIFIED\*.txt -TargetPath .\TARGET\*.txt -ResultPath .\RESULT -Force
$result |
Where-Object MergeResult –eq ‘Merged’ |
foreach { Set-NAVApplicationObjectProperty -TargetPath $_.Result -VersionListProperty “$_.Modified.VersionList,$_.Target.VersionList!”;
Get-NAVApplicationObjectProperty -Source $_.Result }
# Display property VersionList of CODXXXX.TXT in MODIFIED, TARGET, and RESULT
Get-NAVApplicationObjectProperty -Source .\MODIFIED\CODXXXX.txt | select VersionList
Get-NAVApplicationObjectProperty -Source .\TARGET\CODXXXX.txt | select VersionList
Get-NAVApplicationObjectProperty -Source .\RESULT\CODXXXX.txt | select VersionList
#15. Set Application Properties
# Set date/time to fixed date (January 31st, 2015) on Merged objects
Merge-NAVApplicationObject -OriginalPath .\ORIGINAL\*.txt -ModifiedPath .\MODIFIED\*.txt -TargetPath .\TARGET\*.txt -ResultPath .\RESULT -Force -PassThru |
Where-Object MergeResult –eq ‘Merged’ |
foreach { Set-NAVApplicationObjectProperty -TargetPath $_.Result -DateTimeProperty “31-1-2015” }
#16. Export Language
# Export ONE language (Spanish) from a single object file.
Export-NAVApplicationObjectLanguage –Source .\original\TAB14.TXT -LanguageId “ESP” -Destination .\result\TAB14-ESP.TXT -Force
# Export one language (Spanish) from a single object file with non-standard code page ENCODING.
Export-NAVApplicationObjectLanguage –Source .\original\TAB14.TXT -LanguageId “ESP” -Destination .\result\TAB14-ESP-UNICODE.TXT -Encoding Unicode -Force
# Export ONE language (Spanish) from ALL objects into a SINGLE file.
Export-NAVApplicationObjectLanguage –Source .\original\*.TXT -LanguageId “ESP” -Destination .\result\ALL-ESP.TXT -Force
# Export MULTIPLE languages (Spanish, US English) from ALL objects
Export-NAVApplicationObjectLanguage –Source .\original -LanguageId “ESP”,”ENU” -Destination .\result -Force
# Export ALL languages (Spanish, US English, Danish) from ALL objects into result folder
Export-NAVApplicationObjectLanguage –Source .\original -Destination .\result -Force
# Export ALL languages (Spanish, US English, Danish) from ALL objects into a SINGLE file
Export-NAVApplicationObjectLanguage –Source .\original -Destination .\result\single.txt -Force
#17. Import Language
# Import Spanish language from FULL translation file into a single object
Import-NAVApplicationObjectLanguage –Source .\original\TAB14.TXT -LanguageId “ESP” -LanguagePath .\result\ALL-ESP.TXT -Destination .\result -Force
#18. Remove Language
# Remove Spanish captions from a single object
Remove-NAVApplicationObjectLanguage –Source .\target\TAB14.TXT -LanguageId “ESP” -Destination .\result\TAB14-ESP-REMOVED.TXT -Force
# Remove all captions from multiple objects, result in a single file
Remove-NAVApplicationObjectLanguage –Source .\target\TAB14.TXT, .\target\PAGXXXX.TXT -Destination .\result -Force
#19. Test-Languages
# Test all Spanish captions are present. PowerShell error returned, if translations are missing.
Test-NAVApplicationObjectLanguage –Source .\original\TAB14.TXT -LanguageId ESP
# Test all Danish captions are all present. Catch error situation and report nicely back to the script.
try
{
Test-NAVApplicationObjectLanguage –Source .\original\TAB14.TXT -LanguageId DAN -ErrorAction Stop
}
catch
{
Write-Host “One or more translations are missing for the DAN language.” -ForegroundColor Yellow
}
# Test all Danish and Spanish captions are all present. With -PassThru a warning is reported and tranlation lines are returned for processing.
Test-NAVApplicationObjectLanguage –Source .\original\TAB14.TXT -LanguageId ESP,DAN -PassThru
#20. Split or Join Language File
# Split an application translation file into per-object files
Split-NAVApplicationObjectLanguageFile -Source .\result\single.txt -Destination .\result -Force
# Join multiple application translation files into one combined file
Join-NAVApplicationObjectLanguageFile -Source .\result\*-ESP.TXT -Destination .\result\JOINED-ESP.txt -Force
I will come with more details in my upcoming posts.


You must be logged in to post a comment.