Continuing from my earlier post Upgrade in Microsoft Dynamics NAV 2016
No doubt typically, customers want all the customizations that have been implemented in their existing Microsoft Dynamics NAV databases to be migrated to their new Microsoft Dynamics NAV 2016 databases.
Depending on the version of Microsoft Dynamics NAV that a database is being upgraded from, the amount of code changes between the two versions is large or small.
To upgrade the application code, you must merge code from different versions of the application. This merge process is known as a code upgrade or application upgrade.
You must upgrade the application before you upgrade the data.
Application Upgrade Overview
You must analyze and process code changes by comparing and evaluating three separate versions of the Microsoft Dynamics NAV database:
| Version |
Description |
| Original version |
This is the baseline version of the solution that you want to upgrade, such as the original release of Microsoft Dynamics NAV 2013. |
| Modified version |
This is the version that you want to upgrade, such as a customer’s database with customizations and add-on solutions. |
| Target version |
This is the target of the merge process that you want to upgrade your application to, such as the standard version of the Microsoft Dynamics NAV 2016 database. |
When you merge the application objects from these three versions, you can import the result into a new Microsoft Dynamics NAV 2016 database that then contains the upgraded application.
At the end of the process, you export the merged Microsoft Dynamics NAV 2016 objects from this database to a .fob file that you will use during the data upgrade.
The following list describes the main steps of upgrading the application code:
- Prepare the application object text files.
- Merge versions.
- Resolve conflicts
- Import and compile the merged application objects.
- Export all objects.
To begin, create five folders on the computer and name them as follows:
In my example, the UpgradeDemo folder on the C drive contains five folders: ORIGINAL, MODIFIED, TARGET, DELTA, and RESULT. The DELTA and RESULT folders are empty. The ORIGINAL, MODIFIED, and TARGET folders contains one or more text files that contain application objects.
Preparing the Text Files
The Microsoft Dynamics NAV cmdlets take text files as input. You must prepare three sets of text files that contain application objects as describes in the list above. You can export application objects to text files from the development environment, or by running the ExportObjects command. The following list describes the main steps of preparing the text files that you must provide as input for the application merge process.

- First, export all application objects from the original version, such as the original Microsoft Dynamics NAV 2013 R2 database. Do not export system tables. Name the file OldBaseVersion.txt, and then save the file in the ORIGINAL folder that you created earlier. For example, the Microsoft.Dynamics.Nav.Model.Tools.psd1 module includes a function, Export-NAVApplicationObject, that runs the ExportObjects command. This means that you can run a command such as the following:
Export-NAVApplicationObject –DatabaseServer MyServer –DatabaseName “Demo Database NAV (7-1)” –Path C:\Upgrade\ORIGINAL\OldBaseVersion.txt
- Next, export all relevant application objects from the modified version, such as the customized Microsoft Dynamics NAV 2013 database. Do not export system tables. Name the file OldCustomVersion.txt, and then save the file in the MODIFIED folder that you created earlier.
- Finally, export all application objects from the new base version, such as the original Microsoft Dynamics NAV 2016 database. Do not export system tables. Name the file NewBaseVersion.txt, and then save the file in the TARGET folder that you created earlier.
Optionally, you can use the Split-NAVApplicationObjectFile cmdlet to split each text file into separate text files for each application object. This can make it easier to keep track of the process. The end result at this stage is three folders with one or more text files that contain the three sets of application objects that you want to merge.
To compare two sets of application objects
- Open the Microsoft Dynamics NAV 2016 Development Shell in administrator mode.
- Navigate to the location of your folders by typing a command such as the following:
cd c:\UserData\UpgradeDemo (in my case)
- To run the cmdlet to compare all application objects in the ORIGINAL folder to the application objects in the MODIFIED folder, type the following command:
Compare-NAVApplicationObject -OriginalPath ‘C:\UserData\Upgrade Demo\Original’ -ModifiedPath ‘C:\UserData\Upgrade Demo\Modified’ -DeltaPath ‘C:\UserData\Upgrade Demo\Delta’
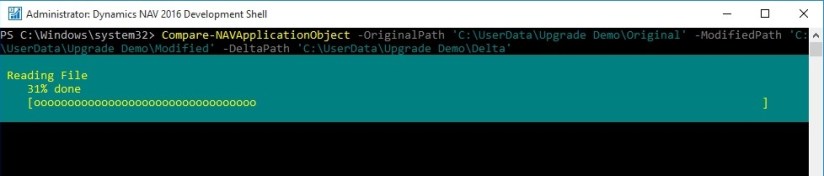

This generates a number of DELTA files that describe the difference between ORIGINAL and MODIFIED. You can open the DELTA files in text editors such as Notepad. The following example illustrates how a DELTA file identifies the difference between ORIGINAL and MODIFIED.

Let us understand how the changes are reported when we compare the objects.


You can apply those differences to TARGET by using the Update-NAVApplicationObject cmdlet.
To apply DELTA files to application objects
- Open the Microsoft Dynamics NAV 2016 Development Shell in administrator mode.
- Navigate to the location of your folders by typing a command such as the following:
cd c:\UserData\UpgradeDemo (in my case)
In this example, the folder structure is the same as described above procedure. You can now run the cmdlet.
- To run the cmdlet to apply the differences that are stored in the DELTA folder to the application objects in the TARGET folder, type the following command:
Update-NAVApplicationObject –DeltaPath ‘C:\UserData\Upgrade Demo\Delta’ -TargetPath ‘C:\UserData\Upgrade Demo\Target’ -ResultPath ‘C:\UserData\Upgrade Demo\Result’

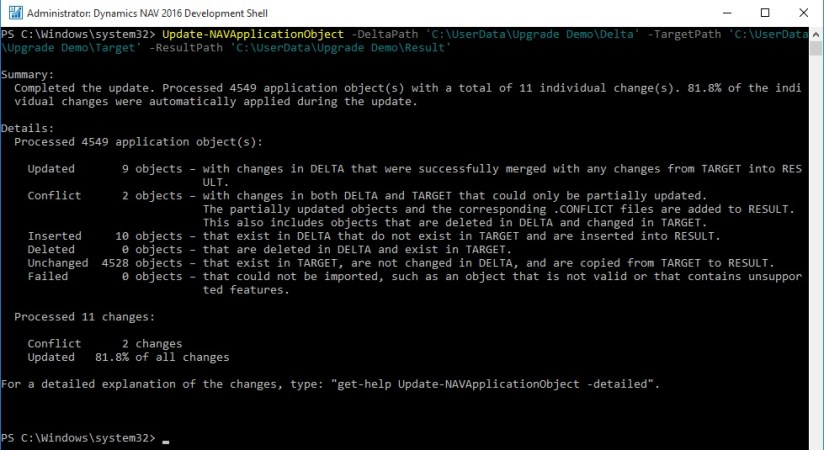
This merges the difference between ORIGINAL and MODIFIED with the target solution and puts the resulting solution in the RESULT folder.
You can now import the merged objects into a Microsoft Dynamics NAV database.
Merging Versions
Alternatively to above process you can merge the three sets of application objects to create the application for the new database.
You can use the Merge-NAVApplicationObject cmdlet to merge the three sets of application objects.
The following example illustrates the type of command that you can run.
Merge-NAVApplicationObject -OriginalPath ‘C:\UserData\Upgrade Demo\Original’ -TargetPath ‘C:\UserData\Upgrade Demo\Target’ -ModifiedPath ‘C:\UserData\Upgrade Demo\Modified’ -ResultPath ‘C:\UserData\Upgrade Demo\Result’


Depending on the number of objects that you are merging and the number of differences found, this can take a few seconds, a few minutes, or longer.
The RESULT folder will contain a text file for each application object. The result of the merge is shown when the cmdlet completes, including a description of any application objects with conflicting code.

These conflicts are stored in .CONFLICT files in the RESULT folder. You can import all objects in the RESULT folder into the new Microsoft Dynamics NAV 2016 database, or you can analyze the conflicts before you import the objects.
Handling Conflicts
Depending on the application that you are upgrading, you can choose to analyze the conflicting code before you import the merged objects into the development environment.
The conflicts are shown in the merged text files but are also identified in .CONFLICT files in the RESULT folder. Subfolders then contain copies of the source files from the versions that have conflicting code.

You can analyze the conflicts in any tool, make the relevant changes, and then run the merge operation again. Alternatively, you can import the merged files into the development environment, and resolve the conflicts there.
Importing and Compiling Merged Objects
After you have completed the merge, import the new custom version into the new Microsoft Dynamics NAV 2016 database, and then compile all objects. You must resolve any compilation errors before you can continue.
The text files with the merged application objects include successfully merged code, and code that is partially merged. You can import the partially merged objects into the Microsoft Dynamics NAV 2016 development environment and resolve the conflicts there.
You can use Import-NAVApplicationObject, that runs the ImportObjects command.
This means that you can run a command such as the following:
Join-NAVApplicationObjectFile -Source ‘C:\UserData\Upgrade Demo\Result\*.txt’ -Destination ‘C:\UserData\Upgrade Demo\FinalMergedObjects\all-merged.txt’
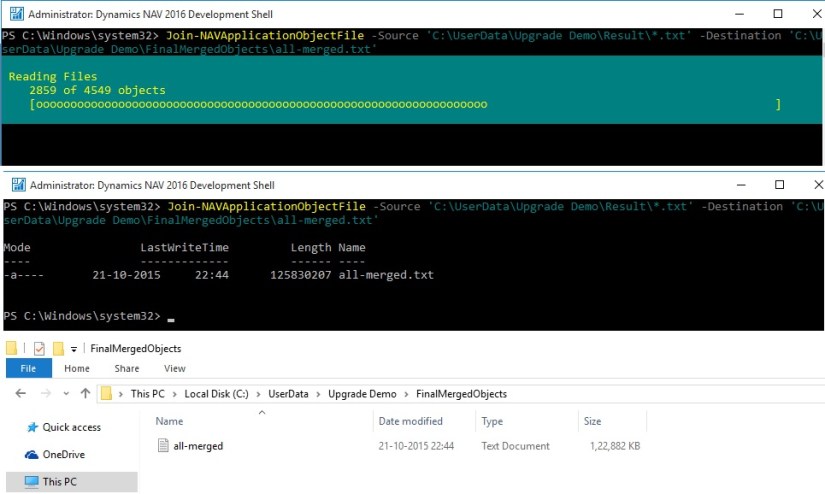
First we will join the many text files into a single file using above command and as a result we get all-merged.txt file which we will import in database using below command.
Import-NAVApplicationObject –DatabaseServer MyServer –DatabaseName “My Upgraded App” –Path C:\Upgrade\all-merged.txt
Now we import objects obtained from previous step into an existing, empty database.

When you compile the objects, an error is thrown for each code conflict, and you can use the tools that are available in the development environment to resolve the conflicts.
You now have a new database with a fully upgraded application.
Exporting All Objects
Now, you must export all objects to an objects.fob file so that you can import them when performing the data upgrade. The export must include customized objects, upgraded reports, and all other Microsoft Dynamics NAV 2016 objects.
This completes the upgrade of the application code. Next, you must upgrade the data in the database.
However you are free to do object merge and upgrade as you do earlier, here I concentrated using Dynamics Navision 2016 Development Shell. As this is the new way also much faster than what we used to do earlier.
We can use this in identifying the Objects under different categories like Modified, having conflicts and New Objects which can help in estimating also and planning the action in advance.
I will come up with further step and more details in my upcoming posts.
28.620561
77.437322


You must be logged in to post a comment.