
See how a robust business intelligence solution can help you leverage technology in order to gain new visibility on your business that will enable profitable, data-driven decisions on a daily basis.
Video-1
Video-2
See how a robust business intelligence solution can help you leverage technology in order to gain new visibility on your business that will enable profitable, data-driven decisions on a daily basis.
Video-1
Video-2
Get answers to the most commonly asked questions around what to look for in a business intelligence solution and provider, including implementation expectations, important features to look for (that you probably didn’t know you need), and different options for report and dashboard distribution.
Watch Video here :
In Microsoft Dynamics NAV and Project Madeira, it is possible to use Microsoft Word 2013 or later to modify the report layout to some extent . Customers can edit/modify the report layout in Microsoft word document and this editing experience is WYSIWYG. This feature makes it easy for customers to modify their reports and save them without touching the underlying report objects.
Code. Prompt. Automate. — The Age of AI Agents
In Microsoft Dynamics NAV and Project Madeira, it is possible to use Microsoft Word 2013 or later to modify the report layout to some extent . Customers can edit/modify the report layout in Microsoft word document and this editing experience is WYSIWYG. This feature makes it easy for customers to modify their reports and save them without touching the underlying report objects.
This feature becomes all the more important in Project Madeira! Which is why, I decided to write about this feature. I will be using screenshots from Project Madeira in this blog. However, it matches pretty much with Dynamics NAV as well 🙂
Its important to know that reports in NAV and Madeira can have RDLC layout or Word Layout and some reports have both layouts.
View original post 845 more words
Do Until
The logic of this loop is to execute the Do {block} until (the condition is true).
As usual in PowerShell, pay close attention to the style of brackets, the curly brackets or parentheses guides you to write the correct code.

Note: Don’t try: Until ($strQuit = “N”). You need here to use -eq, this is PowerShell’s way of comparing two values.
Do While
The logic of ‘Do … While’ is the opposite of the Do Until. {Execute the block statement} while the (condition is true)

Note: There are difference between until & while in above two examples: Until ($strQuit -eq “N”) While ($strQuit -ne “N”)
‘While’ on Its Own – No Explicit ‘Do’
This method is the more traditional way with the (condition) followed by the {Block command}. Clearly, PowerShell’s While loop is simpler and more basic than the ‘Do … While’ construction in above two examples.

Note: In this example the ‘While’ clause is at the beginning instead of the end.
‘For’ Loop
Below example is a simple method using the keyword ‘For’. As usual there is a (condition) and {Block Statement}.
The speciality of this loop is the <init> and <repeat> sections.
Here is the syntax:
For (<init>; <condition>; <repeat>) {<command_block>}
Example: Times Table for 25

One side-effect of the For loop is that it always returns the <init> before it tests for the condition.
The <repeat> modifies the $i variable, which is then tested inside the <condition> of the next cycle.
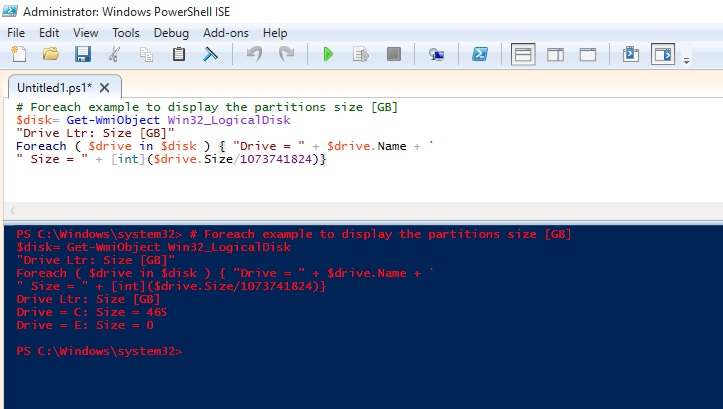
‘Foreach’ loop
The PowerShell ‘Foreach’ loop is more complex, and has more arguments than the ‘for’ and ‘Do While’ loops. The key feature is that the loop interrogates an array, known as a collection. It then applies a {Statement Block} to each iteration. In addition to the position and the type of bracket, observe the tiny, but crucial keyword – ‘In’.


# PowerShell ForEach loop to display files in C:\Program files
$Path = “C:\Program Files\” “{0,10} {1,-24} {2,-2}” -f ` ” Size”, “Last Accessed”, “File Name ” Foreach ($file in Get-Childitem $Path -recurse -force) {If ($file.extension -eq “.txt”) { “{0,10} {1,-24} {2,-2}” -f ` $file.length, $file.LastAccessTime, $file.fullname } }
# PowerShell ForEach-Objcet piping into block statement
Clear-Host $Path = “C:\Program Files\” Get-Childitem $Path -recurse -force | Foreach-Object {If ($_.extension -eq “.txt”) {Write-Host $_.fullname } }

I will come up with more stuffs in my upcoming posts.
Till then keep practicing and stay tuned for more details.
PowerShell is a great way to automate almost anything in Windows.
However, it’s not just a scripting language.
If you find yourself using it as a command line shell it may be useful to store your functions and customizations in a profile that gets loaded every time you load the Console.
The first thing we do here is check if we already have a profile. There is an automatic variable, $Profile, that stores the fully qualified location of the PowerShell profile. An easy way to check if any profile exists is to use the Test-Path cmdlet on the $Profile variable.
Test-Path $Profile

As you can see no profile file yet created for me, so we will create one, we can easily do that with the New-Item cmdlet.
New-Item –Path $Profile –Type File –Force
Using the force parameter will cause a profile to be created even if already we have one. This means our old profile will be overwritten and new will be created.

Profile can be edit using notepad, which can be easily started using PowerShell.
notepad $Profile

You can put any commands, functions, alias’s and even module imports into your PowerShell profile.
I normally work on PowerShell for Navision so I would prefer loading module whenever I launch the PowerShell command, so I include my cmdlets for loading the same in my profile.

Save the Profile and close the PowerShell. Next time I launch PowerShell this Module get loaded for me by default.
Finally, I would like to also have some customizations to the console. One is it basically determines if you have opened an elevated PowerShell console and changes the font colour, this way I will always remember that I am running with elevated privileges.
Let us Save the Profile and check the effect of this Profile.

That’s all for today.
I will come up with more stuffs in my upcoming posts.
Till then keep practicing and stay tuned for more details.
PowerShell has something called Execution Policies, which stop you from just running any old script. In fact, by default, you can’t run any scripts and need to change your execution policy if you want to be allowed to run them. There are 4 notable Execution Policies:
To see what your current Execution Policy is set to, open a PowerShell Console and type:
Get-ExecutionPolicy

Set-ExecutionPolicy RemoteSigned

To run this command you need to run the PowerShell with Administrative rights. Right click on icon and select Run as Administrator and try the command again.

When i run PowerShell as Administrator, now i am able to execute the command successfully as in below screen.

The proper term for a PowerShell command is a cmdlet, and from now on we will use this correct terminology. It just felt more appropriate to call them commands for this introduction.
I will come up with more stuffs in my upcoming posts.
Till then keep practicing and stay tuned for more details.
ForEach simply looks at a set of list and pulls out one at a time to look at them and then, perform some type of action or set of commands on it.
One different part of a ForEach loop is the keyword in that lives within that parenthetical statement. That tells PowerShell to create a single variable to hold the values that come out, one at a time, for your list.
Let’s define a variable with list of Fruits
$names = “Apple”,”Banana”,”Grape”,”Orange”,”Chiku”
When we make a list within a variable, we have created an array, which is simply a sort of matrix thing that PowerShell holds in memory that lets it store a lots of things at one time.
Let’s also initialize a count variable so we get a feel of how the loop is going.
$count = 0
Let’s use a ForEach loop to count how many names we have. Remember our keyword in we have to create a new variable that we can call FruitName. This holds each single name that comes out of that list of names we have stored in the variable $names.
ForEach ($FruitName in $names)
{
$count += 1
Write-Host “$FruitName”
}
Finally, I’ll add a simple Write-Host line after the end (after the right curly brace, that is) to display the count, so we can actually give us the count of names in the list of Fruits.
Write-Host “The total number of names is $count.”
Here is the output of above script.

I will come up with more stuffs in my upcoming posts.
Till then keep practicing and stay tuned for more details.
Do While is the simplest of the looping constructs in PowerShell.
A looping construct is basically a piece of code that repeats the same action over and over again to a set of iteration, it loops through a set of statements, doing some action in each of its iteration, until some condition is met or that set of statement is exhausted.
Do While is simply a construct that says to PowerShell, “repeat set of things until some condition becomes true”.
For example, let’s set up a control variable called count and give it an initial value of one.
$count = 1
Then, let’s set up a simple Do While construct that adds 1 to whatever value of count is already in that variable, until the variable has the number 10 in it.
Do
{
$count = $count + 1
Write-Host “The current value of the variable is $count”
} While ($count –lt 10)

Another way of doing same is:
You can also set up a Do While construct so that your set of commands only executes when the condition is true. You just need to eliminate the do statement, and only use while.
While ($count –lt 10)
{
$count = $count + 1
Write-Host “The current value of the variable is $count”
}

Only difference in above both way of using Do While construct is in first way if we initialize Count with 11 then also the loop with execute once as the condition is tested after loop is executed at least once if condition is satisfied the loop will continue else will exit. Where as in second way the condition is tested before it enters the loop and will exit before first iteration of the loop.

I will come up with more stuffs in my upcoming posts.
Till then keep practicing and stay tuned for more details.
The simplest form of decision making in PowerShell is the if/then mechanism.
The code that runs if your comparison clause is YES/TRUE or NO/FALSE must be surrounded within curly braces, it is best practice to put these curly braces on lines by themselves so that you can match them up when you are writing more complicated scripts.
If condition is met then
{
Do This
}
Else
{
Do This
}
Example:
If (20 –gt 15)
{
Write-Host “20 is Greater than 15”
}

Here the –gt is the PowerShell switch for “greater than”.
Another Example using Nesting
If (20 –gt 25)
{
Write-Host “20 is Greater than 25”
}
elseif (25 –gt 20)
{
Write-Host “25 is Greater than 20”
}

You can include n number of these elseif blocks in your script, there is no maximum limit for how many times it occurs in script.
If (10 –gt 11)
{
Write-Host “10 is Greater than 11”
}
elseif (11 –lt 10)
{
Write-Host “11 is Less than 10”
}
elseif (20 –gt 40)
{
Write-Host “20 is Greater than 40”
}
else
{
Write-Host “None of above conditions are true”
}

I will come up with more stuffs in my upcoming posts.
Till then keep practicing and stay tuned for more details.
PowerShell is built into Windows, so there is no requirement of separate fee or licensing cost. In addition, different server products come with their own Power Shells, too, which expands the capability to do things you want using PowerShell.
For demo purpose I am using Windows PowerShell ISE.

An introduction to scripts
Scripts in PowerShell are basically just text files with the special filename extension of ps1.
To create a script, you enter a series of PowerShell commands in a sequence in a new Notepad file or any text editor you like, and then save that file with extension as .ps1, where name of your file is a friendly description of your script with no spaces.

How do I run my scripts?
To run a PowerShell script that you already have, you enter in a PowerShell window either:
The full path (folder and file name) of the script, like so: c:\powershell\myscript.ps1
Or
If your script is in the current directory the console is looking at, use a period and then a backslash, like this: .\myscrip.ps1
Other than this, there is nothing special needed for creating a script in PowerShell. You can simply add the commands you like.

How do I define Variables?
In PowerShell, variables always have a dollar sign ($) prefixed before them.
Let us declare few variables right now:
$name = ‘Ashwini’
$anynumber = 111074
$location = ‘Ghaziabad’
$listofnumbers = 15,20,35,40

If I want to define a variable with text as its value, I will require to add a single quote on either side of the text value.
Let’s say we want to find out the total number of cmdlets available on the system, we can use:
(get-command).count

Let’s declare a variable to store that count in. We’ll call it
$numbersofcmdlets
We will store output in this variable of the (get-command).count .
$numbersofcmdlets = (get-command).count
Now we can use this variable as part of something else.
For a simple example, let’s look at the Write-Host cmdlet, which simply writes text to the screen of the machine hosting the PowerShell session. Write-Host has a lots of capabilities, but in its simplest form, you can just say:
Write-Host “Dynamics Nav Blog Site by Ashwini Tripathi”
You can integrate variables with Write-Host. You just call them with the dollar sign notation and work them right into your text.
For example, I can say:
Write-Host “There are $numbersofcmdlets commands available for use on this system.”

I will come up with more stuffs in my upcoming posts.
Till then keep practicing and stay tuned for more details.

You must be logged in to post a comment.