You will get step by step walkthrough on how to implement Multitenancy in my next upcoming post.
You can choose to migrate your Microsoft Dynamics NAV solution to a multitenant deployment architecture where you maintain a single application that is used by two or more companies that store their data in separate databases.
This can make maintenance of your solution easier if you support multiple customers with the same application functionality.
Tenants and Companies
When you upgrade your application and the data to Microsoft Dynamics NAV 2015, you have a database that has the same number of companies as you had before the upgrade.
This database is considered a tenant.
This does not mean that you have to turn your solution into a multitenant deployment. But it means that you can if you want to.
For example, your Microsoft Dynamics NAV deployment in the earlier version consisted of a database that has 20 companies.
In other words, you support 20 companies that all share the same application functionality.
Here we are considering, the companies are separate companies that have nothing to do with each other except that they are supported by you in one database.
In Microsoft Dynamics NAV 2015, you can choose to extract the application-wide tables into a separate database and keep the data for all 20 companies in the original database. This becomes a single-tenant business data database.
Then, you can choose to split the business data database into one for each company so that you run a truly multitenant environment.
The application is stored separately in the application database, and you maintain application functionality centrally.
Pros
When you modify the application, you make the changes available to one tenant at a time. As a result, if something goes wrong, all other tenants are not affected.
Compare this to earlier versions of Microsoft Dynamics NAV where a database could contain several companies. These companies could be related or not, but they would all use the same application and write to the same database. Also, when you modified the application, it would affect all companies immediately. So if something went wrong, all companies would be affected.
Cons
The email logging functionality in Microsoft Dynamics NAV requires the Microsoft Dynamics NAV Server service account to have access to the Exchange server. But in a multitenant deployment, this is not always possible.
Separating Application Data from Business Data
Microsoft Dynamics NAV 2015 separates tables that describe the application from the tables that contain business data. Depending on your deployment scenario, you can choose to store all Microsoft Dynamics NAV tables in one database, or you can export the application tables to a dedicated database.
In multitenant deployments, the application must be stored in a dedicated database.
Application Database versus Business Data Databases
The application database contains tables that describe your application.
This includes a description of the objects that your application consists of, and other data that is common to all tenants.
The data that users enter in your application is stored in the business data database because this data is specific to their company.
Optionally, you can create multiple business data databases, such as if you want to support your customers as tenants.
When you have exported the application tables to a separate database, you can no longer access the business database from the Microsoft Dynamics NAV Development Environment. This is because the metadata for the tables in the business database is stored in the application database and modified in that database.
For example, if you want to modify a report, you modify the report object in the application database. Then, when you deploy the updated application to your production environment, when a user accesses the report, they see the modified report.
Microsoft Dynamics NAV includes Windows PowerShell cmdlets that help you export application tables to a dedicated database, and other cmdlets to help you maintain a multitenant deployment.
Distribution of the System Tables in Each Database
The application tables are system tables that define the application. Other system tables remain in the business data database.
The following table describes which system tables are moved to the application database when you run the Export-NAVApplication cmdlet and which tables remain in the business data database.
| Application database | Business data database |
| Chart | Access Control |
| Client Add-in | Active Session |
| Client Add-in Resources | Company |
| Debugger Breakpoint | Device |
| Debugger Watch | Document Service |
| Object | Integration Page |
| Object Metadata | Object Metadata Snapshot |
| Object Tracking | Object Translation |
| Permission | Page Data Personalization |
| Permission Set | Printer Selection |
| Profile | Record Link |
| Profile Metadata | Report List Translation |
| Send-To Program | Session Event |
| Server Instance | User |
| Style Sheet | User Default Style Sheet |
| Web Service | User Metadata |
| User Personalization | |
| User Property |
Microsoft Dynamics NAV Windows PowerShell Cmdlets
Microsoft Dynamics NAV 2015 includes Windows PowerShell cmdlets for administration and for merging and modifying application object files.
The cmdlets are available in two Windows PowerShell modules: Microsoft Dynamics NAV 2015 Administration Shell and Microsoft Dynamics NAV 2015 Development Shell.
- The Microsoft Dynamics NAV 2015 Administration Shell includes cmdlets for administering the Microsoft Dynamics NAV deployment, such as adding and configuring Microsoft Dynamics NAV server instances, databases, and users. The Microsoft Dynamics NAV 2015 Administration Shell is installed with the Microsoft Dynamics NAV Server.
- The Microsoft Dynamics NAV 2015 Development Shell includes cmdlets for merging and modifying application object files. The Microsoft Dynamics NAV 2015 Development Shell is installed with the Microsoft Dynamics NAV Development Environment.
The cmdlets are implemented in Windows PowerShell 3.0, which is included with Windows Server 2012 and Windows 8.
Alternatively to running Microsoft Dynamics NAV 2015 Administration Shell and Microsoft Dynamics NAV 2015 Development Shell from where they are installed, you can import the relevant module into the Windows PowerShell Integrated Scripting Environment (ISE).
Starting a Microsoft Dynamics NAV 2015 Administration Shell Session
You must run the Microsoft Dynamics NAV 2015 Administration Shell as an Administrator. On the computer that is running Microsoft Dynamics NAV Server, choose Start, in the Search box, type Microsoft Dynamics NAV 2015 Administration Shell, right-click the related link, and then choose Run as Administrator.
To run the cmdlets in the Microsoft Dynamics NAV 2015 Administration Shell, you must be a member of the local Administrator group on the computer where the Microsoft Dynamics NAV 2015 Administration Shell is installed.
Starting a Microsoft Dynamics NAV 2015 Development Shell Session
On the computer that is running Microsoft Dynamics NAV Development Environment, choose Start, in the Search box, type Microsoft Dynamics NAV 2015 Development Shell, and then choose the related link.
Creating Tenants from Companies
If your Microsoft Dynamics NAV solution includes multiple companies in one database, you can choose to migrate to multitenancy where the Microsoft Dynamics NAV companies become tenants of your application database.
Companies in Multitenancy Deployments
In Microsoft Dynamics NAV 2015, you can maintain multiple companies in each business database, and you can choose to export all or some of the companies to separate tenant databases.
A tenant database can contain one or more companies. Therefore, you can deploy the number of tenants that suits your solution. This varies between solutions.
You may prefer to have a dedicated tenant database for each legal entity in your deployment. Or you may prefer to have a tenant database for each group of legal entities where each legal entity is a Microsoft Dynamics NAV company in that tenant database.
In this example, we assume that your current deployment consists of one or more databases with multiple companies in each database.
If you migrate your solution as suggested by the examples in this section, you will have a deployment where your application is stored in a dedicated application database.
Each company in the original database will be moved into a dedicated business database, which is mounted as tenants on a Microsoft Dynamics NAV Server instance.
Before you can create tenants from Microsoft Dynamics NAV companies, you must have exported the application to a dedicated application database.
Running a Windows PowerShell Script to Create Tenants from Companies
Microsoft Dynamics NAV includes a sample Windows PowerShell script and a sample SQL script, HowTo-MoveCompanyToTenant.ps1 and HowTo-MoveCompanyToTenant.sql.
These scripts illustrate how you can move company-specific data to new business databases and mount them as new tenants.
You can modify the scripts and then run them in the Microsoft Dynamics NAV 2015 Administration Shell.
Sample Windows PowerShell Scripts for Microsoft Dynamics NAV
The Microsoft Dynamics NAV product media includes a folder that has examples of how you can use the Microsoft Dynamics NAV Windows PowerShell cmdlets to upgrade, deploy, and maintain your Microsoft Dynamics NAV solution.
Microsoft Dynamics NAV Sample Scripts
The sample Windows PowerShell scripts are available in the WindowsPowerShellScripts folder on the Microsoft Dynamics NAV product media.
You can copy the folder to your computer and use the scripts as a starting point for managing your own solution.
Depending on your solution, you can then add the sample Windows PowerShell module into the Microsoft Dynamics NAV 2015 Administration Shell or Microsoft Dynamics NAV 2015 Development Shell and then run the scripts.
The current version of Microsoft Dynamics NAV includes the following sample modules.
| Parent folder | Module name | Description |
| ApplicationMergeUtilities | Contains sample scripts that illustrate different ways of using Windows PowerShell cmdlets to merge and modify application objects. The sample scripts use the Microsoft.Dynamics.Nav.Model.Tools.psd1 module, which you must import first. | |
| Cloud | HowTo | Contains sample scripts and files for deploying a fully functional end-to-end Microsoft Dynamics NAV solution on Microsoft Azure virtual machines. |
| NAVAdministration | Illustrates how Windows PowerShell can be used to automate the provisioning and management of Microsoft Dynamics NAV installations on a virtual machine (VM). | |
| NAVRemoteAdministration | Illustrates how Windows PowerShell can be used to automate the provisioning and management of Microsoft Dynamics NAV installations on Azure VMs. | |
| NAVRemoteAdministrationSamples | Provides examples of a fully automated deployment of Microsoft Dynamics NAV on Azure. | |
| Multitenancy | NAVMultitenancySamples | Illustrates how you can automate the steps that are required to migrate to a multitenant deployment architecture.. |
| Upgrade | NAVUpgradeModule | Illustrates how you can automate the upgrade of a Microsoft Dynamics NAV 2013 database to Microsoft Dynamics NAV 2015.. |
Running the Sample Scripts
The sample scripts are designed to be run from the context of the Windows PowerShell module that is part of each collection of sample scripts.
For example, to run the scripts for upgrading to Microsoft Dynamics NAV, import the NAVUpgradeSamples.psm1 module into the Microsoft Dynamics NAV 2015 Administration Shell.
Similarly, to run the sample scripts for merging application objects, open the HowTo-Start-Import-NAV-Module.ps1 script in the Windows PowerShell IDE, navigate the command prompt to the folder where you placed the samples, and then run the script.
The HowTo-MoveCompanyToTenant.ps1 script uses Microsoft Dynamics NAV cmdlets and SQL commands to copy data from a Microsoft Dynamics NAV company in a business database to a new tenant database.
It mounts the tenant database on a Microsoft Dynamics NAV Server instance, and then deletes the data and the company from the original database.
You can adapt the scripts to your solution and rename them so that they do not start with “HowTo-“. Then, you can run the MoveCompanyToTenant.ps1 script in Windows PowerShell with the relevant parameters as shown in the following example.
MoveCompanyToTenant -ServerInstance ‘DynamicsNAV’ -FromDatabase ‘Demo Database NAV (8-0)’ -CompanyName ‘CRONUS International Ltd.’ -OldTenantName default -NewTenantName CRONUS1 -ServiceAccount ‘NT AUTHORITY\NETWORK SERVICE’ -DatabaseServer MySQLServer
In the example, the script will move the CRONUS International Ltd. company from the Demo Database NAV (8-0) database to a new tenant database, CRONUS1.
The script also adds an account for the Microsoft Dynamics NAV Server instance in the new database and removes the company from the original database.
All information that is stored in shared tables, but which is specific to the company, is copied to the new tenant. The following table describes the parameters and the parameter values in the example.
| Parameter | Value | Description |
| ServerInstance | DynamicsNAV | The name of the Microsoft Dynamics NAV Server instance. |
| FromDatabase | Demo Database NAV (8-0) | The name of the business database that the company must be moved from.
This database must have been upgraded to Microsoft Dynamics NAV 2015, and you must have exported the application tables to an application database.. |
| CompanyName | CRONUS International Ltd. | The name of the company that you want to move to a new tenant database. |
| OldTenantName | default | The name of the tenant in the database that you are exporting from.
In many cases, you are working with a single-tenant business database that contains multiple companies. If you did not specify another ID for the tenant when you created the tenant database, specify default. If you have added more tenants to the solution, you must specify the tenant name. |
| NewTenantName | CRONUS1 | The name of the new tenant database.
In the example, this is based on the name of the original company. But because this value will identify the tenant, the value must be unique. For example, if the name of the company is Spotsmeyer’s Furnishings, the name of the new tenant database can be SPOTSMEYERS. Alternatively, you can use a naming scheme of your choice, such as TENANT1, TENANT2, and so on. |
| ServiceAccount | NT AUTHORITY\NETWORK SERVICE | The account that Microsoft Dynamics NAV Server uses to access SQL Server. In a default deployment, this is the NT AUTHORITY\NETWORK SERVICE account. |
| DatabaseServer | MySQLServer | The name of the database tier server where the current business database is located. The new tenant database for the exported company will be created on the same server. |
| RemoveCompanyWhenMoved | Specifies if each company must be deleted in the original tenant database when it is created in the new tenant database. The default value is true. Therefore, you must set the parameter to false if you do not want the script to delete the companies. |
The script uses the sqlcmd utility to create the database, assign database permissions to the service account, and move the data. This utility is part of SQL Server. The script creates four temporary tables in the original database to handle user-specific data, company-specific data, tables that will not be moved, and user IDs. You must modify the MoveCompanyToTenant.sql script to change the default values.
After this step, you have an application database and a business data database for each company in the original database. The company-specific business data databases are tenants, and your solution is multitenant.
If you want to move back to storing application tables and business data in a single database, you can use the Microsoft Dynamics NAV Windows PowerShell cmdlets to merge the databases.
Merging an Application Database with a Tenant Database
In Microsoft Dynamics NAV 2015, you can separate the application data into a dedicated application database.
However, if you want revert the separation of application data and business data, you can merge the two databases.
Microsoft Dynamics NAV includes Windows PowerShell cmdlets that can help you merge the databases, and you can use the cmdlets in a script that runs in Windows PowerShell.
When you merge the two databases, you migrate to single-tenancy.
In a multitenant deployment, you can merge a single tenant with the application tables and leave the remaining tenants in the existing deployment.
In that case, you add the application tables to the relevant tenant database and leave the original application database unchanged. If you have separated the application data into a dedicated database but you have not used it in a multitenant deployment, you can also use the cmdlet and a sample script to merge the two databases.
Migrating to Single-Tenancy
Before you can start the merge of the two databases, you must collect the relevant information. If you write a script, you must be able to provide values for the parameters that the Windows PowerShell cmdlets require. The migration includes the following main steps:
- Gather the prerequisite information.
- Merge the two databases.
- Migrate from multitenancy to single-tenancy.
- Migrate from two databases to one database.
- Change the client connection endpoints.
- Post-migration clean-up.
Each step is explained in more details in the following sections.
Step 1: Gather the Prerequisite Information
The sample scripts require the following information:
- Identify the name of the Microsoft Dynamics NAV Server server instance that the tenant database is connected to. This value is used as the input for the serverInstance variable in the sample scripts.
- Identify the name of the application database that the tenant database is connected to. This value is used as the input for the appDatabaseName variable in the sample scripts.
- Identify the name of the tenant database that you want to merge with the application database. This value is used as the input for the tenantDatabaseName variable in the sample scripts.
- If you are migrating from a multitenant deployment, identify the tenant ID of the tenant database. This value is used as the input for the tenantId variable in the sample scripts.
- Make sure that you have the server role called securityadmin in the relevant instance of SQL Server.
- Make sure that you have the db_owner role for both the application database and the tenant database.
- Make sure that you are a member of the Administrators security group on the server that runs the Microsoft Dynamics NAV Server instance and where the Windows PowerShell scripts run.
Step 2: Merge the Two Databases
To merge the application database and the tenant database, you must run the Microsoft Dynamics NAV 2015 Administration Shell as an administrator.
Depending on your scenario, you can copy one of the sample scripts and update the variables based on the prerequisite information that you gathered in the previous section.
This section includes two sample scripts that you can base your own script on.
The first script merges an application database and a tenant database that is currently a tenant in a multitenant deployment.
# PURPOSE: This sample script migrates a tenant in a multitenant deployment to a single-tenant deployment.
### Modify these variables with values appropriate to your environment ###
$serverInstance = “”
$appDatabaseName = “”
$tenantDatabaseName = “”
$tenantId = “”
### You should not need to modify any variables below this line ###
# Save the current multitenancy configuration.
Save-NAVTenantConfiguration -ServerInstance $serverInstance
# Create a new server instance for the requested tenant.
New-NAVServerInstance -ServerInstance $tenantId -ManagementServicesPort 7045
# Dismount the requested tenant from the multitenant server instance.
Dismount-NAVTenant -ServerInstance $serverInstance -Tenant $tenantId
# Save the updated multitenancy configuration.
Save-NAVTenantConfiguration -ServerInstance $serverInstance
# Remove any application tables from the tenant database if these were not already removed.
Remove-NAVApplication -DatabaseName $tenantDatabaseName
# Copy the application tables from the current application database to the tenant database.
Export-NAVApplication -DatabaseName $appDatabaseName -ApplicationDatabaseName $tenantDatabaseName
# Reconfigure the CustomSettings.config file for the new server instance to use the tenant database.
Set-NAVServerConfiguration -ServerInstance $tenantId -KeyName DatabaseName -KeyValue $tenantDatabaseName -WarningAction Ignore
# Reconfigure the CustomSettings.config to use single-tenant mode.
# Set-NAVServerConfiguration -ServerInstance $serverInstance -KeyName Multitenant -KeyValue false -WarningAction Ignore
# Start the new server instance if it is not running.
Set-NAVServerInstance -ServerInstance $tenantId -Start
# Dismount all tenants on the new server instance that are not using the current tenant database.
Get-NAVTenant -ServerInstance $tenantId | where {$_.Database -ne $tenantDatabaseName} | foreach { Dismount-NAVTenant -ServerInstance $tenantId -Tenant $_.Id }
# Save the new single-tenant configuration.
Save-NAVTenantConfiguration -ServerInstance $tenantId
Write-Host “Operation complete.” -foregroundcolor cyan
The second script merges an application database and a tenant database that has not been mounted on a Microsoft Dynamics NAV Server instance as a tenant.
# PURPOSE: This sample script merges an application database and a tenant database that are not part of a multitenant deployment.
### Modify these variables with values appropriate to your environment ###
$serverInstance = “”
$appDatabaseName = “”
$tenantDatabaseName = “”
### You should not need to modify any variables below this line ###
# Save the current server configuration.
Save-NAVTenantConfiguration -ServerInstance $serverInstance
# Stop the server instance if it is running.
Set-NAVServerInstance -ServerInstance $serverInstance -Stop
# Remove any application tables from the tenant database if these have not already been removed.
Remove-NAVApplication -DatabaseName $tenantDatabaseName
# Copy the application tables from the application database to the tenant database.
Export-NAVApplication -DatabaseName $appDatabaseName -ApplicationDatabaseName $tenantDatabaseName
# Reconfigure the CustomSettings.config to use the tenant database.
Set-NAVServerConfiguration -ServerInstance $serverInstance -KeyName DatabaseName -KeyValue $tenantDatabaseName -WarningAction Ignore
# Reconfigure the CustomSettings.config to use single-tenant mode
# Set-NAVServerConfiguration -ServerInstance $serverInstance -KeyName Multitenant -KeyValue false -WarningAction Ignore
# Start the server instance.
Set-NAVServerInstance -ServerInstance $serverInstance -Start
# Dismount all tenants that are not using the current tenant database.
Get-NAVTenant -ServerInstance $serverInstance | where {$_.Database -ne $tenantDatabaseName} | foreach { Dismount-NAVTenant -ServerInstance $serverInstance -Tenant $_.Id }
# Save the current single-tenant configuration.
Save-NAVTenantConfiguration -ServerInstance $serverInstance
Write-Host “Operation complete.” -foregroundcolor cyan
In both scenarios, you can create scripts that are based on these samples, provide value for the variables, run the script, and the review the output to make sure that you achieved the expected result.
Step 3: Change the Client Connection Endpoints
The first sample script creates a new Microsoft Dynamics NAV Server instance with a name that is based on the specified tenant ID.
The script only enables the management services endpoint in the Microsoft Dynamics NAV Server configuration settings.
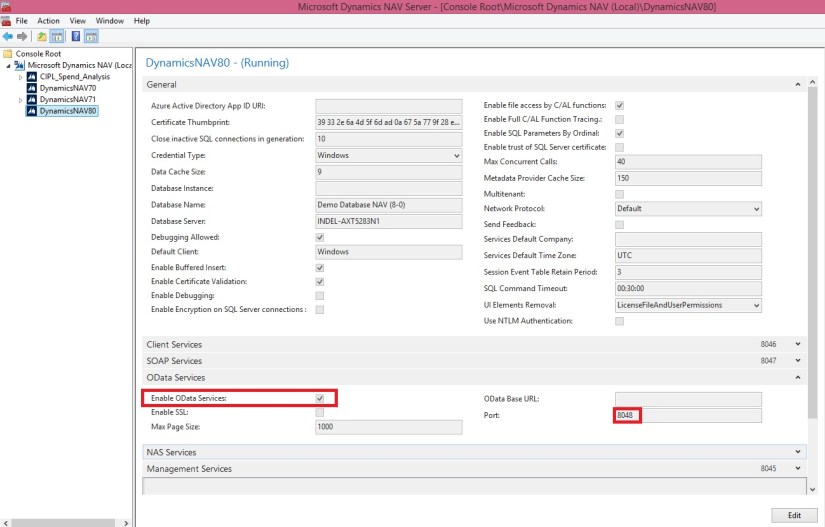
You must also configure the server instance to enable client services, SOAP web services, and OData web services.
You must send the configuration changes to the users who access the reconfigured tenant. Otherwise, they are not able to connect to the database.
The second sample script illustrates a simpler scenario where you move the application tables to the only database that accessed the application database. As a result, all client endpoints continue as they did before, and you do not have to update any clients.
Step 4: Post-Migration Clean-Up
In the first scenario where you move a tenant from multitenancy to single-tenancy, you must update the Microsoft Dynamics NAV Server account and database permissions.
Also, any tenant-specific files that have been saved to the original server location must be moved to the relevant location on the new server.
You will get step by step walkthrough on how to implement Multitenancy in my next upcoming post.