Data Migration, How To, Information, Instalation & Configuration, Maderia, Tip & Tricks

Assisted Setup (Data Migration) – Madeira

Login to Madeira using your credentials.

From Home page Action Tab Ribbon choose Assisted Setup & Tasks.

AssistSetup-1.1

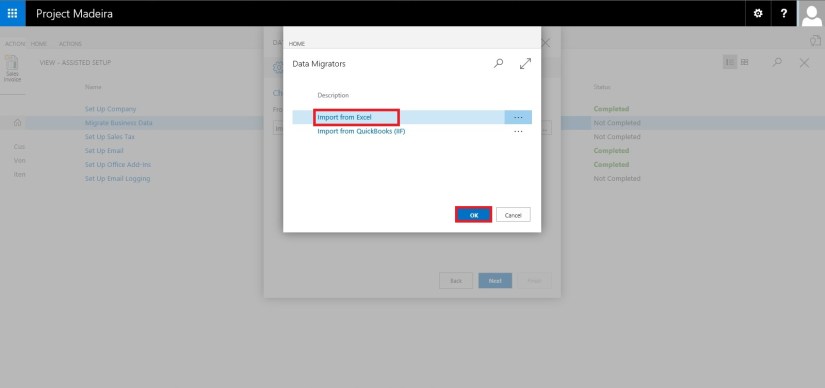
From Assisted Setup Window select Migrate Business Data Task to continue.

AssistSetup-2.1

From Welcome Screen select Next.

AssistSetup-3

Here you can choose source using which you want to Import Data using Assist Edit Button.

AssistSetup-4

Select Import from Excel option and say OK.

AssistSetup-5

Select Download Template file.

AssistSetup-6

Save the File to desired path.

AssistSetup-7

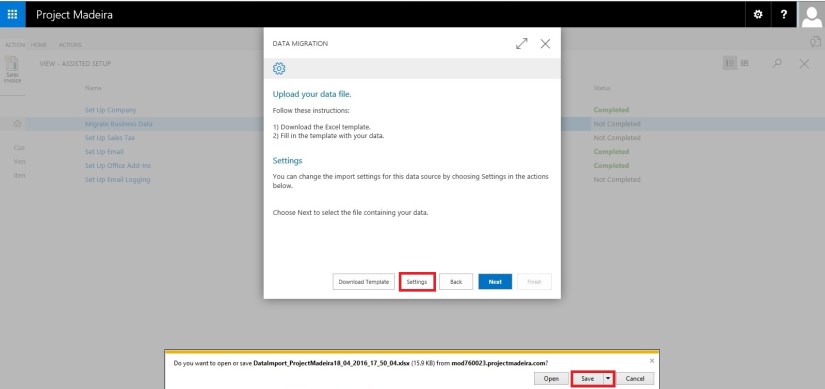
From Settings Select the Templates you wish to Apply to your Data for Customer, Vendor & Item and choose close to proceed.

AssistSetup-8

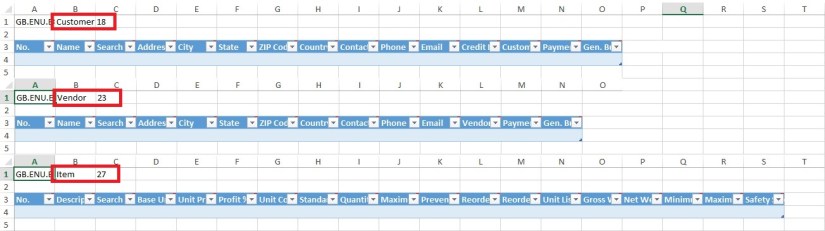
Below is the format of Template downloaded in above step. Fill in the data to Import.

AssistSetup-9

When we don’t select any template in above step for Customer, Vendor & Item will give confirmation message as below. Choose Yes to proceed.

AssistSetup-10

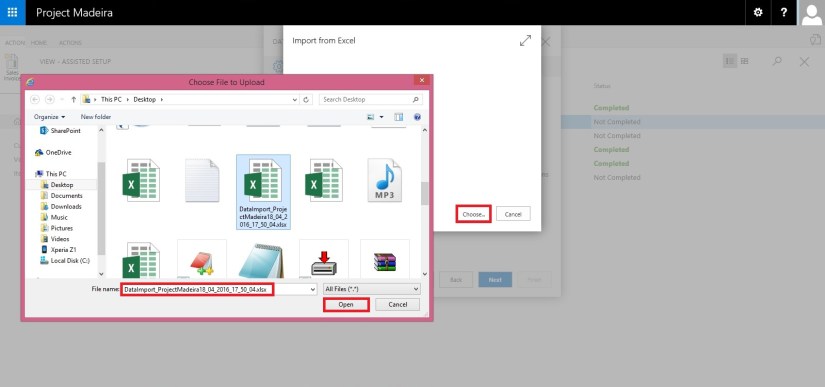
From next screen Select choose button to specify the Excel file which we prepared in above step using downloaded Template.

AssistSetup-11

This will fetch the data from the file and show you no of records in each table which is going to be imported.

AssistSetup-12

Here if you are familiar with the Rapid Start you can select Advance and perform action accordingly or can skip and proceed to Next Step by selecting Next. Here I am selecting Advance to show the screen.

AssistSetup-13

Confirm with Yes to proceed.

AssistSetup-14

Your Package page will open as shown in above screen, choose Apply Package and handle any import issue with the data to complete the step.

AssistSetup-15

Confirm with Yes to continue.

AssistSetup-16

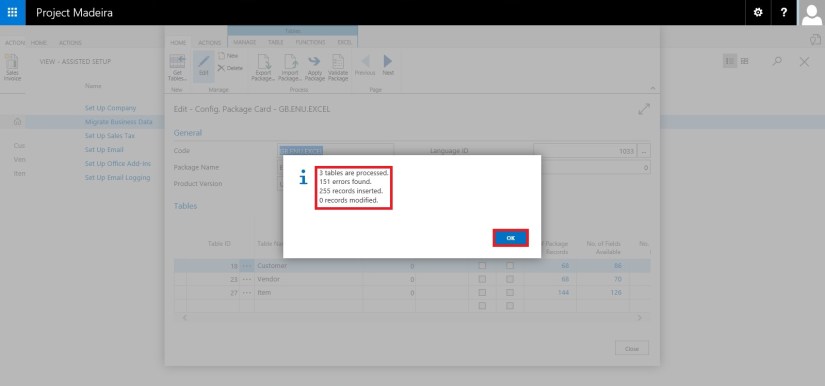
After processing it will show the status of data, review and fix the issues to continue.

AssistSetup-17

You can drilldown and review the issues and take required steps to proceed with issue fixing and importing of data. Here I choose close to return to previous step of simple import without using Package option.

AssistSetup-18

Select Next to continue with next step.

AssistSetup-19

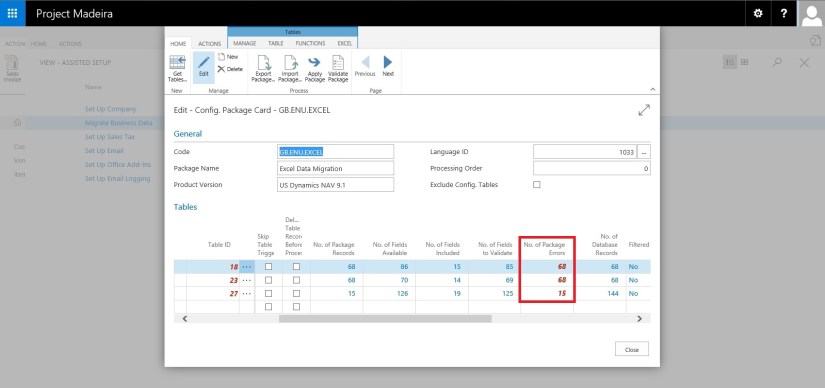
After processing it will show status of data and errors in data. Say OK to continue.

AssistSetup-20

Here we can choose Show Errors to review the Errors.

AssistSetup-21

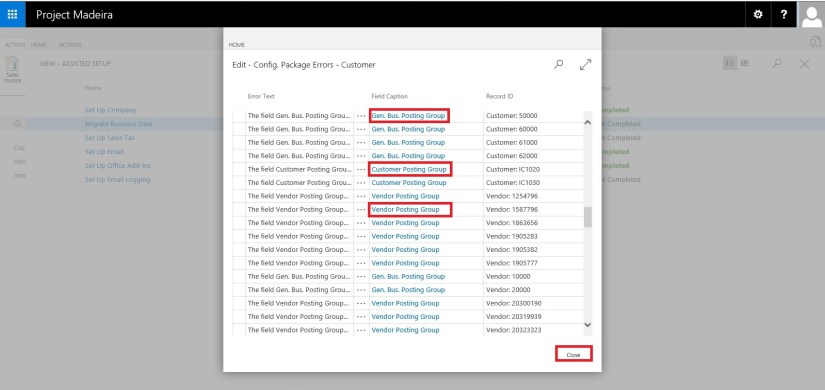
We find that in my data most of the issues is related to Gen. Bus. Posting Group, Customer Posting Group, Vendor Posting Group, etc… We can fix these issues later, so just respond Close to continue with Next step.

AssistSetup-22

Our data is now Imported with errors, we will take care of issues with data as reviewed above. Respond Finish to complete this step & Process.

AssistSetup-23

Now you can see this step is marked as completed in Status.

Our data is imported we will access the data and fix the issues accordingly.

I will come up with more details in my upcoming posts.

Till then keep exploring and Learning.


How To, Information, Instalation & Configuration, Maderia, Tip & Tricks

Assisted Setup – Madeira

When you want to explore Project “Madeira” on your own, you can always go back to the Getting Started tour. See in cubes area marked.

AssistSetup-1

At Home page you will find the Assisted Setup & Tasks action. See in Ribbon marked in above screen.

Here you see a list of assisted setup that can help you getting started.

AssistSetup-2

You can migrate data such as vendors, customers, and items from your existing financial system using the Migrate Business Data assisted setup. Once you are done with this piece you are good to go ahead exploring more.

Depending on your need, check if the other assisted setup can help you in any manner.

In the Assisted Setup window, you will find the followings:


ASSISTED SETUP

Set Up Company: – Creates a new trial company for you to enter data and try out Project “Madeira”. If you went through the Getting Started tour this step is probably already completed.

Migrate Business Data: – Lets you import your existing company data such as vendors, customers, and items from Excel or QuickBooks.

Set up Sales Tax: – Gets you started with default tax groups and assigning tax area codes that you can assign to customers and vendors in order to automatically calculate sales tax in sales or purchase documents.

Set up Email: – Gets you ready for sending email messages directly from sales orders or contacts in Project “Madeira”.

Set up Office Add-Ins: – Sets up the ability to use and launch Project “Madeira” from Outlook.

Set up Email Logging: – Sets up the capability to log email correspondence in Project “Madeira” to follow up on interactions.


Will come up with more details in my upcoming posts.

Till then keep exploring and learning.


Corfu Navision 2016, Functional Tips, How To, Information, Tip & Tricks

How do I:Set Up Invoice Rounding

One of my reader requested for this topic, since I am too late to respond, don’t now if this can help him in any manner. But still may help someone in future. From past 2 months I am too busy in other activities that I am unable to check and respond to mails and also very limited posts.

I would request to keep writing to me when ever I get some spare time will definitely respond in form of posts to your queries.

Here we go…

Please find the Link below for other part of this post for complete answer to the query in sequence posted separately each part of setup: “Please let me know how to setup invoice rounding in Navision 2015, step wise.”

I have taken screen shot from Navision 2016 although every thing remains same and equally applicable to Navision 2015.

If you want to automatic invoice rounding to deal with Local regulations or local custom may require the invoice to be rounded in a specific way required.

When an invoice is rounded, an extra line is inserted with the rounding amount and this line is posted additionally with the other invoice lines.

To use automatic invoice rounding, you must follow below steps: explained separately via different posts

Corfu Navision 2016, Functional Tips, How To, Information, Tip & Tricks

How do I: Set Up Rounding Rules for Foreign Currency

To use the automatic invoice rounding function, you must set up rounding rules.

To set up rounding rules for foreign currency

  1. Open the Currencies
  2. In the Currencies window, fill in the Invoice Rounding Precision and Invoice Rounding Type For more information on specific field, select the field, and then press F1.

InvoiceRounding-3

Corfu Navision 2016, Functional Tips, How To, Information, Tip & Tricks

How do I: Set Up Rounding Rules for the LCY

To use the automatic invoice rounding function, you will be required to set up rounding rules.

To set up rounding rules for local currency

  1. Open General Ledger Setup
  2. In the General Ledger Setup window, on the Respective Fast Tab, fill in the Amount Rounding Precision, Unit-Amount Rounding Precision, Rounding Precision (LCY) and Invoice Rounding Type (LCY) fields.

InvoiceRounding-2

You can take help of technical team to add/display fields not visible on the page. These fields are available in Table. For more details about fields you can use F1 help.

Corfu Navision 2016, Functional Tips, How To, Information, Tip & Tricks

How do I: Set Up General Ledger Accounts for Invoice Rounding Differences

To use the automatic invoice rounding function, you will be required to set up the general ledger account or accounts in which the rounding differences will be posted. Before you can do this, you will be required to set up VAT product posting groups.

To set up general ledger accounts for invoice rounding differences

  1. Set up the account in the Chart of Accounts window and name it Invoice Rounding or as required name. (I am showing the standard Account defined in Demo Database, you can setup your own as per the requirement)
  2. In the Posting Type field, select <Blank>.
  3. Fill in the VAT Bus. Posting Group field or can leave blank.
  4. Fill in the VAT Prod. Posting Group You may want to set up a new group code that can be used for invoice rounding, if don’t have any existing to be used.

InvoiceRounding-1

Now you need to assign the invoice rounding account to posting groups in the Customer Posting Groups window and the Vendor Posting Groups window.

InvoiceRounding-6

InvoiceRounding-7