Functional Tips

Correct a Posted Sales Invoice in Nav 2015

Today we will learn correct a posted sales invoice.

In previous versions of Microsoft Dynamics NAV, this required a number of steps.

This scenario demonstrates how to perform the same action in Microsoft Dynamics NAV 2015.

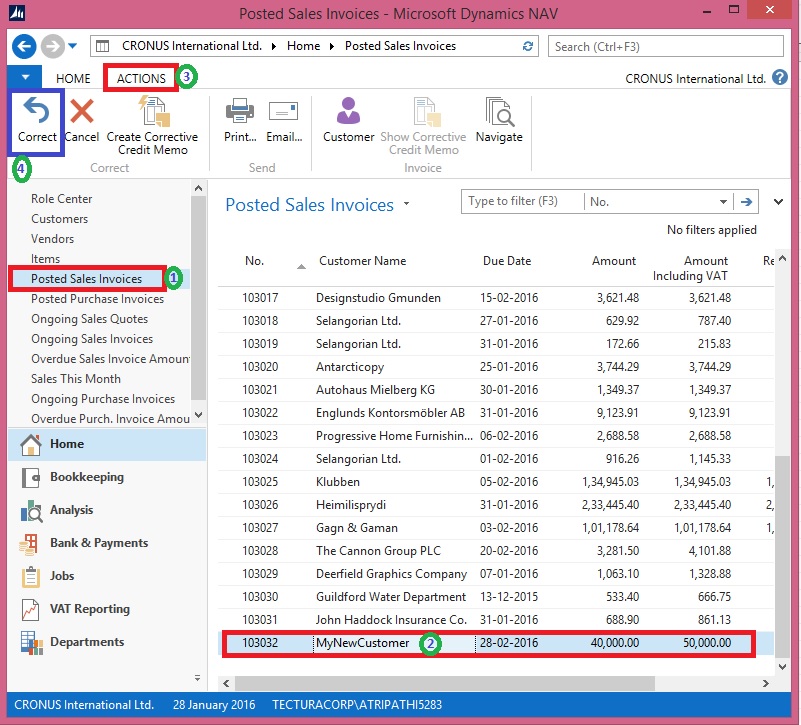
  • On the Role Centre, choose Posted Sales Invoices to open the list of posted sales invoices.
  • In the list of posted sales invoices, select the sales invoice that you posted in previous post, if not done click here to see the process we followed in earlier post.
  • On the Home tab, in the Manage group, choose View.
  • On the Home tab, in the Correct group, choose Correct, and then choose the Yes button

CorrectPSI-1

 or

CorrectPSI-2

The posted sales invoice is now cancelled with a credit memo. A new sales invoice has been created for you.

CorrectPSI-3

  • To open the automatically generated New Invoice that was created, choose Yes.
  • On the new sales invoice Perform the required changes. I am changing the Quantity in my example.

CorrectPSI-4

  • On the Home tab, in the Posting group, choose Post to post the corrected sales invoice.
  • Respond Yes to review the posted New Sales Invoice.

CorrectPSI-5

  • To review the Posted Credit Memo for the above Invoice Correction find as below:

CorrectPSI-6

We are done. It’s easy na.

Functional Tips

Create a Sales Invoice for a new Customer

In this session we will create a sales invoice for a new customer (Customer we don’t have in our Master).

To follow Step by Step you need to do a small setup:

Open the User Personalization and Set your Profile ID as below:

SINewCustomer-1

Select your Profile as “SMALL BUSINESS

Your Role Center will look like below:

SINewCustomer-2

  • On the Role Center, choose Ongoing Sales Invoices to open the list of ongoing sales Invoices.
  • On the Home tab, in the New group, choose New to create a new sales invoice.
  • In the Customer Name field, type the name of the new customer, and then press Enter or Tab to leave the field

Create the sales invoice for the new customer.

Notice that some fields are marked with red asterisks to tell which fields must be filled.

SINewCustomer-3

  • In the pop-up dialog, choose Yes to create the new customer
  • In the Templates window, select Customer DOMESTIC (or as desired), and then choose the OK button.

SINewCustomer-4

  • The Customer Card window opens in edit mode. Choose the OK button to close it.

SINewCustomer-5

  • The page closes and focus is back on the sales invoice that is now updated with the customer data.
  • In the Sales Invoice window, on the Lines FastTab, create a new line:

         Enter some line data for example : Item No.: 1001, Quantity: 10

  • On the Home tab, in the Posting group, choose Post.
  • Choose Yes.

SINewCustomer-6

  • Choose No to review the posted sales invoice, as of now we don’t require.

Helpful where we require instant Customer registration for recording the Orders. Later we will fill out rest of the details regarding Customer.